Gaggle Workspace

Start Boss
Data Files
Select an organism from the portal to see available data:| Name | Type | Description | Operations |
|---|
| Name | Type | Description | Operations |
|---|
My Groups
eCH Hydrogenases
Group
Group
- 3rd Party Geese
- The Gaggle paper in BMC Bioinformatics
- R Project
- Translator
- firegoose-1.0.1070.xpi
- here
- Next-Generation Javaâ„¢ Plug-In Release Notes
- below
- The Gaggle paper in BMC Bioinformatics
- here
- Boss
- R Project
- 3rd Party Geese
- 3rd Party Geese
- The Gaggle paper in BMC Bioinformatics
- Data Standards
- Cytoscape
- DataLoader
- DMV
- Firegoose
- Genome Browser
- MeV
- R Project
- Translator
- Cytoscape
- MeV
- Translator
- DMV
- Geese
- DataLoader
- Firegoose
- DMV
- Annotation
- Boss
- DataLoader
- Cytoscape
- Lab website
- ISB website
- Data Standards
- Geese
- Firegoose
- DMV
- DataLoader
- Cytoscape
- Annotation
- Boss
- Data Standards
- Geese
- Genome Browser
- Firegoose
- MeV
- Genome Browser
- Annotation
- Boss
- The Gaggle paper in BMC Bioinformatics
- 3rd Party Geese
- Data Standards
- Geese
- MeV
- Genome Browser
- Translator
- R Project
- Annotation
Group
test
Test
123Group
Group
- Venn Diagram
- Venn Diagram
- GO Enrichment
- GO Enrichment
- ID Mapper
- Network Viewer
- Keyword Search
- GO Enrichment
- Venn Diagram
- Keyword Search
- Venn Diagram
- Keyword Search
- Keyword Search
- ID Mapper
- GO Enrichment
- Network Viewer
- Keyword Search
- Venn Diagram
- Network Viewer
- GO Enrichment
- Venn Diagram
- Keyword Search
- ID Mapper
- ID Mapper
- Network Viewer
- GO Enrichment
- GO Enrichment
- Venn Diagram
- Keyword Search
- ID Mapper
- Network Viewer
- ID Mapper
- Network Viewer
- GO Enrichment
- Venn Diagram
- Keyword Search
- Network Viewer
- ID Mapper
- Venn Diagram
- GO Enrichment
- Keyword Search
- Network Viewer
- ID Mapper
- Network Viewer
- ID Mapper
- Keyword Search
- Keyword Search
- Venn Diagram
- GO Enrichment
- ID Mapper
- Network Viewer
- Keyword Search
- Venn Diagram
- Keyword Search
- GO Enrichment
- Venn Diagram
- GO Enrichment
- Venn Diagram
- Network Viewer
- GO Enrichment
- ID Mapper
- Keyword Search
- GO Enrichment
- Venn Diagram
- Venn Diagram
- Keyword Search
- ID Mapper
- GO Enrichment
- Network Viewer
- Keyword Search
- Venn Diagram
- Keyword Search
- Venn Diagram
- ID Mapper
- ID Mapper
- Network Viewer
- ID Mapper
- GO Enrichment
- Network Viewer
- GO Enrichment
- Venn Diagram
- Network Viewer
- GO Enrichment
- Venn Diagram
- Keyword Search
- ID Mapper
- Network Viewer
- GO Enrichment
- Network Viewer
- Keyword Search
- Venn Diagram
- ID Mapper
- ID Mapper
- GO Enrichment
- Network Viewer
- ID Mapper
- ID Mapper
- Keyword Search
- Network Viewer
- Network Viewer
Group
- Keyword Search
- Network Viewer
- ID Mapper
- Venn Diagram
- GO Enrichment
- Network Viewer
- ID Mapper
- Keyword Search
- Venn Diagram
- Venn Diagram
- GO Enrichment
- Venn Diagram
- GO Enrichment
- Venn Diagram
- GO Enrichment
- Network Viewer
- ID Mapper
- Network Viewer
- ID Mapper
- Keyword Search
- Keyword Search
- Venn Diagram
- Network Viewer
- ID Mapper
- Network Viewer
- ID Mapper
- Keyword Search
- Keyword Search
- Venn Diagram
- GO Enrichment
- Network Viewer
- ID Mapper
- ID Mapper
- Venn Diagram
- GO Enrichment
- GO Enrichment
- Network Viewer
- Keyword Search
- Venn Diagram
- MeV
- Generic
- Cytoscape
- KBase
- Firegoose
- ID Mapper
- Network Viewer
- ID Mapper
- Network Viewer
- ID Mapper
- Keyword Search
- GO Enrichment
- Network Viewer
- Venn Diagram
- GO Enrichment
- Network Viewer
- GO Enrichment
- ID Mapper
- Network Viewer
- GO Enrichment
- Venn Diagram
- GO Enrichment
- Venn Diagram
- Keyword Search
- Venn Diagram
- Keyword Search
- ID Mapper
- ID Mapper
- Venn Diagram
- Venn Diagram
- GO Enrichment
- GO Enrichment
- ID Mapper
- Network Viewer
- Keyword Search
- GO Enrichment
- Venn Diagram
- Keyword Search
- ID Mapper
- ID Mapper
- Network Viewer
- Network Viewer
- GO Enrichment
- GO Enrichment
- Venn Diagram
- Venn Diagram
- Keyword Search
- Keyword Search
- Venn Diagram
- GO Enrichment
- Keyword Search
- ID Mapper
- GO Enrichment
- Network Viewer
- Keyword Search
- Venn Diagram
- Case 3
- Sample 4
- Case 1
- Case 2
- Network Viewer
- GO Enrichment
- Sample2
- Sample
- Venn Diagram
- Keyword Search
- ID Mapper
- ID Mapper
- Network Viewer
- GO Enrichment
- Keyword Search
- Keyword Search
- ID Mapper
- Network Viewer
- GO Enrichment
- Venn Diagram
- Keyword Search
- ID Mapper
- Network Viewer
- Keyword Search
- Keyword Search
- GO Enrichment
- Venn Diagram
- ID Mapper
- GO Enrichment
- Network Viewer
- Keyword Search
- Venn Diagram
- Keyword Search
- Venn Diagram
- ID Mapper
- ID Mapper
- Network Viewer
- GO Enrichment
- Venn Diagram
- Keyword Search
- GO Enrichment
- Network Viewer
- ID Mapper
- GO Enrichment
- Network Viewer
- Keyword Search
- Venn Diagram
- ID Mapper
- Network Viewer
- GO Enrichment
- ID Mapper
- ID Mapper
- Network Viewer
- GO Enrichment
- Network Viewer
- Keyword Search
- Venn Diagram
- ID Mapper
- ID Mapper
- GO Enrichment
- Network Viewer
- GO Enrichment
- GO Enrichment
- Venn Diagram
- Venn Diagram
- Keyword Search
- Network Viewer
- ID Mapper
- Venn Diagram
- GO Enrichment
- Network Viewer
- GO Enrichment
- Keyword Search
- Keyword Search
- ID Mapper
- GO Enrichment
- Network Viewer
- Keyword Search
- Venn Diagram
- Network Viewer
- ID Mapper
- GO Enrichment
- Network Viewer
- Keyword Search
- Venn Diagram
- ID Mapper
- ID Mapper
- GO Enrichment
- Network Viewer
- ID Mapper
- Network Viewer
- Keyword Search
- Venn Diagram
- Keyword Search
- Network Viewer
- GO Enrichment
- ID Mapper
- ID Mapper
- ID Mapper
- Venn Diagram
- Keyword Search
- Keyword Search
- Network Viewer
- GO Enrichment
- Venn Diagram
- GO Enrichment
- Keyword Search
- ID Mapper
- GO Enrichment
- Network Viewer
- Venn Diagram
- GO Enrichment
- Keyword Search
- Keyword Search
- Venn Diagram
- GO Enrichment
- GO Enrichment
- Venn Diagram
- Network Viewer
- GO Enrichment
- Venn Diagram
- Keyword Search
- ID Mapper
- Network Viewer
- ID Mapper
- Network Viewer
- Keyword Search
- Venn Diagram
- Keyword Search
- Network Viewer
- ID Mapper
- Venn Diagram
- GO Enrichment
- Venn Diagram
- GO Enrichment
- GO Enrichment
- Venn Diagram
- Keyword Search
- Venn Diagram
- Network Viewer
- Network Viewer
- ID Mapper
- ID Mapper
- Keyword Search
- GO Enrichment
- Venn Diagram
- Keyword Search
- ID Mapper
- Network Viewer
- ID Mapper
- Network Viewer
- GO Enrichment
- Venn Diagram
- ID Mapper
- Venn Diagram
- Keyword Search
- Venn Diagram
- Keyword Search
- Network Viewer
- GO Enrichment
- API documents
- quick start guide.
- ID Mapper
- Network Viewer
- Keyword Search
- Venn Diagram
- Keyword Search
- GO Enrichment
- Venn Diagram
- GO Enrichment
- Venn Diagram
- Keyword Search
- Venn Diagram
- GO Enrichment
- Network Viewer
- ID Mapper
- Keyword Search
- Network Viewer
- GO Enrichment
- ID Mapper
- Keyword Search
- GO Enrichment
- Venn Diagram
- ID Mapper
- Network Viewer
- Venn Diagram
- Keyword Search
- Network Viewer
- ID Mapper
- Keyword Search
- Keyword Search
- Venn Diagram
- GO Enrichment
- ID Mapper
- Network Viewer
- Network Viewer
- ID Mapper
- Keyword Search
- Venn Diagram
- GO Enrichment
- Network Viewer
- Keyword Search
- Venn Diagram
- 6.21.13
- ID Mapper
- ID Mapper
- Keyword Search
- Network Viewer
- Network Viewer
- Venn Diagram
- GO Enrichment
- Network Viewer
- ID Mapper
- Keyword Search
- ID Mapper
- Network Viewer
- Keyword Search
- GO Enrichment
- Venn Diagram
1Group
- Brassinosteroid biosynthesis
- Insect hormone biosynthesis
- Zeatin biosynthesis
- Limonene and pinene degradation
- Monoterpenoid biosynthesis
- Sesquiterpenoid and triterpenoid biosynthesis
- Diterpenoid biosynthesis
- Carotenoid biosynthesis
- Geraniol degradation
- Type I polyketide structures
- Nicotinic cholinergic receptor antagonists
- Neurotransmitter transporter inhibitors
- Ion transporter inhibitors
- Nuclear receptors
- Potassium channel blocking and opening drugs
- Sodium channel blocking drugs
- Calcium channel blocking drugs
- GABA-A receptor agonists/antagonists
- Ion channels
- N-Metyl-D-aspartic acid receptor antagonists
- GABAergic synapse
- Glutamatergic synapse
- Dopaminergic synapse
- Cholinergic synapse
- Long-term potentiation
- Serotonergic synapse
- Retrograde endocannabinoid signaling
- Long-term depression
- Neurotrophin signaling pathway
- Synaptic vesicle cycle
- Phenylalanine, tyrosine and tryptophan biosynthesis
- Tryptophan metabolism
- Phenylalanine metabolism
- Tyrosine metabolism
- Histidine metabolism
- Arginine and proline metabolism
- Lysine degradation
- Lysine biosynthesis
- Amino acid related enzymes
- Indole alkaloid biosynthesis
- Isoflavonoid biosynthesis
- Phenylpropanoid biosynthesis
- Polyketide biosynthesis proteins
- Prenyltransferases
- Anthocyanin biosynthesis
- Flavone and flavonol biosynthesis
- Flavonoid biosynthesis
- Stilbenoid, diarylheptanoid and gingerol biosynthesis
- MAPK signaling pathway - fly
- MAPK signaling pathway - yeast
- ErbB signaling pathway
- Wnt signaling pathway
- Two-component system
- Ras signaling pathway
- Rap1 signaling pathway
- MAPK signaling pathway
- Notch signaling pathway
- Hedgehog signaling pathway
- Search&Color Pathway
- Search Pathway
- Proximal tubule bicarbonate reclamation
- Endocrine and other factor-regulated calcium reabsorption
- Apoptosis
- Carbohydrate digestion and absorption
- Bile secretion
- Fat digestion and absorption
- Protein digestion and absorption
- Mineral absorption
- Vitamin digestion and absorption
- Aldosterone-regulated sodium reabsorption
- Vasopressin-regulated water reabsorption
- Meiosis - yeast
- Transfer RNA biogenesis
- Translation factors
- mRNA surveillance pathway
- Cell cycle
- Ribosome
- Ribosome biogenesis
- Spliceosome
- Ribosome
- Aminoacyl-tRNA biosynthesis
- Cell cycle - yeast
- Gap junction
- Signaling pathways regulating pluripotency of stem cells
- KEGG Atlas
- Hematopoietic cell lineage
- Complement and coagulation cascades
- Signaling pathways regulating pluripotency of stem cells
- NOD-like receptor signaling pathway
- RIG-I-like receptor signaling pathway
- Platelet activation
- Toll-like receptor signaling pathway
- Cytosolic DNA-sensing pathway
- Natural killer cell mediated cytotoxicity
- Hepatitis B
- Influenza A
- Measles
- HTLV-I infection
- Amoebiasis
- Epstein-Barr virus infection
- Herpes simplex infection
- Hepatitis C
- Toxoplasmosis
- Malaria
- Neurotrophin signaling pathway
- Dorso-ventral axis formation
- Axon guidance
- Osteoclast differentiation
- Long-term potentiation
- Long-term depression
- Retrograde endocannabinoid signaling
- Synaptic vesicle cycle
- Phototransduction
- Phototransduction - fly
- Microbial metabolism in diverse environments
- Biosynthesis of secondary metabolites
- Metabolic pathways
- Inositol phosphate metabolism
- C5-Branched dibasic acid metabolism
- Butanoate metabolism
- Propanoate metabolism
- Glyoxylate and dicarboxylate metabolism
- Pyruvate metabolism
- Amino sugar and nucleotide sugar metabolism
- Osteoclast differentiation
- Energy
- Cholinergic and anticholinergic drugs
- alpha-Adrenergic receptor agonists/antagonists
- beta-Adrenergic receptor agonists/antagonists
- Dopamine receptor agonists/antagonists
- Histamine H1 receptor antagonists
- Histamine H2/H3 receptor agonists/antagonists
- Serotonin receptor agonists/antagonists
- Eicosanoid receptor agonists/antagonists
- Opioid receptor agonists/antagonists
- Angiotensin receptor and endothelin receptor antagonists
- Rifamycins
- Quinolones
- Nonribosomal peptide structures
- Antifungal agents
- Aminoglycosides
- Cephalosporins - oral agents
- Terpenoid/PK
- Other secondary metabolite
- Xenobiotics
- Chemical structure
- Amino acid
- Other amino
- Glycan
- Cofactor/vitamin
- Tetracyclines
- 2. Genetic Information Processing
- KEGG Atlas
- 3. Environmental Information Processing
- Nicotinic cholinergic receptor antagonists
- G protein-coupled receptors
- Histamine H1 receptor antagonists
- Dopamine receptor agonists/antagonists
- Serotonin receptor agonists/antagonists
- Histamine H2/H3 receptor agonists/antagonists
- Opioid receptor agonists/antagonists
- Eicosanoid receptor agonists/antagonists
- Target-based classification
- Angiotensin receptor and endothelin receptor antagonists
- Arrhythmogenic right ventricular cardiomyopathy (ARVC)
- Hypertrophic cardiomyopathy (HCM)
- Alcoholism
- Nicotine addiction
- Morphine addiction
- Amphetamine addiction
- Cocaine addiction
- Prion diseases
- Viral myocarditis
- Dilated cardiomyopathy (DCM)
- Indole diterpene alkaloid biosynthesis
- Isoquinoline alkaloid biosynthesis
- Carbohydrate digestion and absorption
- Protein digestion and absorption
- Salivary secretion
- Flavonoid biosynthesis
- Pancreatic secretion
- Bile secretion
- Isoflavonoid biosynthesis
- Indole alkaloid biosynthesis
- Adrenergic signaling in cardiomyocytes
- Anthocyanin biosynthesis
- Glycosphingolipid biosynthesis - lacto and neolacto series
- Glycosylphosphatidylinositol(GPI)-anchor biosynthesis
- Glycosaminoglycan biosynthesis - HS/Hep
- Glycosaminoglycan biosynthesis - CS/DS
- Glycosaminoglycan degradation
- Glycosaminoglycan biosynthesis - KS
- Various types of N-glycan biosynthesis
- N-Glycan biosynthesis
- Other types of O-glycan biosynthesis
- Mucin type O-Glycan biosynthesis
- Immunosuppressive agents
- Osteoporosis drugs
- Agents for Alzheimer-type dementia
- Antiparkinsonian agents
- Sulfonamide derivatives - overview
- Sulfonamide derivatives - sulfa drugs
- Sulfonamide derivatives - diuretics
- Sulfonamide derivatives - hypoglycemic agents
- Antiarrhythmic drugs
- Antiulcer drugs
- Monoterpenoid biosynthesis
- Terpenoid backbone biosynthesis
- Diterpenoid biosynthesis
- Sesquiterpenoid and triterpenoid biosynthesis
- Brassinosteroid biosynthesis
- Carotenoid biosynthesis
- Zeatin biosynthesis
- Insect hormone biosynthesis
- Geraniol degradation
- Limonene and pinene degradation
- Polyketide biosynthesis proteins
- Two-component system
- Neuroactive ligand-receptor interaction
- mTOR signaling pathway
- Plant hormone signal transduction
- PI3K-Akt signaling pathway
- AMPK signaling pathway
- cAMP signaling pathway
- cGMP-PKG signaling pathway
- Phosphatidylinositol signaling system
- Sphingolipid signaling pathway
- Prostaglandins
- Benzoic acid family
- Neurotransmitter transporter inhibitors
- Catecholamine transferase inhibitors
- Cyclooxygenase inhibitors
- HMG-CoA reductase inhibitors
- Renin-angiotensin system inhibitors
- HIV protease inhibitors
- Quinolines
- Eicosanoids
- Cocaine addiction
- Prion diseases
- Huntington's disease
- Amyotrophic lateral sclerosis (ALS)
- Parkinson's disease
- Alzheimer's disease
- Primary immunodeficiency
- Graft-versus-host disease
- Allograft rejection
- Inflammatory bowel disease (IBD)
- Base excision repair
- Nucleotide excision repair
- Proteasome
- DNA replication
- Non-homologous end-joining
- Fanconi anemia pathway
- Mismatch repair
- Homologous recombination
- DNA replication proteins
- Chromosome
- Ribosome
- Spliceosome
- Biosynthesis of alkaloids derived from histidine and purine
- Biosynthesis of alkaloids derived from ornithine, lysine and nicotinic acid
- Biosynthesis of alkaloids derived from shikimate pathway
- Biosynthesis of terpenoids and steroids
- Basal transcription factors
- RNA polymerase
- Biosynthesis of plant hormones
- Biosynthesis of alkaloids derived from terpenoid and polyketide
- Metabolic pathways
- Pyruvate metabolism
- Amino sugar and nucleotide sugar metabolism
- Starch and sucrose metabolism
- Ascorbate and aldarate metabolism
- C5-Branched dibasic acid metabolism
- Butanoate metabolism
- Propanoate metabolism
- Lysosome
- Enzymes
- Inositol phosphate metabolism
- LPS biosynthesis proteins
- Endocytosis
- Lipid biosynthesis proteins
- Lipids
- KEGG GLYCAN
- Amino acid related enzymes
- Glycosphingolipid biosynthesis - ganglio series
- Lipopolysaccharide biosynthesis
- Peptidoglycan biosynthesis
- Other glycan degradation
- Viral carcinogenesis
- KEGG DISEASE
- Central carbon metabolism in cancer
- Choline metabolism in cancer
- Osteoclast differentiation
- Pathways in cancer
- Proteoglycans in cancer
- Chemical carcinogenesis
- Transcriptional misregulation in cancer
- MicroRNAs in cancer
- Signaling pathways regulating pluripotency of stem cells
- Gap junction
- Tight junction
- Adherens junction
- Platelet activation
- Complement and coagulation cascades
- Hematopoietic cell lineage
- NOD-like receptor signaling pathway
- Toll-like receptor signaling pathway
- 7. Drug Development
- GnRH signaling pathway
- Ovarian steroidogenesis
- Estrogen signaling pathway
- Progesterone-mediated oocyte maturation
- Insulin signaling pathway
- Glucagon signaling pathway
- Adipocytokine signaling pathway
- PPAR signaling pathway
- Prolactin signaling pathway
- Oxytocin signaling pathway
- Sulfonamide derivatives - diuretics
- Sulfonamide derivatives - hypoglycemic agents
- Composite structure map
- Monosaccharide codes
- Compounds with biological roles
- Photosynthesis proteins
- KEGG Atlas
- Enzymes
- Amino acid related enzymes
- KEGG GLYCAN
- Lipids
- Lipid biosynthesis proteins
- Acridone alkaloid biosynthesis
- Tropane, piperidine and pyridine alkaloid biosynthesis
- Isoquinoline alkaloid biosynthesis
- Indole diterpene alkaloid biosynthesis
- Indole alkaloid biosynthesis
- Isoflavonoid biosynthesis
- Anthocyanin biosynthesis
- Flavone and flavonol biosynthesis
- Betalain biosynthesis
- Caffeine metabolism
- Antidiabetics
- Antirheumatics - DMARDs and biological agents
- Antithrombosis agents
- Antimigraines
- Osteoporosis drugs
- Immunosuppressive agents
- Antiulcer drugs
- Antiarrhythmic drugs
- Sulfonamide derivatives - hypoglycemic agents
- Sulfonamide derivatives - diuretics
- Cephalosporins - oral agents
- Cephalosporins - parenteral agents
- Systemic lupus erythematosus
- Asthma
- Chagas disease (American trypanosomiasis)
- Leishmaniasis
- Toxoplasmosis
- Malaria
- Penicillins
- Vancomycin resistance
- beta-Lactam resistance
- CAM ligands
- African trypanosomiasis
- Hypnotics
- Antiglaucoma agents
- Anticonvulsants
- Anxiolytics
- Antirheumatics - DMARDs and biological agents
- Antithrombosis agents
- Antidyslipidemic agents
- Antidiabetics
- Opioid analgesics
- Local analgesics
- Antineoplastics - agents from natural products
- Antineoplastics - hormones
- Antineoplastics - alkylating agents
- Antineoplastics - antimetabolic agents
- Antiviral agents
- Anti-HIV agents
- Rifamycins
- Antifungal agents
- Macrolides and ketolides
- Quinolones
- Various types of N-glycan biosynthesis
- Thiamine metabolism
- Glycan binding proteins
- HS/Hep binding proteins
- Proteoglycans
- LPS biosynthesis proteins
- Glycosyltransferases
- Monosaccharide codes
- Vitamin B6 metabolism
- Riboflavin metabolism
- Biosynthesis of phenylpropanoids
- Folate biosynthesis
- Lipoic acid metabolism
- Acridone alkaloid biosynthesis
- Selenocompound metabolism
- Cyanoamino acid metabolism
- Lipid biosynthesis proteins
- Pantothenate and CoA biosynthesis
- beta-Alanine metabolism
- Taurine and hypotaurine metabolism
- Phosphonate and phosphinate metabolism
- Phenylalanine metabolism
- Tryptophan metabolism
- Phenylalanine, tyrosine and tryptophan biosynthesis
- Amino acid related enzymes
- Caffeine metabolism
- Indole alkaloid biosynthesis
- Isoflavonoid biosynthesis
- Indole diterpene alkaloid biosynthesis
- Regulation of autophagy
- Bacterial chemotaxis
- CAMs
- Cellular antigens
- Endocytosis
- Phagosome
- Lysosome
- Peroxisome
- D-Arginine and D-ornithine metabolism
- D-Alanine metabolism
- Glutathione metabolism
- Thiamine metabolism
- Riboflavin metabolism
- Vitamin B6 metabolism
- Progesterone, androgen and estrogen receptor agonists/antagonists
- Retinoic acid receptor (RAR) and retinoid X receptor (RXR) agonists/antagonists
- G protein-coupled receptors
- Glucocorticoid and mineralocorticoid receptor agonists/antagonists
- Angiotensin receptor and endothelin receptor antagonists
- Target-based classification
- Eicosanoid receptor agonists/antagonists
- Opioid receptor agonists/antagonists
- Histamine H2/H3 receptor agonists/antagonists
- Serotonin receptor agonists/antagonists
- Thyroid cancer
- Glioma
- Chronic myeloid leukemia
- Acute myeloid leukemia
- Viral carcinogenesis
- Chemical carcinogenesis
- Pancreatic cancer
- Colorectal cancer
- Melanoma
- Basal cell carcinoma
- beta-Lactam resistance
- Glycerolipid metabolism
- Steroid hormone biosynthesis
- Fatty acid elongation
- Fatty acid biosynthesis
- Synthesis and degradation of ketone bodies
- Fatty acid degradation
- Steroid biosynthesis
- Cutin, suberine and wax biosynthesis
- Secondary bile acid biosynthesis
- Primary bile acid biosynthesis
- Bacterial toxins
- HTLV-I infection
- Shigellosis
- Pertussis
- Legionellosis
- Staphylococcus aureus infection
- Tuberculosis
- Bacterial invasion of epithelial cells
- KEGG Pathogen
- Infectious diseases
- Ribosome biogenesis in eukaryotes
- Thyroid cancer
- Acute myeloid leukemia
- Chronic myeloid leukemia
- Basal cell carcinoma
- Melanoma
- Renal cell carcinoma
- Bladder cancer
- Prostate cancer
- Endometrial cancer
- Small cell lung cancer
- HIV protease inhibitors
- RNA transport
- Ion transporter inhibitors
- Ion channels
- Catecholamine transferase inhibitors
- Neurotransmitter transporter inhibitors
- Oocyte meiosis
- Progesterone-mediated oocyte maturation
- Estrogen signaling pathway
- Insulin secretion
- Chemokine signaling pathway
- Glucagon signaling pathway
- Insulin signaling pathway
- PPAR signaling pathway
- Adipocytokine signaling pathway
- Ovarian steroidogenesis
- GnRH signaling pathway
- Antiinfectives
- Antineoplastics - alkylating agents
- KEGG DRUG
- ATC classification (WHO)
- USP drug classification (USA)
- Therapeutic category of drugs (Japan)
- Rifamycins
- Antifungal agents
- Antiviral agents
- Anti-HIV agents
- Cephalosporins - parenteral agents
- Penicillins
- Vancomycin resistance
- beta-Lactam resistance
- African trypanosomiasis
- Chagas disease (American trypanosomiasis)
- Leishmaniasis
- Toxoplasmosis
- Malaria
- SNAREs
- Chaperones and folding catalysts
- SNARE interactions in vesicular transport
- Protein processing in endoplasmic reticulum
- Protein export
- Spliceosome
- RNA degradation
- Proteasome
- Sulfur relay system
- Ubiquitin mediated proteolysis
- Antiparkinsonian agents
- Agents for Alzheimer-type dementia
- alpha-Adrenergic receptor agonists/antagonists
- Cholinergic and anticholinergic drugs
- Antipsychotics - phenothiazines
- Antipsychotics
- Antidepressants
- Antipsychotics - butyrophenones
- Dopamine receptor agonists/antagonists
- beta-Adrenergic receptor agonists/antagonists
- Pathogenic Escherichia coli infection
- Epithelial cell signaling in Helicobacter pylori infection
- Shigellosis
- Salmonella infection
- Legionellosis
- Pertussis
- Tuberculosis
- Staphylococcus aureus infection
- KEGG Pathogen
- Bacterial invasion of epithelial cells
- Eicosanoids
- Prostaglandins
- Benzoic acid family
- 1,2-Diphenyl substitution family
- HMG-CoA reductase inhibitors
- Renin-angiotensin system inhibitors
- HIV protease inhibitors
- Quinolines
- Naphthalene family
- Benzodiazepine family
- Glycosaminoglycan biosynthesis - KS
- Glycosaminoglycan biosynthesis - HS/Hep
- Mucin type O-Glycan biosynthesis
- Various types of N-glycan biosynthesis
- Glycosaminoglycan biosynthesis - CS/DS
- Other types of O-glycan biosynthesis
- Glutathione metabolism
- D-Alanine metabolism
- N-Glycan biosynthesis
- Purine metabolism
- Lipids
- Lipid biosynthesis proteins
- alpha-Linolenic acid metabolism
- Biosynthesis of unsaturated fatty acids
- Arachidonic acid metabolism
- Linoleic acid metabolism
- Pyrimidine metabolism
- Adherens junction
- Tight junction
- p53 signaling pathway
- Focal adhesion
- Hematopoietic cell lineage
- Gap junction
- Signaling pathways regulating pluripotency of stem cells
- Complement and coagulation cascades
- Platelet activation
- Peptidoglycan biosynthesis
- Glycosphingolipid biosynthesis - ganglio series
- Lipopolysaccharide biosynthesis
- Antiulcer drugs
- Immunosuppressive agents
- Antiparkinsonian agents
- Sulfonamide derivatives - overview
- Sulfonamide derivatives - sulfa drugs
- Sulfonamide derivatives - diuretics
- Fatty acid metabolism
- Osteoporosis drugs
- Antimigraines
- Peptidoglycan biosynthesis
- Biosynthesis of amino acids
- Glycosaminoglycan degradation
- Glycosylphosphatidylinositol(GPI)-anchor biosynthesis
- Carbon metabolism
- 2-Oxocarboxylic acid metabolism
- Color Pathway
- Aminobenzoate degradation
- Fluorobenzoate degradation
- Lysine biosynthesis
- Chlorocyclohexane and chlorobenzene degradation
- Aflatoxin biosynthesis
- Benzoate degradation
- Metabolic pathways
- Toluene degradation
- Xylene degradation
- Bacterial chemotaxis
- Regulation of autophagy
- Galactose metabolism
- Histidine metabolism
- Arginine and proline metabolism
- Cellular antigens
- CAM ligands
- CAMs
- Valine, leucine and isoleucine degradation
- Peroxisome
- Glycine, serine and threonine metabolism
- Phagosome
- Pyrimidine metabolism
- Dilated cardiomyopathy (DCM)
- Viral myocarditis
- HS/Hep binding proteins
- Insulin secretion
- Insulin signaling pathway
- Antigen processing and presentation
- T cell receptor signaling pathway
- B cell receptor signaling pathway
- Fc epsilon RI signaling pathway
- Fc gamma R-mediated phagocytosis
- Leukocyte transendothelial migration
- Intestinal immune network for IgA production
- Chemokine signaling pathway
- Colorectal cancer
- Pancreatic cancer
- Glioma
- Thyroid cancer
- Acute myeloid leukemia
- Chronic myeloid leukemia
- Basal cell carcinoma
- Melanoma
- Renal cell carcinoma
- Bladder cancer
- Mineral absorption
- Compounds with biological roles
- Fat digestion and absorption
- Chemical structure
- Small cell lung cancer
- Renal cell carcinoma
- ECM-receptor interaction
- Cytokine-cytokine receptor interaction
- Neuroactive ligand-receptor interaction
- Two-component system
- Plant hormone signal transduction
- mTOR signaling pathway
- AMPK signaling pathway
- PI3K-Akt signaling pathway
- cGMP-PKG signaling pathway
- cAMP signaling pathway
- Herpes simplex infection
- Epstein-Barr virus infection
- Hepatitis B
- Hepatitis C
- Toxoplasmosis
- Leishmaniasis
- Amoebiasis
- Malaria
- Bacterial chemotaxis
- Flagellar assembly
- Chagas disease (American trypanosomiasis)
- African trypanosomiasis
- Cofactor/vitamin
- Terpenoid/PK
- Influenza A
- Thiamine metabolism
- Glycan binding proteins
- Lipid
- Proteoglycans
- Pantothenate and CoA biosynthesis
- Nicotinate and nicotinamide metabolism
- Vitamin B6 metabolism
- Riboflavin metabolism
- Lipoic acid metabolism
- Biotin metabolism
- Biosynthesis of alkaloids derived from shikimate pathway
- Biosynthesis of terpenoids and steroids
- Biosynthesis of alkaloids derived from histidine and purine
- Biosynthesis of alkaloids derived from ornithine, lysine and nicotinic acid
- Biosynthesis of plant hormones
- Biosynthesis of alkaloids derived from terpenoid and polyketide
- Aminoacyl-tRNA biosynthesis
- Ribosome
- mRNA surveillance pathway
- RNA transport
- Measles
- HTLV-I infection
- Legionellosis
- Pertussis
- Tuberculosis
- Staphylococcus aureus infection
- KEGG Pathogen
- Bacterial invasion of epithelial cells
- Bacterial toxins
- Infectious diseases
- Osteoporosis drugs
- Immunosuppressive agents
- Antiulcer drugs
- Antiarrhythmic drugs
- Sulfonamide derivatives - hypoglycemic agents
- Sulfonamide derivatives - diuretics
- Sulfonamide derivatives - sulfa drugs
- Sulfonamide derivatives - overview
- Antithrombosis agents
- Antimigraines
- mRNA surveillance pathway
- Ribosome biogenesis in eukaryotes
- Axon guidance
- Spliceosome
- Ribosome
- Aminoacyl-tRNA biosynthesis
- RNA transport
- Basal transcription factors
- Spliceosome
- Transcription factors
- Transcription machinery
- Eicosanoids
- Prostaglandins
- Benzoic acid family
- 1,2-Diphenyl substitution family
- HMG-CoA reductase inhibitors
- Renin-angiotensin system inhibitors
- HIV protease inhibitors
- Quinolines
- Naphthalene family
- Benzodiazepine family
- Melanoma
- Biosynthesis of vancomycin group antibiotics
- Phenylpropanoid biosynthesis
- Retinoic acid receptor (RAR) and retinoid X receptor (RXR) agonists/antagonists
- Peroxisome proliferator-activated receptor (PPAR) agonists
- Serotonin receptor agonists/antagonists
- Biosynthesis of ansamycins
- Histamine H1 receptor antagonists
- Biosynthesis of type II polyketide products
- Glucocorticoid and mineralocorticoid receptor agonists/antagonists
- Progesterone, androgen and estrogen receptor agonists/antagonists
- Opioid receptor agonists/antagonists
- Angiotensin receptor and endothelin receptor antagonists
- Tropane, piperidine and pyridine alkaloid biosynthesis
- Isoquinoline alkaloid biosynthesis
- Indole diterpene alkaloid biosynthesis
- Indole alkaloid biosynthesis
- Isoflavonoid biosynthesis
- Anthocyanin biosynthesis
- Flavone and flavonol biosynthesis
- Flavonoid biosynthesis
- Stilbenoid, diarylheptanoid and gingerol biosynthesis
- Phenylpropanoid biosynthesis
- Acute myeloid leukemia
- Riboflavin metabolism
- Vitamin B6 metabolism
- B cell receptor signaling pathway
- T cell receptor signaling pathway
- Biotin metabolism
- Lipoic acid metabolism
- Folate biosynthesis
- One carbon pool by folate
- Retinol metabolism
- Porphyrin and chlorophyll metabolism
- Platelet activation
- Complement and coagulation cascades
- Antigen processing and presentation
- Natural killer cell mediated cytotoxicity
- Cytosolic DNA-sensing pathway
- RIG-I-like receptor signaling pathway
- GnRH signaling pathway
- Ovarian steroidogenesis
- Insulin signaling pathway
- Glucagon signaling pathway
- Other amino
- Adipocytokine signaling pathway
- PPAR signaling pathway
- Leukocyte transendothelial migration
- Intestinal immune network for IgA production
- Chemokine signaling pathway
- Insulin secretion
- Antineoplastics - protein kinases inhibitors
- Antineoplastics
- Type I polyketide structures
- Biosynthesis of 12-, 14- and 16-membered macrolides
- Therapeutic category of drugs (Japan)
- Antiinfectives
- Limonene and pinene degradation
- Geraniol degradation
- Sesquiterpenoid and triterpenoid biosynthesis
- Diterpenoid biosynthesis
- Antineoplastics - alkylating agents
- Antineoplastics - antimetabolic agents
- Overview of biosynthetic pathways
- Pesticides
- Cytochrome P450
- Drug metabolism - other enzymes
- Endocrine disrupting compounds
- Metabolism of xenobiotics by cytochrome P450
- Drug metabolism - cytochrome P450
- Furfural degradation
- Steroid degradation
- Glucocorticoid and mineralocorticoid receptor agonists/antagonists
- Angiotensin receptor and endothelin receptor antagonists
- Histamine H1 receptor antagonists
- Dopamine receptor agonists/antagonists
- beta-Adrenergic receptor agonists/antagonists
- alpha-Adrenergic receptor agonists/antagonists
- Opioid receptor agonists/antagonists
- Eicosanoid receptor agonists/antagonists
- Serotonin receptor agonists/antagonists
- Histamine H2/H3 receptor agonists/antagonists
- Cell cycle - yeast
- Various types of N-glycan biosynthesis
- N-Glycan biosynthesis
- Other types of O-glycan biosynthesis
- Mucin type O-Glycan biosynthesis
- D-Arginine and D-ornithine metabolism
- D-Glutamine and D-glutamate metabolism
- Glutathione metabolism
- D-Alanine metabolism
- Two-component system
- Plant hormone signal transduction
- Glycosaminoglycan biosynthesis - HS/Hep
- Glycosaminoglycan biosynthesis - CS/DS
- Calcium signaling pathway
- Phosphatidylinositol signaling system
- Nicotinate and nicotinamide metabolism
- Adherens junction
- Vitamin B6 metabolism
- p53 signaling pathway
- Focal adhesion
- Oocyte meiosis
- Apoptosis
- Cell cycle - Caulobacter
- Riboflavin metabolism
- Cell cycle
- Cell cycle - yeast
- Thiamine metabolism
- Folate biosynthesis
- Lipoic acid metabolism
- Biotin metabolism
- Pantothenate and CoA biosynthesis
- Primary immunodeficiency
- Ribosome
- Allograft rejection
- Graft-versus-host disease
- Autoimmune thyroid disease
- Inflammatory bowel disease (IBD)
- Systemic lupus erythematosus
- Aminoacyl-tRNA biosynthesis
- Pyrimidine metabolism
- Amphetamine addiction
- Morphine addiction
- Fatty acid biosynthesis
- Fatty acid elongation
- Fatty acid degradation
- Synthesis and degradation of ketone bodies
- Cutin, suberine and wax biosynthesis
- Pathogenic Escherichia coli infection
- Phenylalanine metabolism
- Tryptophan metabolism
- Cysteine and methionine metabolism
- Valine, leucine and isoleucine degradation
- Valine, leucine and isoleucine biosynthesis
- Lysine biosynthesis
- Lysine degradation
- Arginine and proline metabolism
- Histidine metabolism
- Tyrosine metabolism
- Peroxisome
- Lysosome
- Bacterial chemotaxis
- Regulation of autophagy
- Cellular antigens
- Phagosome
- Endocytosis
- Amino acid
- Regulation of actin cytoskeleton
- Flagellar assembly
- Toll-like receptor signaling pathway
- NOD-like receptor signaling pathway
- Complement and coagulation cascades
- Platelet activation
- Signaling pathways regulating pluripotency of stem cells
- Hematopoietic cell lineage
- Tight junction
- Gap junction
- RIG-I-like receptor signaling pathway
- Cytosolic DNA-sensing pathway
- Oxytocin signaling pathway
- KEGG DISEASE
- Viral carcinogenesis
- Chemical carcinogenesis
- Proteoglycans in cancer
- MicroRNAs in cancer
- Transcriptional misregulation in cancer
- Choline metabolism in cancer
- Central carbon metabolism in cancer
- Human diseases
- KEGG Cancer
- Toluene degradation
- Chlorocyclohexane and chlorobenzene degradation
- Nitrotoluene degradation
- Xylene degradation
- Styrene degradation
- Ethylbenzene degradation
- Caprolactam degradation
- Atrazine degradation
- Bisphenol degradation
- DDT degradation
- PPAR signaling pathway
- Biosynthesis of type II polyketide products
- Biosynthesis of type II polyketide backbone
- Insect hormone biosynthesis
- Brassinosteroid biosynthesis
- Limonene and pinene degradation
- Zeatin biosynthesis
- Type I polyketide structures
- Geraniol degradation
- Biosynthesis of ansamycins
- Biosynthesis of 12-, 14- and 16-membered macrolides
- Secretion system
- Solute carrier family
- Transporters
- Bacterial secretion system
- Phosphotransferase system (PTS)
- ABC transporters
- Proteasome
- Ubiquitin system
- Base excision repair
- DNA replication
- KEGG reaction modules
- Help
- G protein-coupled receptors
- Nuclear receptors
- Ion channels
- KEGG modules
- Therapeutic category of drugs (Japan)
- Antiinfectives
- Antineoplastics
- Target-based classification
- Hypnotics
- Antineoplastics
- Antineoplastics - agents from natural products
- Antineoplastics - antimetabolic agents
- Antineoplastics - protein kinases inhibitors
- Antineoplastics - hormones
- Therapeutic category of drugs (Japan)
- USP drug classification (USA)
- Antineoplastics - alkylating agents
- Antiinfectives
- Fatty acid biosynthesis
- Sulfur metabolism
- Photosynthesis proteins
- Methane metabolism
- Nitrogen metabolism
- Carbon fixation in photosynthetic organisms
- Carbon fixation pathways in prokaryotes
- Fatty acid elongation
- Fatty acid degradation
- Ubiquinone and other terpenoid-quinone biosynthesis
- Terpenoid backbone biosynthesis
- Retinol metabolism
- Porphyrin and chlorophyll metabolism
- Folate biosynthesis
- One carbon pool by folate
- Biotin metabolism
- Lipoic acid metabolism
- Nicotinate and nicotinamide metabolism
- Pantothenate and CoA biosynthesis
- Pentose and glucuronate interconversions
- Macrolides and ketolides
- Tetracyclines
- Proteoglycans
- HS/Hep binding proteins
- p53 signaling pathway
- Apoptosis
- Flagellar assembly
- Bacterial chemotaxis
- Bacterial motility proteins
- Regulation of actin cytoskeleton
- Focal adhesion
- Cytoskeleton proteins
- Tight junction
- Adherens junction
- Glycosaminoglycan biosynthesis - HS/Hep
- Glycosaminoglycan biosynthesis - KS
- Glycosphingolipid biosynthesis - ganglio series
- Lipopolysaccharide biosynthesis
- Glycosphingolipid biosynthesis - lacto and neolacto series
- Glycosphingolipid biosynthesis - globo series
- Clavulanic acid biosynthesis
- Streptomycin biosynthesis
- Glycosyltransferases
- Carbapenem biosynthesis
- Novobiocin biosynthesis
- Aflatoxin biosynthesis
- Butirosin and neomycin biosynthesis
- Puromycin biosynthesis
- Vitamin B6 metabolism
- Nicotinate and nicotinamide metabolism
- Thiamine metabolism
- Riboflavin metabolism
- Lipoic acid metabolism
- Folate biosynthesis
- Pantothenate and CoA biosynthesis
- Biotin metabolism
- One carbon pool by folate
- Retinol metabolism
- RNA transport
- mRNA surveillance pathway
- RNA polymerase
- Basal transcription factors
- Spliceosome
- Transcription factors
- Transcription machinery
- Spliceosome
- Ribosome
- Aminoacyl-tRNA biosynthesis
- Antipsychotics - butyrophenones
- Antipsychotics - phenothiazines
- Agents for Alzheimer-type dementia
- Antidepressants
- Sulfonamide derivatives - overview
- Antiparkinsonian agents
- Sulfonamide derivatives - diuretics
- Sulfonamide derivatives - sulfa drugs
- Antiarrhythmic drugs
- Sulfonamide derivatives - hypoglycemic agents
- Retinol metabolism
- One carbon pool by folate
- ErbB signaling pathway
- MAPK signaling pathway - yeast
- MAPK signaling pathway - fly
- MAPK signaling pathway
- Rap1 signaling pathway
- Ras signaling pathway
- Two-component system
- Secretion system
- Notch signaling pathway
- Wnt signaling pathway
- Nuclear receptors
- Ion channels
- GTP-binding proteins
- CAMs
- G protein-coupled receptors
- Enzyme-linked receptors
- Cytokine receptors
- Cytokines
- CAM ligands
- Cellular antigens
- Non-alcoholic fatty liver disease (NAFLD)
- Maturity onset diabetes of the young
- Nicotine addiction
- Alcoholism
- Type I diabetes mellitus
- Type II diabetes mellitus
- Viral myocarditis
- Cocaine addiction
- Amphetamine addiction
- Morphine addiction
- Phosphonate and phosphinate metabolism
- Tropane, piperidine and pyridine alkaloid biosynthesis
- Acridone alkaloid biosynthesis
- Selenocompound metabolism
- Indole diterpene alkaloid biosynthesis
- Isoquinoline alkaloid biosynthesis
- Glucosinolate biosynthesis
- Benzoxazinoid biosynthesis
- Caffeine metabolism
- Biosynthesis of terpenoids and steroids
- KEGG Pathogen
- Nucleotide excision repair
- Base excision repair
- Homologous recombination
- Mismatch repair
- Ubiquitin system
- SNAREs
- DNA replication
- Proteasome
- Fanconi anemia pathway
- Non-homologous end-joining
- Photosynthesis - antenna proteins
- Endometrial cancer
- Prostate cancer
- Non-small cell lung cancer
- Small cell lung cancer
- Systemic lupus erythematosus
- Asthma
- Autoimmune thyroid disease
- Rheumatoid arthritis
- Allograft rejection
- Inflammatory bowel disease (IBD)
- ABC transporters
- Phosphotransferase system (PTS)
- Mismatch repair
- Homologous recombination
- Non-homologous end-joining
- Fanconi anemia pathway
- RNA degradation
- DNA replication
- Base excision repair
- Nucleotide excision repair
- Phenylalanine, tyrosine and tryptophan biosynthesis
- Tryptophan metabolism
- Phenylalanine metabolism
- Tyrosine metabolism
- Histidine metabolism
- Arginine and proline metabolism
- Lysine degradation
- Lysine biosynthesis
- Valine, leucine and isoleucine biosynthesis
- Valine, leucine and isoleucine degradation
- Sulfur metabolism
- Nitrogen metabolism
- Chromosome
- DNA replication proteins
- Photosynthesis
- Mismatch repair
- Fanconi anemia pathway
- Non-homologous end-joining
- Methane metabolism
- Carbon fixation pathways in prokaryotes
- Carbon fixation in photosynthetic organisms
- Photosynthesis - antenna proteins
- Composite structure map
- Monosaccharide codes
- Sulfonamide derivatives - diuretics
- Sulfonamide derivatives - hypoglycemic agents
- Antiarrhythmic drugs
- Antiulcer drugs
- Immunosuppressive agents
- Osteoporosis drugs
- Antimigraines
- Antithrombosis agents
- Antirheumatics - DMARDs and biological agents
- Antidiabetics
- Phenylpropanoid biosynthesis
- 4. Cellular Processes
- 5. Organismal Systems
- Dioxin degradation
- 3. Environmental Information Processing
- Xenobiotics
- Chemical structure
- Terpenoid/PK
- Other secondary metabolite
- Polycyclic aromatic hydrocarbon degradation
- Furfural degradation
- 6. Human Diseases
- KEGG Atlas
- Glycan
- Cofactor/vitamin
- Amino acid
- Other amino
- Lipid
- Nucleotide
- Carbohydrate
- Energy
- Terpenoid/PK
- Other secondary metabolite
- Fc gamma R-mediated phagocytosis
- Fc epsilon RI signaling pathway
- B cell receptor signaling pathway
- 7. Drug Development
- Antigen processing and presentation
- Natural killer cell mediated cytotoxicity
- Cytosolic DNA-sensing pathway
- RIG-I-like receptor signaling pathway
- Intestinal immune network for IgA production
- Leukocyte transendothelial migration
- 6. Human Diseases
- 5. Organismal Systems
- 4. Cellular Processes
- Insulin secretion
- Insulin signaling pathway
- 3. Environmental Information Processing
- 2. Genetic Information Processing
- Chaperones and folding catalysts
- SNAREs
- Proteasome
- RNA degradation
- DNA replication
- Base excision repair
- Ubiquitin system
- Proteasome
- PPAR signaling pathway
- Nucleotide excision repair
- Mismatch repair
- Benzodiazepine family
- Nonribosomal peptide structures
- Hepatitis B
- Geraniol degradation
- Limonene and pinene degradation
- Biosynthesis of 12-, 14- and 16-membered macrolides
- Type I polyketide structures
- Biosynthesis of type II polyketide backbone
- Biosynthesis of ansamycins
- Tetracycline biosynthesis
- Biosynthesis of type II polyketide products
- Antiviral agents
- Antifungal agents
- Rifamycins
- Quinolones
- Macrolides and ketolides
- Tetracyclines
- Aminoglycosides
- Cephalosporins - oral agents
- Antineoplastics - alkylating agents
- Anti-HIV agents
- Metabolic pathways
- Help
- Kanehisa Laboratories
- Kanehisa Laboratories
- 2-Oxocarboxylic acid metabolism
- Carbon metabolism
- Microbial metabolism in diverse environments
- Biosynthesis of secondary metabolites
- Small cell lung cancer
- Non-small cell lung cancer
- Cytokines
- Systemic lupus erythematosus
- Rheumatoid arthritis
- Autoimmune thyroid disease
- Focal adhesion
- Inflammatory bowel disease (IBD)
- CAM ligands
- Central carbon metabolism in cancer
- Choline metabolism in cancer
- Sphingolipid signaling pathway
- cAMP signaling pathway
- Gastric acid secretion
- Axon guidance
- Osteoclast differentiation
- Circadian rhythm
- Circadian entrainment
- Circadian rhythm - fly
- Circadian rhythm - plant
- Plant-pathogen interaction
- Pathways in cancer
- Phenylpropanoid biosynthesis
- Renin-angiotensin system
- Cardiac muscle contraction
- Homologous recombination
- Mismatch repair
- DNA replication
- Proteasome
- Nucleotide excision repair
- Base excision repair
- Chaperones and folding catalysts
- RNA degradation
- Ubiquitin system
- SNAREs
- Staphylococcus aureus infection
- GABAergic synapse
- Cholinergic synapse
- Dopaminergic synapse
- Serotonergic synapse
- Long-term potentiation
- Long-term depression
- Retrograde endocannabinoid signaling
- Synaptic vesicle cycle
- Neurotrophin signaling pathway
- Type I diabetes mellitus
- Type II diabetes mellitus
- Carbon metabolism
- Microbial metabolism in diverse environments
- KEGG modules
- Ion channels
- Nuclear receptors
- G protein-coupled receptors
- Biosynthesis of secondary metabolites
- Metabolic pathways
- 7. Drug Development
- KEGG reaction modules
- Pyruvate metabolism
- Serotonergic synapse
- Proximal tubule bicarbonate reclamation
- Ribosome biogenesis
- Ribosome
- Ribosome biogenesis in eukaryotes
- mRNA surveillance pathway
- RNA transport
- Aminoacyl-tRNA biosynthesis
- Ribosome
- Spliceosome
- Transcription machinery
- Transcription factors
- GTP-binding proteins
- Mineral absorption
- Vitamin digestion and absorption
- Pancreatic secretion
- Gastric acid secretion
- Salivary secretion
- Vascular smooth muscle contraction
- Fat digestion and absorption
- Protein digestion and absorption
- Carbohydrate digestion and absorption
- Bile secretion
- Hippo signaling pathway
- Hippo signaling pathway - fly
- Hedgehog signaling pathway
- TGF-beta signaling pathway
- NF-kappa B signaling pathway
- TNF signaling pathway
- VEGF signaling pathway
- Jak-STAT signaling pathway
- HIF-1 signaling pathway
- FoxO signaling pathway
- Glycosaminoglycan biosynthesis - HS/Hep
- Glycosaminoglycan biosynthesis - CS/DS
- Glycosaminoglycan degradation
- Glycosaminoglycan biosynthesis - KS
- Various types of N-glycan biosynthesis
- N-Glycan biosynthesis
- Other types of O-glycan biosynthesis
- Mucin type O-Glycan biosynthesis
- Glycosphingolipid biosynthesis - lacto and neolacto series
- Glycosylphosphatidylinositol(GPI)-anchor biosynthesis
- Steroid hormone biosynthesis
- Secondary bile acid biosynthesis
- Glycerophospholipid metabolism
- Glycerolipid metabolism
- Sphingolipid metabolism
- Ether lipid metabolism
- Linoleic acid metabolism
- Arachidonic acid metabolism
- Biosynthesis of unsaturated fatty acids
- alpha-Linolenic acid metabolism
- Other types of O-glycan biosynthesis
- Glycosaminoglycan biosynthesis - CS/DS
- Various types of N-glycan biosynthesis
- Mucin type O-Glycan biosynthesis
- Glutathione metabolism
- N-Glycan biosynthesis
- D-Arginine and D-ornithine metabolism
- D-Alanine metabolism
- Cyanoamino acid metabolism
- D-Glutamine and D-glutamate metabolism
- Retinoic acid receptor (RAR) and retinoid X receptor (RXR) agonists/antagonists
- Peroxisome proliferator-activated receptor (PPAR) agonists
- Glucocorticoid and mineralocorticoid receptor agonists/antagonists
- Progesterone, androgen and estrogen receptor agonists/antagonists
- Target-based classification
- G protein-coupled receptors
- Opioid receptor agonists/antagonists
- Angiotensin receptor and endothelin receptor antagonists
- Nuclear receptors
- Nicotinic cholinergic receptor antagonists
- Peroxisome proliferator-activated receptor (PPAR) agonists
- Retinoic acid receptor (RAR) and retinoid X receptor (RXR) agonists/antagonists
- Eicosanoid receptor agonists/antagonists
- Serotonin receptor agonists/antagonists
- Angiotensin receptor and endothelin receptor antagonists
- Opioid receptor agonists/antagonists
- G protein-coupled receptors
- Target-based classification
- Progesterone, androgen and estrogen receptor agonists/antagonists
- Glucocorticoid and mineralocorticoid receptor agonists/antagonists
- Butirosin and neomycin biosynthesis
- Puromycin biosynthesis
- Antipsychotics
- Glucosinolate biosynthesis
- Benzoxazinoid biosynthesis
- Caffeine metabolism
- Betalain biosynthesis
- Clavulanic acid biosynthesis
- Streptomycin biosynthesis
- Penicillin and cephalosporin biosynthesis
- Carbapenem biosynthesis
- Aflatoxin biosynthesis
- Novobiocin biosynthesis
- Phytochemical compounds
- Streptomycin biosynthesis
- Clavulanic acid biosynthesis
- Puromycin biosynthesis
- Butirosin and neomycin biosynthesis
- Aminobenzoate degradation
- Benzoate degradation
- Cysteine and methionine metabolism
- Glycine, serine and threonine metabolism
- Alanine, aspartate and glutamate metabolism
- Pyrimidine metabolism
- Purine metabolism
- Lipid biosynthesis proteins
- Valine, leucine and isoleucine biosynthesis
- Valine, leucine and isoleucine degradation
- Oxidative phosphorylation
- Photosynthesis
- Photosynthesis - antenna proteins
- Carbon fixation in photosynthetic organisms
- Carbon fixation pathways in prokaryotes
- Methane metabolism
- Nitrogen metabolism
- Sulfur metabolism
- Photosynthesis proteins
- Estrogen signaling pathway
- Ovarian steroidogenesis
- Insulin signaling pathway
- Insulin secretion
- Adipocytokine signaling pathway
- Glucagon signaling pathway
- KEGG Pathogen
- MAPK signaling pathway - yeast
- ErbB signaling pathway
- Ras signaling pathway
- Rap1 signaling pathway
- MAPK signaling pathway
- MAPK signaling pathway - fly
- Transporters
- Solute carrier family
- Secretion system
- Two-component system
- Epstein-Barr virus infection
- Herpes simplex infection
- Clavulanic acid biosynthesis
- Carbapenem biosynthesis
- Influenza A
- Benzoxazinoid biosynthesis
- Glucosinolate biosynthesis
- Betalain biosynthesis
- Caffeine metabolism
- Acridone alkaloid biosynthesis
- Tropane, piperidine and pyridine alkaloid biosynthesis
- Isoquinoline alkaloid biosynthesis
- Sphingolipid metabolism
- Arachidonic acid metabolism
- Primary bile acid biosynthesis
- Secondary bile acid biosynthesis
- Cutin, suberine and wax biosynthesis
- Steroid biosynthesis
- Glycerophospholipid metabolism
- Ether lipid metabolism
- Steroid hormone biosynthesis
- Glycerolipid metabolism
- Sphingolipid signaling pathway
- cAMP signaling pathway
- VEGF signaling pathway
- Jak-STAT signaling pathway
- NF-kappa B signaling pathway
- TNF signaling pathway
- HIF-1 signaling pathway
- FoxO signaling pathway
- Calcium signaling pathway
- Phosphatidylinositol signaling system
- Prostate cancer
- Endometrial cancer
- Renal cell carcinoma
- Bladder cancer
- Basal cell carcinoma
- Melanoma
- Acute myeloid leukemia
- Chronic myeloid leukemia
- Glioma
- Thyroid cancer
- Carotenoid biosynthesis
- Brassinosteroid biosynthesis
- Sesquiterpenoid and triterpenoid biosynthesis
- Diterpenoid biosynthesis
- Terpenoid backbone biosynthesis
- Monoterpenoid biosynthesis
- Choline metabolism in cancer
- Antiinfectives
- RIG-I-like receptor signaling pathway
- Pathways in cancer
- Central carbon metabolism in cancer
- Plant-pathogen interaction
- Circadian rhythm - fly
- Cytosolic DNA-sensing pathway
- Ubiquinone and other terpenoid-quinone biosynthesis
- Natural killer cell mediated cytotoxicity
- MicroRNAs in cancer
- Proteoglycans in cancer
- Homologous recombination
- Antigen processing and presentation
- Oxidative phosphorylation
- T cell receptor signaling pathway
- Lipid biosynthesis proteins
- B cell receptor signaling pathway
- Lipids
- Fc epsilon RI signaling pathway
- DNA replication
- Fc gamma R-mediated phagocytosis
- Translation factors
- Nucleotide excision repair
- Base excision repair
- Carotenoid biosynthesis
- GTP-binding proteins
- Ion channels
- CAM ligands
- CAMs
- Bacterial motility proteins
- Cellular antigens
- KEGG DISEASE
- Cytoskeleton proteins
- Human diseases
- KEGG Cancer
- Biosynthesis of terpenoids and steroids
- Biosynthesis of phenylpropanoids
- Caffeine metabolism
- Acridone alkaloid biosynthesis
- Drug metabolism - other enzymes
- Drug metabolism - cytochrome P450
- Pesticides
- Flavonoid biosynthesis
- Cytochrome P450
- Biosynthesis of plant secondary metabolites
- Indole alkaloid biosynthesis
- Phototransduction
- Neurotrophin signaling pathway
- Olfactory transduction
- Phototransduction - fly
- Long-term depression
- Long-term potentiation
- Synaptic vesicle cycle
- Retrograde endocannabinoid signaling
- Inflammatory mediator regulation of TRP channels
- Taste transduction
- VEGF signaling pathway
- Hippo signaling pathway - fly
- NF-kappa B signaling pathway
- Jak-STAT signaling pathway
- HIF-1 signaling pathway
- TNF signaling pathway
- Calcium signaling pathway
- FoxO signaling pathway
- Sphingolipid signaling pathway
- Phosphatidylinositol signaling system
- Caprolactam degradation
- Atrazine degradation
- Hippo signaling pathway
- TGF-beta signaling pathway
- MAPK signaling pathway
- Rap1 signaling pathway
- MAPK signaling pathway - yeast
- MAPK signaling pathway - fly
- Wnt signaling pathway
- ErbB signaling pathway
- Hedgehog signaling pathway
- Notch signaling pathway
- Pyrimidine metabolism
- Amino acid related enzymes
- Phenylalanine, tyrosine and tryptophan biosynthesis
- CAMs
- Phenylalanine metabolism
- Ion channels
- Nuclear receptors
- Lysosome
- Phagosome
- Aminoglycosides
- Tetracyclines
- Penicillins
- Cephalosporins - parenteral agents
- Cephalosporins - oral agents
- Chagas disease (American trypanosomiasis)
- African trypanosomiasis
- beta-Lactam resistance
- Vancomycin resistance
- Phototransduction
- Phototransduction - fly
- Cholinergic synapse
- Dopaminergic synapse
- Serotonergic synapse
- Long-term potentiation
- Long-term depression
- Retrograde endocannabinoid signaling
- Synaptic vesicle cycle
- Neurotrophin signaling pathway
- Antineoplastics - alkylating agents
- Anti-HIV agents
- Antiviral agents
- Antifungal agents
- Rifamycins
- Therapeutic category of drugs (Japan)
- USP drug classification (USA)
- ATC classification (WHO)
- KEGG DRUG
- Biosynthesis of type II polyketide products
- Hepatitis C
- Biosynthesis of type II polyketide backbone
- Xylene degradation
- Toluene degradation
- Ascorbate and aldarate metabolism
- Nitrotoluene degradation
- Atrazine degradation
- Styrene degradation
- DDT degradation
- Caprolactam degradation
- Glycolysis / Gluconeogenesis
- Citrate cycle (TCA cycle)
- KEGG reaction modules
- Fructose and mannose metabolism
- Galactose metabolism
- Pentose phosphate pathway
- Pentose and glucuronate interconversions
- Tetracyclines
- Geraniol degradation
- Herpes simplex infection
- Nucleotide excision repair
- Glycan
- Cofactor/vitamin
- Amino acid
- Other amino
- Xenobiotics
- Chemical structure
- Terpenoid/PK
- Other secondary metabolite
- 2. Genetic Information Processing
- 3. Environmental Information Processing
- Atrazine degradation
- Styrene degradation
- DDT degradation
- Caprolactam degradation
- Xylene degradation
- Toluene degradation
- Mismatch repair
- Nitrotoluene degradation
- Dioxin degradation
- Bisphenol degradation
- Glyoxylate and dicarboxylate metabolism
- Propanoate metabolism
- Butanoate metabolism
- C5-Branched dibasic acid metabolism
- Inositol phosphate metabolism
- Enzymes
- Compounds with biological roles
- Oxidative phosphorylation
- Photosynthesis
- Photosynthesis - antenna proteins
- Cytokines
- Nuclear receptors
- Enzyme-linked receptors
- Cytokine receptors
- Cell adhesion molecules (CAMs)
- G protein-coupled receptors
- Cytokine-cytokine receptor interaction
- ECM-receptor interaction
- Regulation of autophagy
- Neuroactive ligand-receptor interaction
- Thyroid hormone signaling pathway
- Melanogenesis
- Renin-angiotensin system
- Cardiac muscle contraction
- Progesterone-mediated oocyte maturation
- Prolactin signaling pathway
- Oxytocin signaling pathway
- Thyroid hormone synthesis
- Adrenergic signaling in cardiomyocytes
- Vascular smooth muscle contraction
- DDT degradation
- Bisphenol degradation
- 2. Genetic Information Processing
- Naphthalene degradation
- Ethylbenzene degradation
- Styrene degradation
- Atrazine degradation
- Caprolactam degradation
- Proteasome
- Ubiquitin system
- SNAREs
- Chaperones and folding catalysts
- Translation factors
- Transfer RNA biogenesis
- Ribosome biogenesis
- Ribosome
- Chromosome
- DNA replication proteins
- Non-small cell lung cancer
- Asthma
- Bladder cancer
- Prostate cancer
- Endometrial cancer
- Small cell lung cancer
- Chronic myeloid leukemia
- Basal cell carcinoma
- Melanoma
- Renal cell carcinoma
- Biosynthesis of plant hormones
- Biosynthesis of alkaloids derived from terpenoid and polyketide
- PI3K-Akt signaling pathway
- Biosynthesis of alkaloids derived from histidine and purine
- Spliceosome
- Endocrine disrupting compounds
- 5. Organismal Systems
- 6. Human Diseases
- 7. Drug Development
- Search Pathway
- Search&Color Pathway
- Color Pathway
- Metabolic pathways
- Biosynthesis of secondary metabolites
- Chloroalkane and chloroalkene degradation
- Fluorobenzoate degradation
- Aminobenzoate degradation
- Benzoate degradation
- Nitrotoluene degradation
- Xylene degradation
- Toluene degradation
- Chlorocyclohexane and chlorobenzene degradation
- ATC classification (WHO)
- USP drug classification (USA)
- Styrene degradation
- Ethylbenzene degradation
- Hypnotics
- Anxiolytics
- Anticonvulsants
- Local analgesics
- Biosynthesis of type II polyketide backbone
- Biosynthesis of ansamycins
- Brassinosteroid biosynthesis
- Carotenoid biosynthesis
- Zeatin biosynthesis
- Insect hormone biosynthesis
- Geraniol degradation
- Limonene and pinene degradation
- Biosynthesis of 12-, 14- and 16-membered macrolides
- Type I polyketide structures
- Phenylalanine, tyrosine and tryptophan biosynthesis
- Tryptophan metabolism
- Histidine metabolism
- Arginine and proline metabolism
- Phenylalanine metabolism
- Tyrosine metabolism
- Valine, leucine and isoleucine biosynthesis
- Valine, leucine and isoleucine degradation
- Lysine degradation
- Lysine biosynthesis
- FoxO signaling pathway
- HIF-1 signaling pathway
- Phosphatidylinositol signaling system
- Calcium signaling pathway
- cAMP signaling pathway
- Sphingolipid signaling pathway
- cGMP-PKG signaling pathway
- mTOR signaling pathway
- AMPK signaling pathway
- Antineoplastics - antimetabolic agents
- Antineoplastics - agents from natural products
- Antiinfectives
- Antineoplastics - alkylating agents
- Antineoplastics
- Hypnotics
- Antineoplastics - hormones
- Antineoplastics - protein kinases inhibitors
- Anxiolytics
- Anticonvulsants
- Chemical carcinogenesis
- Viral carcinogenesis
- MicroRNAs in cancer
- Proteoglycans in cancer
- Choline metabolism in cancer
- Transcriptional misregulation in cancer
- Pathways in cancer
- Central carbon metabolism in cancer
- Plant-pathogen interaction
- Monosaccharide codes
- Ribosome
- Aminoacyl-tRNA biosynthesis
- Basal transcription factors
- Spliceosome
- Biosynthesis of plant hormones
- RNA polymerase
- Biosynthesis of alkaloids derived from histidine and purine
- Biosynthesis of alkaloids derived from terpenoid and polyketide
- RNA transport
- mRNA surveillance pathway
- Rap1 signaling pathway
- Ras signaling pathway
- Bacterial secretion system
- Phosphotransferase system (PTS)
- ABC transporters
- DNA repair and recombination proteins
- Two-component system
- Secretion system
- Solute carrier family
- Transporters
- Pyruvate metabolism
- Thyroid hormone signaling pathway
- Cardiac muscle contraction
- Ascorbate and aldarate metabolism
- C5-Branched dibasic acid metabolism
- Butanoate metabolism
- Propanoate metabolism
- Salivary secretion
- Bile secretion
- Pancreatic secretion
- Enzymes
- Inositol phosphate metabolism
- Antipsychotics - phenothiazines
- Antipsychotics
- Antidepressants
- Antipsychotics - butyrophenones
- Antiparkinsonian agents
- Agents for Alzheimer-type dementia
- Sulfonamide derivatives - sulfa drugs
- Sulfonamide derivatives - overview
- Sulfonamide derivatives - hypoglycemic agents
- Sulfonamide derivatives - diuretics
- Salivary secretion
- Renin-angiotensin system
- Estrogen signaling pathway
- Ovarian steroidogenesis
- Prolactin signaling pathway
- Progesterone-mediated oocyte maturation
- Thyroid hormone synthesis
- Oxytocin signaling pathway
- Melanogenesis
- Thyroid hormone signaling pathway
- DNA repair and recombination proteins
- Chromosome
- DNA replication proteins
- Fanconi anemia pathway
- Non-homologous end-joining
- Homologous recombination
- Mismatch repair
- Nucleotide excision repair
- ABC transporters
- T cell receptor signaling pathway
- Glyoxylate and dicarboxylate metabolism
- Inflammatory bowel disease (IBD)
- Allograft rejection
- Rheumatoid arthritis
- Autoimmune thyroid disease
- Alzheimer's disease
- Parkinson's disease
- Graft-versus-host disease
- Primary immunodeficiency
- Ion channels
- KEGG Atlas
- ECM-receptor interaction
- KEGG Atlas
- KEGG Atlas
- KEGG Atlas
- KEGG Atlas
- KEGG Atlas
- KEGG Atlas
- Parkinson's disease
- KEGG modules
- KEGG reaction modules
- mTOR signaling pathway
- Plant hormone signal transduction
- Two-component system
- ABC transporters
- cAMP signaling pathway
- cGMP-PKG signaling pathway
- PI3K-Akt signaling pathway
- AMPK signaling pathway
- Solute carrier family
- Phosphotransferase system (PTS)
- Bacterial secretion system
- Amphetamine addiction
- Cocaine addiction
- Prion diseases
- Serotonergic synapse
- Long-term potentiation
- Proximal tubule bicarbonate reclamation
- Collecting duct acid secretion
- Aldosterone-regulated sodium reabsorption
- Endocrine and other factor-regulated calcium reabsorption
- Cholinergic synapse
- Dopaminergic synapse
- Glutamatergic synapse
- GABAergic synapse
- Benzoxazinoid biosynthesis
- Glucosinolate biosynthesis
- Carbapenem biosynthesis
- Penicillin and cephalosporin biosynthesis
- Acridone alkaloid biosynthesis
- Tropane, piperidine and pyridine alkaloid biosynthesis
- Porphyrin and chlorophyll metabolism
- Betalain biosynthesis
- Caffeine metabolism
- pathway maps
- Cell cycle - yeast
- Cell cycle
- HS/Hep binding proteins
- Proteoglycans
- Monosaccharide codes
- Composite structure map
- Phagosome
- Glycosyltransferases
- Regulation of actin cytoskeleton
- Flagellar assembly
- Bacterial chemotaxis
- Regulation of autophagy
- Cocaine addiction
- Amphetamine addiction
- Huntington's disease
- Prion diseases
- Alcoholism
- Hypertrophic cardiomyopathy (HCM)
- Morphine addiction
- Nicotine addiction
- Arrhythmogenic right ventricular cardiomyopathy (ARVC)
- Dilated cardiomyopathy (DCM)
- Metabolic pathways
- Biosynthesis of secondary metabolites
- Glycolysis / Gluconeogenesis
- KEGG modules
- KEGG reaction modules
- KEGG Atlas
- KEGG Atlas
- KEGG Atlas
- KEGG Atlas
- Citrate cycle (TCA cycle)
- Pentose phosphate pathway
- KEGG Atlas
- KEGG Atlas
- Benzoxazinoid biosynthesis
- Glucosinolate biosynthesis
- Penicillins
- Cephalosporins - parenteral agents
- Antineoplastics - protein kinases inhibitors
- Antineoplastics
- Antineoplastics - agents from natural products
- Antineoplastics - hormones
- Antineoplastics - alkylating agents
- Antineoplastics - antimetabolic agents
- Isoquinoline alkaloid biosynthesis
- Vancomycin resistance
- Secondary bile acid biosynthesis
- Primary bile acid biosynthesis
- Biosynthesis of phenylpropanoids
- Biosynthesis of plant secondary metabolites
- Overview of biosynthetic pathways
- Phytochemical compounds
- Aflatoxin biosynthesis
- Novobiocin biosynthesis
- Puromycin biosynthesis
- Butirosin and neomycin biosynthesis
- Streptomycin biosynthesis
- Clavulanic acid biosynthesis
- Lipopolysaccharide biosynthesis
- Glycosphingolipid biosynthesis - ganglio series
- Glycosphingolipid biosynthesis - globo series
- Glycosphingolipid biosynthesis - lacto and neolacto series
- Composite structure map
- KEGG GLYCAN
- Other glycan degradation
- Peptidoglycan biosynthesis
- Glycosyltransferases
- Monosaccharide codes
- Adipocytokine signaling pathway
- Glucagon signaling pathway
- Leukocyte transendothelial migration
- Fc gamma R-mediated phagocytosis
- Fc epsilon RI signaling pathway
- B cell receptor signaling pathway
- Insulin signaling pathway
- Insulin secretion
- Chemokine signaling pathway
- Intestinal immune network for IgA production
- Degradation of aromatic compounds
- Glycolysis / Gluconeogenesis
- Citrate cycle (TCA cycle)
- Pentose phosphate pathway
- Pentose and glucuronate interconversions
- Fructose and mannose metabolism
- Type I diabetes mellitus
- Ascorbate and aldarate metabolism
- Starch and sucrose metabolism
- Amino sugar and nucleotide sugar metabolism
- Hypertrophic cardiomyopathy (HCM)
- Arrhythmogenic right ventricular cardiomyopathy (ARVC)
- Nicotine addiction
- Alcoholism
- Amphetamine addiction
- Morphine addiction
- Endometrial cancer
- 2. Genetic Information Processing
- Non-small cell lung cancer
- Asthma
- Melanoma
- Renal cell carcinoma
- Bladder cancer
- Prostate cancer
- Nucleotide
- Amino acid
- Other amino
- Glycan
- Systemic lupus erythematosus
- Rheumatoid arthritis
- Other secondary metabolite
- Xenobiotics
- Secondary bile acid biosynthesis
- Primary bile acid biosynthesis
- Photosynthesis proteins
- Fatty acid elongation
- Fatty acid biosynthesis
- Synthesis and degradation of ketone bodies
- Fatty acid degradation
- Steroid biosynthesis
- Cutin, suberine and wax biosynthesis
- Eicosanoid receptor agonists/antagonists
- Serotonin receptor agonists/antagonists
- Histamine H2/H3 receptor agonists/antagonists
- Histamine H1 receptor antagonists
- Dopamine receptor agonists/antagonists
- beta-Adrenergic receptor agonists/antagonists
- alpha-Adrenergic receptor agonists/antagonists
- Cholinergic and anticholinergic drugs
- Angiotensin receptor and endothelin receptor antagonists
- Opioid receptor agonists/antagonists
- SNARE interactions in vesicular transport
- Protein processing in endoplasmic reticulum
- Transfer RNA biogenesis
- Ribosome biogenesis
- Protein export
- Translation factors
- mRNA surveillance pathway
- RNA transport
- Ribosome
- Ribosome biogenesis in eukaryotes
- Glutamatergic synapse
- GABAergic synapse
- Fat digestion and absorption
- Vitamin digestion and absorption
- Mineral absorption
- Vasopressin-regulated water reabsorption
- Aldosterone-regulated sodium reabsorption
- Endocrine and other factor-regulated calcium reabsorption
- Proximal tubule bicarbonate reclamation
- Collecting duct acid secretion
- Cytokine-cytokine receptor interaction
- Antidiabetics
- Antidyslipidemic agents
- Antiglaucoma agents
- Cholinergic and anticholinergic drugs
- Osteoporosis drugs
- Antimigraines
- Antithrombosis agents
- Antirheumatics - DMARDs and biological agents
- alpha-Adrenergic receptor agonists/antagonists
- beta-Adrenergic receptor agonists/antagonists
- Cell adhesion molecules (CAMs)
- 4. Cellular Processes
- 5. Organismal Systems
- Polyketide sugar unit biosynthesis
- Xenobiotics
- Chemical structure
- 2. Genetic Information Processing
- 3. Environmental Information Processing
- Glycan
- Cofactor/vitamin
- Terpenoid/PK
- Other secondary metabolite
- Graft-versus-host disease
- Primary immunodeficiency
- Ras signaling pathway
- Rap1 signaling pathway
- Ion channels
- GTP-binding proteins
- Asthma
- Nuclear receptors
- Cellular antigens
- Two-component system
- CAMs
- Allograft rejection
- Renin-angiotensin system
- Cardiac muscle contraction
- Thyroid hormone signaling pathway
- Melanogenesis
- Salivary secretion
- Gastric acid secretion
- Adrenergic signaling in cardiomyocytes
- Vascular smooth muscle contraction
- Pancreatic secretion
- Bile secretion
- Signaling pathways regulating pluripotency of stem cells
- Gap junction
- Complement and coagulation cascades
- Hematopoietic cell lineage
- Focal adhesion
- p53 signaling pathway
- Tight junction
- Adherens junction
- Toll-like receptor signaling pathway
- Platelet activation
- KEGG Atlas
- KEGG Atlas
- KEGG Atlas
- KEGG Atlas
- Glycosaminoglycan degradation
- Glycosaminoglycan biosynthesis - KS
- Other types of O-glycan biosynthesis
- Mucin type O-Glycan biosynthesis
- Glycosaminoglycan biosynthesis - HS/Hep
- Glycosaminoglycan biosynthesis - CS/DS
- Glutathione metabolism
- D-Alanine metabolism
- Various types of N-glycan biosynthesis
- N-Glycan biosynthesis
- KEGG Atlas
- KEGG Atlas
- Complement and coagulation cascades
- Hematopoietic cell lineage
- Toll-like receptor signaling pathway
- Platelet activation
- RIG-I-like receptor signaling pathway
- NOD-like receptor signaling pathway
- Natural killer cell mediated cytotoxicity
- Cytosolic DNA-sensing pathway
- T cell receptor signaling pathway
- Antigen processing and presentation
- Carbon fixation in photosynthetic organisms
- Carbon fixation pathways in prokaryotes
- Oxidative phosphorylation
- Photosynthesis
- Photosynthesis - antenna proteins
- C5-Branched dibasic acid metabolism
- Inositol phosphate metabolism
- Enzymes
- Compounds with biological roles
- Meiosis - yeast
- Penicillins
- Cephalosporins - parenteral agents
- Cephalosporins - oral agents
- Aminoglycosides
- Toxoplasmosis
- Leishmaniasis
- Chagas disease (American trypanosomiasis)
- African trypanosomiasis
- Insect hormone biosynthesis
- Brassinosteroid biosynthesis
- Limonene and pinene degradation
- Zeatin biosynthesis
- Type I polyketide structures
- Macrolides and ketolides
- Biosynthesis of ansamycins
- Biosynthesis of 12-, 14- and 16-membered macrolides
- Arrhythmogenic right ventricular cardiomyopathy (ARVC)
- Hypertrophic cardiomyopathy (HCM)
- Alcoholism
- Nicotine addiction
- Type II diabetes mellitus
- Type I diabetes mellitus
- Viral myocarditis
- Dilated cardiomyopathy (DCM)
- Maturity onset diabetes of the young
- Non-alcoholic fatty liver disease (NAFLD)
- Flavonoid biosynthesis
- Stilbenoid, diarylheptanoid and gingerol biosynthesis
- Anthocyanin biosynthesis
- Flavone and flavonol biosynthesis
- Pesticides
- Basal transcription factors
- RNA polymerase
- Cytochrome P450
- Transcription machinery
- Transcription factors
- Indole alkaloid biosynthesis
- Isoflavonoid biosynthesis
- Glycerolipid metabolism
- Steroid hormone biosynthesis
- Adherens junction
- Focal adhesion
- Gap junction
- Tight junction
- Oocyte meiosis
- Meiosis - yeast
- p53 signaling pathway
- Apoptosis
- Cellular antigens
- Signaling pathways regulating pluripotency of stem cells
- 6. Human Diseases
- 7. Drug Development
- 4. Cellular Processes
- 5. Organismal Systems
- 2. Genetic Information Processing
- 3. Environmental Information Processing
- Xenobiotics
- Chemical structure
- KEGG
- GenomeNet
- Microbial metabolism in diverse environments
- Carbon metabolism
- Viral myocarditis
- Type I diabetes mellitus
- Biosynthesis of amino acids
- Degradation of aromatic compounds
- 2-Oxocarboxylic acid metabolism
- Fatty acid metabolism
- Morphine addiction
- Nicotine addiction
- Cocaine addiction
- Amphetamine addiction
- Arrhythmogenic right ventricular cardiomyopathy (ARVC)
- Dilated cardiomyopathy (DCM)
- Alcoholism
- Hypertrophic cardiomyopathy (HCM)
- 7. Drug Development
- 6. Human Diseases
- 5. Organismal Systems
- 4. Cellular Processes
- 3. Environmental Information Processing
- 2. Genetic Information Processing
- Chemical structure
- Xenobiotics
- Other secondary metabolite
- Terpenoid/PK
- Renin-angiotensin system inhibitors
- HMG-CoA reductase inhibitors
- Neurotransmitter transporter inhibitors
- Ion transporter inhibitors
- Cyclooxygenase inhibitors
- Catecholamine transferase inhibitors
- Potassium channel blocking and opening drugs
- Sodium channel blocking drugs
- Ion channels
- N-Metyl-D-aspartic acid receptor antagonists
- Ubiquinone and other terpenoid-quinone biosynthesis
- Terpenoid backbone biosynthesis
- Nicotinate and nicotinamide metabolism
- Pantothenate and CoA biosynthesis
- Biotin metabolism
- Lipoic acid metabolism
- Folate biosynthesis
- One carbon pool by folate
- Retinol metabolism
- Porphyrin and chlorophyll metabolism
- NF-kappa B signaling pathway
- TNF signaling pathway
- VEGF signaling pathway
- Jak-STAT signaling pathway
- Circadian rhythm - fly
- Circadian rhythm - plant
- Circadian rhythm
- Circadian entrainment
- Axon guidance
- Osteoclast differentiation
- Inflammatory mediator regulation of TRP channels
- Dorso-ventral axis formation
- Olfactory transduction
- Taste transduction
- HIF-1 signaling pathway
- FoxO signaling pathway
- Sulfonamide derivatives - overview
- Sulfonamide derivatives - sulfa drugs
- Agents for Alzheimer-type dementia
- Antiparkinsonian agents
- Antipsychotics - butyrophenones
- Antidepressants
- Antipsychotics
- Antipsychotics - phenothiazines
- Antipsychotics - phenothiazines
- Antipsychotics - butyrophenones
- Opioid analgesics
- Antipsychotics
- Anticonvulsants
- Local analgesics
- Hypnotics
- Anxiolytics
- Antineoplastics - protein kinases inhibitors
- Antineoplastics
- Steroid biosynthesis
- Primary bile acid biosynthesis
- Compounds with biological roles
- Fatty acid biosynthesis
- Inositol phosphate metabolism
- Enzymes
- Synthesis and degradation of ketone bodies
- Cutin, suberine and wax biosynthesis
- Fatty acid elongation
- Fatty acid degradation
- HMG-CoA reductase inhibitors
- Renin-angiotensin system inhibitors
- Catecholamine transferase inhibitors
- Cyclooxygenase inhibitors
- Eicosanoids
- Prostaglandins
- HIV protease inhibitors
- Quinolines
- Benzoic acid family
- 1,2-Diphenyl substitution family
- Pertussis
- Legionellosis
- Vibrio cholerae infection
- Vibrio cholerae pathogenic cycle
- Non-alcoholic fatty liver disease (NAFLD)
- Maturity onset diabetes of the young
- Type I diabetes mellitus
- Type II diabetes mellitus
- Dilated cardiomyopathy (DCM)
- Viral myocarditis
- Hypertrophic cardiomyopathy (HCM)
- Arrhythmogenic right ventricular cardiomyopathy (ARVC)
- Bacterial invasion of epithelial cells
- KEGG Pathogen
- HIV protease inhibitors
- Renin-angiotensin system inhibitors
- Eicosanoids
- Quinolines
- Catecholamine transferase inhibitors
- Neurotransmitter transporter inhibitors
- HMG-CoA reductase inhibitors
- Cyclooxygenase inhibitors
- Benzoic acid family
- Prostaglandins
- Biosynthesis of phenylpropanoids
- Valine, leucine and isoleucine degradation
- Cysteine and methionine metabolism
- Glycine, serine and threonine metabolism
- Alanine, aspartate and glutamate metabolism
- Arginine and proline metabolism
- Lysine degradation
- Lysine biosynthesis
- Valine, leucine and isoleucine biosynthesis
- Tyrosine metabolism
- Histidine metabolism
- Bacterial secretion system
- Phosphotransferase system (PTS)
- ABC transporters
- Fanconi anemia pathway
- Non-homologous end-joining
- Homologous recombination
- Mismatch repair
- Nucleotide excision repair
- Ras signaling pathway
- Two-component system
- Secondary bile acid biosynthesis
- Steroid hormone biosynthesis
- Steroid biosynthesis
- Primary bile acid biosynthesis
- Ether lipid metabolism
- Sphingolipid metabolism
- Glycerolipid metabolism
- Glycerophospholipid metabolism
- Arachidonic acid metabolism
- Linoleic acid metabolism
- Phenylalanine metabolism
- Sesquiterpenoid and triterpenoid biosynthesis
- Histidine metabolism
- Arginine and proline metabolism
- Amino acid related enzymes
- Phenylalanine, tyrosine and tryptophan biosynthesis
- Tryptophan metabolism
- Lipoic acid metabolism
- Folate biosynthesis
- One carbon pool by folate
- Infectious diseases
- Porphyrin and chlorophyll metabolism
- Ubiquinone and other terpenoid-quinone biosynthesis
- Terpenoid backbone biosynthesis
- Drug metabolism - other enzymes
- Drug metabolism - cytochrome P450
- Bisphenol degradation
- DDT degradation
- Naphthalene degradation
- Dioxin degradation
- Furfural degradation
- Polycyclic aromatic hydrocarbon degradation
- Metabolism of xenobiotics by cytochrome P450
- Steroid degradation
- Lysine biosynthesis
- Lysine degradation
- Glycine, serine and threonine metabolism
- Cysteine and methionine metabolism
- Valine, leucine and isoleucine degradation
- Valine, leucine and isoleucine biosynthesis
- Biosynthesis of unsaturated fatty acids
- Purine metabolism
- Pyrimidine metabolism
- Alanine, aspartate and glutamate metabolism
- Legionellosis
- Staphylococcus aureus infection
- Tuberculosis
- Bacterial invasion of epithelial cells
- KEGG Pathogen
- Infectious diseases
- Bacterial toxins
- HTLV-I infection
- Galactose metabolism
- Ascorbate and aldarate metabolism
- Starch and sucrose metabolism
- Amino sugar and nucleotide sugar metabolism
- Citrate cycle (TCA cycle)
- Pentose phosphate pathway
- Pentose and glucuronate interconversions
- Fructose and mannose metabolism
- Ion channels
- Nuclear receptors
- Cytokines
- Cytokine receptors
- Biosynthesis of amino acids
- CAM ligands
- KEGG Atlas
- GTP-binding proteins
- Endocytosis
- KEGG Atlas
- KEGG Atlas
- Propanoate metabolism
- Glyoxylate and dicarboxylate metabolism
- Pyruvate metabolism
- Amino sugar and nucleotide sugar metabolism
- Thyroid hormone signaling pathway
- Melanogenesis
- Oxytocin signaling pathway
- Chronic myeloid leukemia
- Basal cell carcinoma
- Melanoma
- Thyroid hormone synthesis
- Pancreatic cancer
- Glioma
- Thyroid cancer
- Acute myeloid leukemia
- Complement and coagulation cascades
- Bladder cancer
- Prostate cancer
- Platelet activation
- Jak-STAT signaling pathway
- VEGF signaling pathway
- Renin-angiotensin system
- ErbB signaling pathway
- MAPK signaling pathway - yeast
- Notch signaling pathway
- Wnt signaling pathway
- TGF-beta signaling pathway
- Hedgehog signaling pathway
- Hippo signaling pathway - fly
- Hippo signaling pathway
- Endometrial cancer
- Prostate cancer
- Non-small cell lung cancer
- Small cell lung cancer
- Melanoma
- Basal cell carcinoma
- Antifungal agents
- Antiviral agents
- Bladder cancer
- Penicillins
- Cephalosporins - parenteral agents
- Cephalosporins - oral agents
- Aminoglycosides
- Tetracyclines
- Macrolides and ketolides
- Quinolones
- Rifamycins
- Carbon fixation in photosynthetic organisms
- Carbon fixation pathways in prokaryotes
- Methane metabolism
- Nitrogen metabolism
- Sulfur metabolism
- Photosynthesis proteins
- Glycolysis / Gluconeogenesis
- Citrate cycle (TCA cycle)
- Pentose phosphate pathway
- Pentose and glucuronate interconversions
- Phototransduction - fly
- Olfactory transduction
- Taste transduction
- Inflammatory mediator regulation of TRP channels
- Retrograde endocannabinoid signaling
- Synaptic vesicle cycle
- Neurotrophin signaling pathway
- Phototransduction
- Dorso-ventral axis formation
- Axon guidance
- Glutamatergic synapse
- Steroid hormone biosynthesis
- Secondary bile acid biosynthesis
- Fatty acid biosynthesis
- Sulfur metabolism
- Fatty acid degradation
- Fatty acid elongation
- Cutin, suberine and wax biosynthesis
- Synthesis and degradation of ketone bodies
- Primary bile acid biosynthesis
- Steroid biosynthesis
- Nicotine addiction
- Alcoholism
- Prion diseases
- Cocaine addiction
- Amphetamine addiction
- Morphine addiction
- Alzheimer's disease
- Parkinson's disease
- Amyotrophic lateral sclerosis (ALS)
- Huntington's disease
- Dioxin degradation
- Bisphenol degradation
- Sphingolipid signaling pathway
- Phosphatidylinositol signaling system
- Ethylbenzene degradation
- Nitrotoluene degradation
- Xylene degradation
- Toluene degradation
- VEGF signaling pathway
- Caprolactam degradation
- Atrazine degradation
- Styrene degradation
- Update history
- pathway maps
- Benzoic acid family
- KEGG Atlas
- Eicosanoids
- Prostaglandins
- Help
- New pathway maps
- Naphthalene family
- KEGG Atlas
- Acute myeloid leukemia
- Chronic myeloid leukemia
- Viral carcinogenesis
- KEGG DISEASE
- KEGG Cancer
- Human diseases
- Colorectal cancer
- Pancreatic cancer
- Glioma
- Thyroid cancer
- Glycolysis / Gluconeogenesis
- Autoimmune thyroid disease
- Glycosphingolipid biosynthesis - ganglio series
- Glycosphingolipid biosynthesis - globo series
- Polyketide biosynthesis proteins
- Biosynthesis of vancomycin group antibiotics
- Prenyltransferases
- Nonribosomal peptide structures
- Biosynthesis of siderophore group nonribosomal peptides
- Tetracycline biosynthesis
- Polyketide sugar unit biosynthesis
- Glycosaminoglycan biosynthesis - HS/Hep
- Glycosaminoglycan biosynthesis - CS/DS
- Biosynthesis of vancomycin group antibiotics
- Biosynthesis of siderophore group nonribosomal peptides
- Polyketide biosynthesis proteins
- Prenyltransferases
- Phenylpropanoid biosynthesis
- Flavonoid biosynthesis
- Stilbenoid, diarylheptanoid and gingerol biosynthesis
- Anthocyanin biosynthesis
- Flavone and flavonol biosynthesis
- Protein digestion and absorption
- Carbohydrate digestion and absorption
- Cardiac muscle contraction
- Renin-angiotensin system
- Vascular smooth muscle contraction
- Adrenergic signaling in cardiomyocytes
- Gastric acid secretion
- Salivary secretion
- Bile secretion
- Pancreatic secretion
- Ras signaling pathway
- Two-component system
- Secretion system
- Solute carrier family
- Transporters
- Bacterial secretion system
- Phosphotransferase system (PTS)
- ABC transporters
- DNA repair and recombination proteins
- Collecting duct acid secretion
- Sulfur metabolism
- Carbon fixation pathways in prokaryotes
- Methane metabolism
- Dopaminergic synapse
- Serotonergic synapse
- Fatty acid biosynthesis
- Fatty acid elongation
- Retrograde endocannabinoid signaling
- Synaptic vesicle cycle
- Cutin, suberine and wax biosynthesis
- Steroid biosynthesis
- Diterpenoid biosynthesis
- Sesquiterpenoid and triterpenoid biosynthesis
- Novobiocin biosynthesis
- Puromycin biosynthesis
- Butirosin and neomycin biosynthesis
- Streptomycin biosynthesis
- Monoterpenoid biosynthesis
- Terpenoid backbone biosynthesis
- Phytochemical compounds
- Aflatoxin biosynthesis
- Carbapenem biosynthesis
- Penicillin and cephalosporin biosynthesis
- Benzoxazinoid biosynthesis
- Glucosinolate biosynthesis
- Puromycin biosynthesis
- Butirosin and neomycin biosynthesis
- Streptomycin biosynthesis
- Clavulanic acid biosynthesis
- Aflatoxin biosynthesis
- Novobiocin biosynthesis
- PI3K-Akt signaling pathway
- cGMP-PKG signaling pathway
- TNF signaling pathway
- NF-kappa B signaling pathway
- FoxO signaling pathway
- HIF-1 signaling pathway
- Phosphatidylinositol signaling system
- Calcium signaling pathway
- cAMP signaling pathway
- Sphingolipid signaling pathway
- Morphine addiction
- Nicotine addiction
- Parkinson's disease
- Amyotrophic lateral sclerosis (ALS)
- Primary immunodeficiency
- Alzheimer's disease
- Cocaine addiction
- Amphetamine addiction
- Huntington's disease
- Prion diseases
- Phagosome
- Lysosome
- Peroxisome
- Search&Color Pathway
- Bacterial chemotaxis
- Flagellar assembly
- Infectious diseases
- Bacterial toxins
- Serotonergic synapse
- Dopaminergic synapse
- Influenza A
- Regulation of actin cytoskeleton
- HTLV-I infection
- Measles
- Vitamin digestion and absorption
- Fat digestion and absorption
- Protein digestion and absorption
- Carbohydrate digestion and absorption
- Cholinergic synapse
- GABAergic synapse
- Glutamatergic synapse
- Mineral absorption
- Compounds with biological roles
- KEGG Atlas
- Degradation of aromatic compounds
- Enzymes
- Fatty acid metabolism
- Biosynthesis of amino acids
- Carbon metabolism
- 2-Oxocarboxylic acid metabolism
- Long-term potentiation
- Long-term depression
- KEGG Atlas
- KEGG Atlas
- Colorectal cancer
- Pancreatic cancer
- Meiosis - yeast
- Oocyte meiosis
- Regulation of autophagy
- Cell cycle
- Cell cycle - yeast
- Cell cycle - Caulobacter
- Endocytosis
- Phagosome
- Lysosome
- Peroxisome
- Flavonoid biosynthesis
- Flavone and flavonol biosynthesis
- Anthocyanin biosynthesis
- Isoflavonoid biosynthesis
- Biosynthesis of siderophore group nonribosomal peptides
- Biosynthesis of vancomycin group antibiotics
- Phenylpropanoid biosynthesis
- Stilbenoid, diarylheptanoid and gingerol biosynthesis
- Propanoate metabolism
- Glyoxylate and dicarboxylate metabolism
- Pyruvate metabolism
- Amino sugar and nucleotide sugar metabolism
- Starch and sucrose metabolism
- Ascorbate and aldarate metabolism
- Galactose metabolism
- Fructose and mannose metabolism
- Pentose and glucuronate interconversions
- Pentose phosphate pathway
- G protein-coupled receptors
- Two-component system
- Chromosome
- DNA replication proteins
- Proteasome
- Ubiquitin system
- Secretion system
- Solute carrier family
- Transporters
- DNA repair and recombination proteins
- Biosynthesis of plant secondary metabolites
- Glycolysis / Gluconeogenesis
- Biosynthesis of terpenoids and steroids
- Biosynthesis of phenylpropanoids
- Biosynthesis of alkaloids derived from ornithine, lysine and nicotinic acid
- Biosynthesis of alkaloids derived from shikimate pathway
- Biosynthesis of alkaloids derived from terpenoid and polyketide
- KEGG modules
- RNA polymerase
- Biosynthesis of plant hormones
- Galactose metabolism
- Fructose and mannose metabolism
- Catecholamine transferase inhibitors
- Cyclooxygenase inhibitors
- HMG-CoA reductase inhibitors
- Renin-angiotensin system inhibitors
- HIV protease inhibitors
- Ion transporter inhibitors
- Neurotransmitter transporter inhibitors
- Quinolines
- Eicosanoids
- Prostaglandins
- Circadian rhythm
- Circadian entrainment
- Axon guidance
- Osteoclast differentiation
- Inflammatory mediator regulation of TRP channels
- Dorso-ventral axis formation
- Olfactory transduction
- Taste transduction
- Phototransduction
- Phototransduction - fly
- Cyanoamino acid metabolism
- D-Glutamine and D-glutamate metabolism
- D-Arginine and D-ornithine metabolism
- D-Alanine metabolism
- beta-Alanine metabolism
- Taurine and hypotaurine metabolism
- Phosphonate and phosphinate metabolism
- Selenocompound metabolism
- Glutathione metabolism
- Pentose phosphate pathway
- Biosynthesis of unsaturated fatty acids
- Lipids
- Linoleic acid metabolism
- alpha-Linolenic acid metabolism
- Sphingolipid metabolism
- Arachidonic acid metabolism
- Biosynthesis of siderophore group nonribosomal peptides
- Biosynthesis of vancomycin group antibiotics
- Glycerophospholipid metabolism
- Type I polyketide structures
- Biosynthesis of 12-, 14- and 16-membered macrolides
- Biosynthesis of ansamycins
- Biosynthesis of type II polyketide backbone
- Biosynthesis of type II polyketide products
- Tetracycline biosynthesis
- Polyketide sugar unit biosynthesis
- Nonribosomal peptide structures
- Proteasome
- Sulfur relay system
- Chaperones and folding catalysts
- RNA degradation
- Protein processing in endoplasmic reticulum
- Protein export
- Ubiquitin mediated proteolysis
- ATC classification (WHO)
- SNARE interactions in vesicular transport
- Ubiquitin system
- SNAREs
- Vascular smooth muscle contraction
- Salivary secretion
- Cardiac muscle contraction
- Adrenergic signaling in cardiomyocytes
- Melanogenesis
- Renin-angiotensin system
- Thyroid hormone synthesis
- Thyroid hormone signaling pathway
- Gastric acid secretion
- Pancreatic secretion
- HIF-1 signaling pathway
- TNF signaling pathway
- NF-kappa B signaling pathway
- Jak-STAT signaling pathway
- VEGF signaling pathway
- Hippo signaling pathway - fly
- Hippo signaling pathway
- TGF-beta signaling pathway
- Calcium signaling pathway
- FoxO signaling pathway
- Steroid degradation
- Furfural degradation
- Atrazine degradation
- Styrene degradation
- DDT degradation
- Caprolactam degradation
- Dioxin degradation
- Bisphenol degradation
- Polycyclic aromatic hydrocarbon degradation
- Naphthalene degradation
- Monoterpenoid biosynthesis
- Tyrosine metabolism
- African trypanosomiasis
- HTLV-I infection
- Bacterial toxins
- Amoebiasis
- Taurine and hypotaurine metabolism
- Retinol metabolism
- Leishmaniasis
- Chagas disease (American trypanosomiasis)
- Malaria
- Toxoplasmosis
- Insulin signaling pathway
- Insulin secretion
- Chemokine signaling pathway
- Intestinal immune network for IgA production
- Leukocyte transendothelial migration
- Fc gamma R-mediated phagocytosis
- Fc epsilon RI signaling pathway
- KEGG DRUG
- B cell receptor signaling pathway
- T cell receptor signaling pathway
- Antigen processing and presentation
- Vibrio cholerae pathogenic cycle
- Epithelial cell signaling in Helicobacter pylori infection
- Pathogenic Escherichia coli infection
- Salmonella infection
- Shigellosis
- Pertussis
- Legionellosis
- Staphylococcus aureus infection
- Tuberculosis
- Bacterial invasion of epithelial cells
- Cytokine-cytokine receptor interaction
- Neuroactive ligand-receptor interaction
- PI3K-Akt signaling pathway
- cGMP-PKG signaling pathway
- mTOR signaling pathway
- AMPK signaling pathway
- Vibrio cholerae infection
- Epstein-Barr virus infection
- Measles
- HTLV-I infection
- Maturity onset diabetes of the young
- Non-alcoholic fatty liver disease (NAFLD)
- Herpes simplex infection
- Hepatitis C
- Hepatitis B
- Influenza A
- Nicotinate and nicotinamide metabolism
- Pantothenate and CoA biosynthesis
- Biotin metabolism
- Lipoic acid metabolism
- Phototransduction - fly
- Phototransduction
- Taste transduction
- Olfactory transduction
- Glutamatergic synapse
- Inflammatory mediator regulation of TRP channels
- Cholinergic synapse
- GABAergic synapse
- Serotonergic synapse
- Dopaminergic synapse
- Ascorbate and aldarate metabolism
- Starch and sucrose metabolism
- Pentose phosphate pathway
- Pentose and glucuronate interconversions
- Fructose and mannose metabolism
- Galactose metabolism
- KEGG modules
- KEGG reaction modules
- Glycolysis / Gluconeogenesis
- Citrate cycle (TCA cycle)
- Taste transduction
- Olfactory transduction
- Phototransduction - fly
- Phototransduction
- Osteoclast differentiation
- Axon guidance
- Dorso-ventral axis formation
- Inflammatory mediator regulation of TRP channels
- Global/overview
- 1. Metabolism
- 1,2-Diphenyl substitution family
- Benzoic acid family
- Benzodiazepine family
- Naphthalene family
- Quinolines
- HIV protease inhibitors
- Prostaglandins
- Eicosanoids
- 3. Environmental Information Processing
- 2. Genetic Information Processing
- 5. Organismal Systems
- 4. Cellular Processes
- Other secondary metabolite
- Terpenoid/PK
- Chemical structure
- Xenobiotics
- 7. Drug Development
- 6. Human Diseases
- KEGG DISEASE
- Cytoskeleton proteins
- Human diseases
- KEGG Cancer
- Infectious diseases
- KEGG Pathogen
- KEGG DRUG
- Bacterial toxins
- USP drug classification (USA)
- ATC classification (WHO)
- Chaperones and folding catalysts
- Biosynthesis of siderophore group nonribosomal peptides
- Nonribosomal peptide structures
- Polyketide sugar unit biosynthesis
- Tetracycline biosynthesis
- Biosynthesis of type II polyketide products
- Biosynthesis of type II polyketide backbone
- Biosynthesis of ansamycins
- Biosynthesis of 12-, 14- and 16-membered macrolides
- Prenyltransferases
- Biosynthesis of vancomycin group antibiotics
- Glucocorticoid and mineralocorticoid receptor agonists/antagonists
- Progesterone, androgen and estrogen receptor agonists/antagonists
- N-Metyl-D-aspartic acid receptor antagonists
- Ion channels
- Sodium channel blocking drugs
- Potassium channel blocking and opening drugs
- GABA-A receptor agonists/antagonists
- Calcium channel blocking drugs
- Retinoic acid receptor (RAR) and retinoid X receptor (RXR) agonists/antagonists
- Peroxisome proliferator-activated receptor (PPAR) agonists
- Vibrio cholerae infection
- Vibrio cholerae pathogenic cycle
- Epithelial cell signaling in Helicobacter pylori infection
- Pathogenic Escherichia coli infection
- Type I diabetes mellitus
- Type II diabetes mellitus
- Non-alcoholic fatty liver disease (NAFLD)
- Maturity onset diabetes of the young
- Salmonella infection
- Shigellosis
- Glycosyltransferases
- LPS biosynthesis proteins
- Lipopolysaccharide biosynthesis
- Peptidoglycan biosynthesis
- Glycosphingolipid biosynthesis - globo series
- Glycosphingolipid biosynthesis - ganglio series
- Composite structure map
- Monosaccharide codes
- Other glycan degradation
- KEGG GLYCAN
- Ubiquinone and other terpenoid-quinone biosynthesis
- Retinol metabolism
- Porphyrin and chlorophyll metabolism
- Folate biosynthesis
- One carbon pool by folate
- Biotin metabolism
- Lipoic acid metabolism
- Nicotinate and nicotinamide metabolism
- Pantothenate and CoA biosynthesis
- DRUG
- DISEASE
- GENOME
- KO
- LIGAND
- GENES
- KEGG2
- MODULE
- BRITE
- ECM-receptor interaction
- Cytokine-cytokine receptor interaction
- G protein-coupled receptors
- Cell adhesion molecules (CAMs)
- Cytokine receptors
- Enzyme-linked receptors
- Nuclear receptors
- Cytokines
- GTP-binding proteins
- Ion channels
- Rheumatoid arthritis
- Autoimmune thyroid disease
- Small cell lung cancer
- Non-small cell lung cancer
- Asthma
- Systemic lupus erythematosus
- Renal cell carcinoma
- Bladder cancer
- Prostate cancer
- Endometrial cancer
- Transcription machinery
- Transcription factors
- Spliceosome
- Basal transcription factors
- RNA polymerase
- Biosynthesis of plant hormones
- Biosynthesis of alkaloids derived from terpenoid and polyketide
- Biosynthesis of alkaloids derived from histidine and purine
- Biosynthesis of alkaloids derived from ornithine, lysine and nicotinic acid
- Biosynthesis of alkaloids derived from shikimate pathway
- Fatty acid metabolism
- Biosynthesis of plant secondary metabolites
- Biosynthesis of phenylpropanoids
- Naphthalene degradation
- Polycyclic aromatic hydrocarbon degradation
- Furfural degradation
- Steroid degradation
- Metabolism of xenobiotics by cytochrome P450
- Drug metabolism - cytochrome P450
- Drug metabolism - other enzymes
- Overview of biosynthetic pathways
- Compounds with biological roles
- Oxidative phosphorylation
- Photosynthesis
- Photosynthesis - antenna proteins
- Carbon fixation in photosynthetic organisms
- Carbon fixation pathways in prokaryotes
- Methane metabolism
- Nitrogen metabolism
- Sulfur metabolism
- Photosynthesis proteins
- Biosynthesis of plant hormones
- p53 signaling pathway
- Apoptosis
- Adherens junction
- Biosynthesis of alkaloids derived from terpenoid and polyketide
- Cell cycle - Caulobacter
- Cell cycle - yeast
- Oocyte meiosis
- Meiosis - yeast
- Prolactin signaling pathway
- Gap junction
- Tight junction
- Progesterone-mediated oocyte maturation
- GnRH signaling pathway
- Tuberculosis
- Biosynthesis of plant secondary metabolites
- Overview of biosynthetic pathways
- Biosynthesis of alkaloids derived from histidine and purine
- Biosynthesis of alkaloids derived from ornithine, lysine and nicotinic acid
- Biosynthesis of alkaloids derived from shikimate pathway
- Biosynthesis of terpenoids and steroids
- Infectious diseases
- Bacterial toxins
- Plant-pathogen interaction
- Circadian rhythm - plant
- Circadian rhythm - fly
- Circadian entrainment
- Circadian rhythm
- Inflammatory mediator regulation of TRP channels
- Taste transduction
- Olfactory transduction
- Axon guidance
- Dorso-ventral axis formation
- 6. Human Diseases
- Metabolic pathways
- 4. Cellular Processes
- 5. Organismal Systems
- Carbon metabolism
- 2-Oxocarboxylic acid metabolism
- Biosynthesis of secondary metabolites
- Microbial metabolism in diverse environments
- Leukocyte transendothelial migration
- Intestinal immune network for IgA production
- Fatty acid metabolism
- Biosynthesis of amino acids
- Progesterone, androgen and estrogen receptor agonists/antagonists
- Glucocorticoid and mineralocorticoid receptor agonists/antagonists
- G protein-coupled receptors
- Target-based classification
- Nicotinic cholinergic receptor antagonists
- Nuclear receptors
- Peroxisome proliferator-activated receptor (PPAR) agonists
- Retinoic acid receptor (RAR) and retinoid X receptor (RXR) agonists/antagonists
- Calcium channel blocking drugs
- GABA-A receptor agonists/antagonists
- KEGG Atlas
- KEGG Atlas
- KEGG Atlas
- KEGG Atlas
- KEGG Atlas
- 6. Human Diseases
- 5. Organismal Systems
- 4. Cellular Processes
- KEGG Atlas
- KEGG Atlas
- Biosynthesis of vancomycin group antibiotics
- Prenyltransferases
- Polyketide biosynthesis proteins
- Phenylpropanoid biosynthesis
- Tetracycline biosynthesis
- Polyketide sugar unit biosynthesis
- Nonribosomal peptide structures
- Biosynthesis of siderophore group nonribosomal peptides
- Stilbenoid, diarylheptanoid and gingerol biosynthesis
- Flavonoid biosynthesis
- alpha-Adrenergic receptor agonists/antagonists
- beta-Adrenergic receptor agonists/antagonists
- Retinoic acid receptor (RAR) and retinoid X receptor (RXR) agonists/antagonists
- Peroxisome proliferator-activated receptor (PPAR) agonists
- Nuclear receptors
- Cholinergic and anticholinergic drugs
- Antidyslipidemic agents
- Antiglaucoma agents
- Glucocorticoid and mineralocorticoid receptor agonists/antagonists
- Progesterone, androgen and estrogen receptor agonists/antagonists
- Epstein-Barr virus infection
- Amoebiasis
- Amyotrophic lateral sclerosis (ALS)
- Huntington's disease
- Infectious diseases
- Bacterial toxins
- HTLV-I infection
- Measles
- Influenza A
- Hepatitis B
- Hepatitis C
- Herpes simplex infection
- Measles
- Streptomycin biosynthesis
- Clavulanic acid biosynthesis
- Melanogenesis
- Thyroid hormone signaling pathway
- Thyroid hormone synthesis
- Oxytocin signaling pathway
- Prolactin signaling pathway
- Progesterone-mediated oocyte maturation
- Estrogen signaling pathway
- Ovarian steroidogenesis
- GnRH signaling pathway
- PPAR signaling pathway
- Sulfonamide derivatives - sulfa drugs
- Sulfonamide derivatives - diuretics
- Antineoplastics
- Sulfonamide derivatives - overview
- Antiulcer drugs
- Immunosuppressive agents
- Sulfonamide derivatives - hypoglycemic agents
- Antiarrhythmic drugs
- Osteoporosis drugs
- Antimigraines
- Antidepressants
- Antipsychotics - butyrophenones
- Anticonvulsants
- Anxiolytics
- Hypnotics
- Antineoplastics - protein kinases inhibitors
- Antipsychotics - phenothiazines
- Antipsychotics
- Opioid analgesics
- Local analgesics
- Glycosphingolipid biosynthesis - ganglio series
- Lipopolysaccharide biosynthesis
- Peptidoglycan biosynthesis
- Other glycan degradation
- Glycosaminoglycan degradation
- Glycosylphosphatidylinositol(GPI)-anchor biosynthesis
- Glycosphingolipid biosynthesis - lacto and neolacto series
- Glycosphingolipid biosynthesis - globo series
- KEGG GLYCAN
- Composite structure map
- Fatty acid elongation
- Fatty acid biosynthesis
- Synthesis and degradation of ketone bodies
- Fatty acid degradation
- Steroid biosynthesis
- Cutin, suberine and wax biosynthesis
- Glycosaminoglycan biosynthesis - CS/DS
- Other types of O-glycan biosynthesis
- Mucin type O-Glycan biosynthesis
- Various types of N-glycan biosynthesis
- N-Glycan biosynthesis
- Glutathione metabolism
- D-Alanine metabolism
- D-Arginine and D-ornithine metabolism
- D-Glutamine and D-glutamate metabolism
- Apoptosis
- Oocyte meiosis
- Cytoskeleton proteins
- Bacterial motility proteins
- Regulation of actin cytoskeleton
- Flagellar assembly
- Meiosis - yeast
- Cell cycle - Caulobacter
- Cell cycle - yeast
- Cell cycle
- Ion transporter inhibitors
- Ion channels
- GABA-A receptor agonists/antagonists
- Nicotinic cholinergic receptor antagonists
- Nuclear receptors
- Peroxisome proliferator-activated receptor (PPAR) agonists
- Circadian rhythm
- N-Metyl-D-aspartic acid receptor antagonists
- Potassium channel blocking and opening drugs
- Sodium channel blocking drugs
- Calcium channel blocking drugs
- Circadian rhythm - plant
- Plant-pathogen interaction
- Circadian entrainment
- Circadian rhythm - fly
- Choline metabolism in cancer
- Transcriptional misregulation in cancer
- Pathways in cancer
- Central carbon metabolism in cancer
- MicroRNAs in cancer
- Proteoglycans in cancer
- Proteasome
- Sulfur relay system
- Chaperones and folding catalysts
- RNA degradation
- Protein processing in endoplasmic reticulum
- Protein export
- Ubiquitin mediated proteolysis
- SNARE interactions in vesicular transport
- Ubiquitin system
- SNAREs
- Biosynthesis of unsaturated fatty acids
- Lipids
- Linoleic acid metabolism
- alpha-Linolenic acid metabolism
- Sphingolipid metabolism
- Arachidonic acid metabolism
- Glycerophospholipid metabolism
- Ether lipid metabolism
- Lipid biosynthesis proteins
- Purine metabolism
- Steroid degradation
- Metabolism of xenobiotics by cytochrome P450
- Drug metabolism - cytochrome P450
- Drug metabolism - other enzymes
- Eicosanoids
- Quinolines
- KEGG Atlas
- KEGG Atlas
- KEGG Atlas
- HMG-CoA reductase inhibitors
- KEGG Atlas
- Glioma
- Pancreatic cancer
- Cyclooxygenase inhibitors
- Circadian rhythm - plant
- Circadian rhythm - fly
- Colorectal cancer
- Plant-pathogen interaction
- Human diseases
- KEGG Cancer
- Circadian entrainment
- Renin-angiotensin system inhibitors
- CAMs
- Degradation of aromatic compounds
- PI3K-Akt signaling pathway
- AMPK signaling pathway
- Novobiocin biosynthesis
- Cardiac muscle contraction
- Adrenergic signaling in cardiomyocytes
- Melanogenesis
- Renin-angiotensin system
- Thyroid hormone synthesis
- Thyroid hormone signaling pathway
- Prolactin signaling pathway
- Oxytocin signaling pathway
- Phytochemical compounds
- Vascular smooth muscle contraction
- Salivary secretion
- mTOR signaling pathway
- Plant hormone signal transduction
- Penicillin and cephalosporin biosynthesis
- Measles
- Hepatitis C
- Antiglaucoma agents
- Antidyslipidemic agents
- Hepatitis B
- Antiulcer drugs
- Antiarrhythmic drugs
- Osteoporosis drugs
- Immunosuppressive agents
- Antithrombosis agents
- Antimigraines
- Antidiabetics
- Antirheumatics - DMARDs and biological agents
- Intestinal immune network for IgA production
- Leukocyte transendothelial migration
- Fc gamma R-mediated phagocytosis
- Fc epsilon RI signaling pathway
- B cell receptor signaling pathway
- T cell receptor signaling pathway
- Antigen processing and presentation
- Natural killer cell mediated cytotoxicity
- Bacterial invasion of epithelial cells
- Insulin secretion
- Chemokine signaling pathway
- Chromosome
- DNA repair and recombination proteins
- Fanconi anemia pathway
- DNA replication proteins
- Epstein-Barr virus infection
- Amoebiasis
- Influenza A
- Hepatitis B
- Hepatitis C
- Herpes simplex infection
- Infectious diseases
- Bacterial toxins
- HTLV-I infection
- Measles
- Pesticides
- Endocrine disrupting compounds
- Prenyltransferases
- Glycan binding proteins
- Phytochemical compounds
- Polyketide biosynthesis proteins
- LPS biosynthesis proteins
- Glycosyltransferases
- HS/Hep binding proteins
- Proteoglycans
- Transcription factors
- Transcription machinery
- Ribosome biogenesis in eukaryotes
- Ribosome
- Ribosome biogenesis
- Transfer RNA biogenesis
- Translation factors
- RNA polymerase
- Basal transcription factors
- Spliceosome
- Serotonin receptor agonists/antagonists
- Eicosanoid receptor agonists/antagonists
- Histamine H1 receptor antagonists
- Histamine H2/H3 receptor agonists/antagonists
- Target-based classification
- G protein-coupled receptors
- Opioid receptor agonists/antagonists
- Angiotensin receptor and endothelin receptor antagonists
- Sulfonamide derivatives - overview
- Sulfonamide derivatives - sulfa drugs
- Vibrio cholerae infection
- Vibrio cholerae pathogenic cycle
- Non-alcoholic fatty liver disease (NAFLD)
- Maturity onset diabetes of the young
- Type I diabetes mellitus
- Type II diabetes mellitus
- Dilated cardiomyopathy (DCM)
- Viral myocarditis
- Hypertrophic cardiomyopathy (HCM)
- Arrhythmogenic right ventricular cardiomyopathy (ARVC)
- Chagas disease (American trypanosomiasis)
- Leishmaniasis
- beta-Lactam resistance
- African trypanosomiasis
- Penicillins
- Vancomycin resistance
- Cephalosporins - oral agents
- Cephalosporins - parenteral agents
- Tetracyclines
- KEGG DRUG
- Aminoglycosides
- D-Glutamine and D-glutamate metabolism
- D-Arginine and D-ornithine metabolism
- beta-Alanine metabolism
- Phenylalanine, tyrosine and tryptophan biosynthesis
- Amino acid related enzymes
- Selenocompound metabolism
- Cyanoamino acid metabolism
- Taurine and hypotaurine metabolism
- Phosphonate and phosphinate metabolism
- Tyrosine metabolism
- Histidine metabolism
- Glycine, serine and threonine metabolism
- Alanine, aspartate and glutamate metabolism
- Valine, leucine and isoleucine degradation
- Cysteine and methionine metabolism
- Lysine biosynthesis
- Valine, leucine and isoleucine biosynthesis
- Arginine and proline metabolism
- Lysine degradation
- Antigen processing and presentation
- Natural killer cell mediated cytotoxicity
- B cell receptor signaling pathway
- T cell receptor signaling pathway
- NOD-like receptor signaling pathway
- Toll-like receptor signaling pathway
- Cytosolic DNA-sensing pathway
- RIG-I-like receptor signaling pathway
- Fc gamma R-mediated phagocytosis
- Fc epsilon RI signaling pathway
- Antirheumatics - DMARDs and biological agents
- Antithrombosis agents
- One carbon pool by folate
- Folate biosynthesis
- Cholinergic and anticholinergic drugs
- Antiglaucoma agents
- beta-Adrenergic receptor agonists/antagonists
- alpha-Adrenergic receptor agonists/antagonists
- Histamine H1 receptor antagonists
- Dopamine receptor agonists/antagonists
- Glycosaminoglycan biosynthesis - CS/DS
- Other types of O-glycan biosynthesis
- Glycosaminoglycan degradation
- Glycosaminoglycan biosynthesis - KS
- Butirosin and neomycin biosynthesis
- Streptomycin biosynthesis
- Clavulanic acid biosynthesis
- Carbapenem biosynthesis
- Penicillin and cephalosporin biosynthesis
- Benzoxazinoid biosynthesis
- Glucosinolate biosynthesis
- Betalain biosynthesis
- Novobiocin biosynthesis
- Puromycin biosynthesis
- Alanine, aspartate and glutamate metabolism
- Glycine, serine and threonine metabolism
- Cysteine and methionine metabolism
- Epstein-Barr virus infection
- Lysine degradation
- Vancomycin resistance
- beta-Lactam resistance
- Influenza A
- Measles
- Hepatitis C
- Hepatitis B
- Oocyte meiosis
- Apoptosis
- Selenocompound metabolism
- Cyanoamino acid metabolism
- Amino acid related enzymes
- beta-Alanine metabolism
- Bacterial motility proteins
- Cytoskeleton proteins
- Cell cycle
- Cell cycle - yeast
- Tryptophan metabolism
- Phenylalanine, tyrosine and tryptophan biosynthesis
- Renal cell carcinoma
- Mineral absorption
- Leishmaniasis
- Toxoplasmosis
- Hepatitis C
- Hepatitis B
- Influenza A
- Measles
- Malaria
- Amoebiasis
- Epstein-Barr virus infection
- Herpes simplex infection
- Porphyrin and chlorophyll metabolism
- Retinol metabolism
- Antidyslipidemic agents
- Antidiabetics
- Mucin type O-Glycan biosynthesis
- Various types of N-glycan biosynthesis
- N-Glycan biosynthesis
- Ubiquinone and other terpenoid-quinone biosynthesis
- Choline metabolism in cancer
- Central carbon metabolism in cancer
- Potassium channel blocking and opening drugs
- N-Metyl-D-aspartic acid receptor antagonists
- Carbohydrate
- Chemical carcinogenesis
- Proteoglycans in cancer
- MicroRNAs in cancer
- Transcriptional misregulation in cancer
- Peroxisome proliferator-activated receptor (PPAR) agonists
- Nuclear receptors
- Progesterone, androgen and estrogen receptor agonists/antagonists
- Retinoic acid receptor (RAR) and retinoid X receptor (RXR) agonists/antagonists
- Calcium channel blocking drugs
- Sodium channel blocking drugs
- Nicotinic cholinergic receptor antagonists
- GABA-A receptor agonists/antagonists
- Transcriptional misregulation in cancer
- Circadian rhythm - plant
- CAMs
- CAM ligands
- Cytokines
- Nuclear receptors
- Ion channels
- GTP-binding proteins
- Cell adhesion molecules (CAMs)
- G protein-coupled receptors
- Enzyme-linked receptors
- Cytokine receptors
- Opioid analgesics
- Local analgesics
- Anticonvulsants
- Anxiolytics
- Hypnotics
- Antineoplastics
- Antineoplastics - protein kinases inhibitors
- Antineoplastics - hormones
- Antineoplastics - agents from natural products
- Antineoplastics - antimetabolic agents
- Glycosphingolipid biosynthesis - globo series
- Glycosphingolipid biosynthesis - ganglio series
- Lipopolysaccharide biosynthesis
- Peptidoglycan biosynthesis
- Other glycan degradation
- KEGG GLYCAN
- Composite structure map
- Monosaccharide codes
- Glycosyltransferases
- LPS biosynthesis proteins
- Biosynthesis of plant secondary metabolites
- Biosynthesis of phenylpropanoids
- Spliceosome
- Overview of biosynthetic pathways
- Transcription factors
- Transcription machinery
- Pesticides
- Cytochrome P450
- Spliceosome
- Endocrine disrupting compounds
- Antipsychotics
- Antipsychotics - phenothiazines
- Antipsychotics - butyrophenones
- Antidepressants
- Anxiolytics
- Anticonvulsants
- Local analgesics
- Opioid analgesics
- Agents for Alzheimer-type dementia
- Antiparkinsonian agents
- Leishmaniasis
- Chagas disease (American trypanosomiasis)
- RNA transport
- Neurotransmitter transporter inhibitors
- Ion transporter inhibitors
- N-Metyl-D-aspartic acid receptor antagonists
- Potassium channel blocking and opening drugs
- Sodium channel blocking drugs
- Calcium channel blocking drugs
- GABA-A receptor agonists/antagonists
- Nicotinic cholinergic receptor antagonists
- Cyclooxygenase inhibitors
- Catecholamine transferase inhibitors
- Streptomycin biosynthesis
- Butirosin and neomycin biosynthesis
- Benzoxazinoid biosynthesis
- Penicillin and cephalosporin biosynthesis
- Carbapenem biosynthesis
- Clavulanic acid biosynthesis
- Acridone alkaloid biosynthesis
- Caffeine metabolism
- Betalain biosynthesis
- Glucosinolate biosynthesis
- Gap junction
- Signaling pathways regulating pluripotency of stem cells
- Ubiquinone and other terpenoid-quinone biosynthesis
- Brassinosteroid biosynthesis
- Carotenoid biosynthesis
- Diterpenoid biosynthesis
- Sesquiterpenoid and triterpenoid biosynthesis
- Fc epsilon RI signaling pathway
- Fc gamma R-mediated phagocytosis
- Leukocyte transendothelial migration
- Intestinal immune network for IgA production
- Chemokine signaling pathway
- Focal adhesion
- Adherens junction
- Tight junction
- Adrenergic signaling in cardiomyocytes
- Cardiac muscle contraction
- Renin-angiotensin system
- Melanogenesis
- Thyroid hormone signaling pathway
- Thyroid hormone synthesis
- Oxytocin signaling pathway
- Prolactin signaling pathway
- Progesterone-mediated oocyte maturation
- Estrogen signaling pathway
- Monoterpenoid biosynthesis
- Terpenoid backbone biosynthesis
- Composite structure map
- KEGG GLYCAN
- Glycosyltransferases
- Monosaccharide codes
- Proteoglycans
- LPS biosynthesis proteins
- Glycan binding proteins
- HS/Hep binding proteins
- Antipsychotics - butyrophenones
- Antipsychotics - phenothiazines
- Antipsychotics
- Opioid analgesics
- Local analgesics
- Anticonvulsants
- Anxiolytics
- Hypnotics
- Agents for Alzheimer-type dementia
- Antidepressants
- Ethylbenzene degradation
- Nitrotoluene degradation
- Atrazine degradation
- Styrene degradation
- DDT degradation
- Caprolactam degradation
- Dioxin degradation
- Bisphenol degradation
- Polycyclic aromatic hydrocarbon degradation
- Naphthalene degradation
- Plant hormone signal transduction
- N-Metyl-D-aspartic acid receptor antagonists
- Ion transporter inhibitors
- Progesterone, androgen and estrogen receptor agonists/antagonists
- Retinoic acid receptor (RAR) and retinoid X receptor (RXR) agonists/antagonists
- Peroxisome proliferator-activated receptor (PPAR) agonists
- Nicotinic cholinergic receptor antagonists
- GABA-A receptor agonists/antagonists
- Calcium channel blocking drugs
- Sodium channel blocking drugs
- Potassium channel blocking and opening drugs
- Glycosylphosphatidylinositol(GPI)-anchor biosynthesis
- Glycosphingolipid biosynthesis - lacto and neolacto series
- Glycosaminoglycan biosynthesis - KS
- Glycosaminoglycan degradation
- Lipopolysaccharide biosynthesis
- Peptidoglycan biosynthesis
- Nuclear receptors
- Glycosphingolipid biosynthesis - ganglio series
- Cytokine receptors
- Cytokines
- G protein-coupled receptors
- Enzyme-linked receptors
- ECM-receptor interaction
- Cell adhesion molecules (CAMs)
- Neuroactive ligand-receptor interaction
- Cytokine-cytokine receptor interaction
- beta-Alanine metabolism
- Nicotinate and nicotinamide metabolism
- Aminobenzoate degradation
- Fluorobenzoate degradation
- Thyroid hormone synthesis
- Benzoate degradation
- GnRH signaling pathway
- Aflatoxin biosynthesis
- Adipocytokine signaling pathway
- Glucagon signaling pathway
- Prolactin signaling pathway
- Progesterone-mediated oocyte maturation
- Estrogen signaling pathway
- Phytochemical compounds
- Flagellar assembly
- Puromycin biosynthesis
- Regulation of actin cytoskeleton
- Novobiocin biosynthesis
- Taurine and hypotaurine metabolism
- Phosphonate and phosphinate metabolism
- Tyrosine metabolism
- Phenylalanine metabolism
- Systemic lupus erythematosus
- Asthma
- Human diseases
- KEGG Cancer
- Allograft rejection
- Inflammatory bowel disease (IBD)
- Autoimmune thyroid disease
- Rheumatoid arthritis
- Primary immunodeficiency
- Graft-versus-host disease
- Cell cycle
- Cell cycle - yeast
- Bacterial motility proteins
- Cytoskeleton proteins
- Oocyte meiosis
- Apoptosis
- Cell cycle - Caulobacter
- Meiosis - yeast
- p53 signaling pathway
- Focal adhesion
- cAMP signaling pathway
- Sphingolipid signaling pathway
- Phosphatidylinositol signaling system
- Calcium signaling pathway
- mTOR signaling pathway
- AMPK signaling pathway
- Penicillins
- cGMP-PKG signaling pathway
- Neuroactive ligand-receptor interaction
- Plant hormone signal transduction
- Quinolones
- Macrolides and ketolides
- RNA polymerase
- Basal transcription factors
- Drug metabolism - cytochrome P450
- Drug metabolism - other enzymes
- Steroid degradation
- Metabolism of xenobiotics by cytochrome P450
- Polycyclic aromatic hydrocarbon degradation
- Furfural degradation
- Dioxin degradation
- Naphthalene degradation
- Monoterpenoid biosynthesis
- Sesquiterpenoid and triterpenoid biosynthesis
- Ubiquinone and other terpenoid-quinone biosynthesis
- Terpenoid backbone biosynthesis
- Retinol metabolism
- Porphyrin and chlorophyll metabolism
- Folate biosynthesis
- One carbon pool by folate
- Macrolides and ketolides
- Diterpenoid biosynthesis
- Carotenoid biosynthesis
- Ubiquitin mediated proteolysis
- Sulfur relay system
- Proteasome
- RNA degradation
- DNA repair and recombination proteins
- Protein export
- Protein processing in endoplasmic reticulum
- SNARE interactions in vesicular transport
- Chaperones and folding catalysts
- SNAREs
- KEGG DRUG
- ATC classification (WHO)
- Macrolides and ketolides
- Quinolones
- Aminoglycosides
- Tetracyclines
- Antiviral agents
- Anti-HIV agents
- Rifamycins
- Antifungal agents
- Photosynthesis
- Proteasome
- Sulfur relay system
- Ubiquitin mediated proteolysis
- SNARE interactions in vesicular transport
- Protein processing in endoplasmic reticulum
- Protein export
- Translation factors
- Transfer RNA biogenesis
- Ribosome biogenesis
- Ribosome
- Butanoate metabolism
- Propanoate metabolism
- Isoflavonoid biosynthesis
- Anthocyanin biosynthesis
- Flavone and flavonol biosynthesis
- Proteoglycans in cancer
- Other amino
- Amino acid
- Nucleotide
- Endocrine disrupting compounds
- Energy
- Carbohydrate
- Global/overview
- 1. Metabolism
- Tropane, piperidine and pyridine alkaloid biosynthesis
- Cofactor/vitamin
- Glycan
- Indole diterpene alkaloid biosynthesis
- Overview of biosynthetic pathways
- Chemical carcinogenesis
- Acridone alkaloid biosynthesis
- Tropane, piperidine and pyridine alkaloid biosynthesis
- Dopamine receptor agonists/antagonists
- beta-Adrenergic receptor agonists/antagonists
- Anthocyanin biosynthesis
- Flavone and flavonol biosynthesis
- Flavonoid biosynthesis
- Cholinergic and anticholinergic drugs
- Antithrombosis agents
- Indole diterpene alkaloid biosynthesis
- Antidiabetics
- Antirheumatics - DMARDs and biological agents
- Long-term depression
- Thiamine metabolism
- p53 signaling pathway
- Hematopoietic cell lineage
- Proteoglycans
- LPS biosynthesis proteins
- Glycan binding proteins
- HS/Hep binding proteins
- Composite structure map
- KEGG GLYCAN
- Chemical structure
- Xenobiotics
- KEGG DISEASE
- Anti-HIV agents
- Polyketide biosynthesis proteins
- Prenyltransferases
- Biosynthesis of vancomycin group antibiotics
- Biosynthesis of siderophore group nonribosomal peptides
- Antiviral agents
- Polyketide sugar unit biosynthesis
- Tetracycline biosynthesis
- Biosynthesis of type II polyketide products
- Biosynthesis of type II polyketide backbone
- Biosynthesis of ansamycins
- Biosynthesis of alkaloids derived from shikimate pathway
- Biosynthesis of terpenoids and steroids
- Biosynthesis of phenylpropanoids
- Biosynthesis of plant secondary metabolites
- Biosynthesis of plant hormones
- Biosynthesis of alkaloids derived from terpenoid and polyketide
- Biosynthesis of alkaloids derived from histidine and purine
- Biosynthesis of alkaloids derived from ornithine, lysine and nicotinic acid
- Glycosaminoglycan biosynthesis - HS/Hep
- Glycosaminoglycan biosynthesis - KS
- Glycosaminoglycan degradation
- Glycosylphosphatidylinositol(GPI)-anchor biosynthesis
- Glycosphingolipid biosynthesis - lacto and neolacto series
- Glycosphingolipid biosynthesis - globo series
- Antiglaucoma agents
- Cholinergic and anticholinergic drugs
- Antidiabetics
- Antidyslipidemic agents
- Antithrombosis agents
- Antirheumatics - DMARDs and biological agents
- Osteoporosis drugs
- Antimigraines
- Antiulcer drugs
- Immunosuppressive agents
- VEGF signaling pathway
- Jak-STAT signaling pathway
- NF-kappa B signaling pathway
- TNF signaling pathway
- Hedgehog signaling pathway
- TGF-beta signaling pathway
- Hippo signaling pathway
- Hippo signaling pathway - fly
- HIF-1 signaling pathway
- FoxO signaling pathway
- Toluene degradation
- Chlorocyclohexane and chlorobenzene degradation
- Chloroalkane and chloroalkene degradation
- Fluorobenzoate degradation
- Styrene degradation
- Tuberculosis
- Ethylbenzene degradation
- Nitrotoluene degradation
- Xylene degradation
- Staphylococcus aureus infection
- Signaling pathways regulating pluripotency of stem cells
- Gap junction
- Complement and coagulation cascades
- Hematopoietic cell lineage
- Toll-like receptor signaling pathway
- Platelet activation
- RIG-I-like receptor signaling pathway
- NOD-like receptor signaling pathway
- Natural killer cell mediated cytotoxicity
- Cytosolic DNA-sensing pathway
- HTLV-I infection
- Asthma
- Prion diseases
- Endometrial cancer
- Prostate cancer
- Non-small cell lung cancer
- Small cell lung cancer
- Parkinson's disease
- Alzheimer's disease
- Huntington's disease
- Amyotrophic lateral sclerosis (ALS)
- Pathways in cancer
- Non-small cell lung cancer
- KEGG DISEASE
- Viral carcinogenesis
- Herpes simplex infection
- HIF-1 signaling pathway
- TNF signaling pathway
- Calcium signaling pathway
- FoxO signaling pathway
- DDT degradation
- Hippo signaling pathway - fly
- NF-kappa B signaling pathway
- Jak-STAT signaling pathway
- Glycine, serine and threonine metabolism
- Alanine, aspartate and glutamate metabolism
- Lipid biosynthesis proteins
- Lipids
- Biosynthesis of unsaturated fatty acids
- alpha-Linolenic acid metabolism
- Pyrimidine metabolism
- Purine metabolism
- Endocytosis
- Purine metabolism
- Cellular antigens
- Acute myeloid leukemia
- Chronic myeloid leukemia
- Basal cell carcinoma
- CAM ligands
- Colorectal cancer
- Pancreatic cancer
- Glioma
- Thyroid cancer
- Tryptophan metabolism
- Renal cell carcinoma
- Bladder cancer
- GTP-binding proteins
- Tyrosine metabolism
- Histidine metabolism
- Adherens junction
- Focal adhesion
- Taurine and hypotaurine metabolism
- Cell cycle
- Regulation of actin cytoskeleton
- Cell cycle - Caulobacter
- beta-Alanine metabolism
- Oocyte meiosis
- Meiosis - yeast
- p53 signaling pathway
- Apoptosis
- Glycine, serine and threonine metabolism
- Cysteine and methionine metabolism
- Lipid biosynthesis proteins
- Purine metabolism
- Pyrimidine metabolism
- Alanine, aspartate and glutamate metabolism
- Linoleic acid metabolism
- alpha-Linolenic acid metabolism
- Biosynthesis of unsaturated fatty acids
- Lipids
- Steroid biosynthesis
- Primary bile acid biosynthesis
- Ribosome biogenesis
- Transfer RNA biogenesis
- Photosynthesis proteins
- Purine metabolism
- Ubiquitin system
- Proteasome
- Ribosome biogenesis in eukaryotes
- Ribosome
- RNA transport
- mRNA surveillance pathway
- Amino acid
- Nucleotide
- Lipid
- Energy
- Carbohydrate
- Global/overview
- 1. Metabolism
- pathway maps
- Update history
- New pathway maps
- Steroid hormone biosynthesis
- Nucleotide
- Secondary bile acid biosynthesis
- Glycerophospholipid metabolism
- Glycerolipid metabolism
- Cutin, suberine and wax biosynthesis
- Synthesis and degradation of ketone bodies
- Primary bile acid biosynthesis
- Steroid biosynthesis
- Sphingolipid metabolism
- Ether lipid metabolism
- Sesquiterpenoid and triterpenoid biosynthesis
- Monoterpenoid biosynthesis
- Carotenoid biosynthesis
- Diterpenoid biosynthesis
- Insect hormone biosynthesis
- Brassinosteroid biosynthesis
- Limonene and pinene degradation
- Zeatin biosynthesis
- Type I polyketide structures
- Geraniol degradation
- Hematopoietic cell lineage
- Benzodiazepine family
- Biosynthesis of secondary metabolites
- Microbial metabolism in diverse environments
- Global/overview
- 1. Metabolism
- Glucagon signaling pathway
- Adipocytokine signaling pathway
- Chemokine signaling pathway
- Cardiac muscle contraction
- Adrenergic signaling in cardiomyocytes
- Vascular smooth muscle contraction
- Benzoic acid family
- Prostaglandins
- Naphthalene family
- 1,2-Diphenyl substitution family
- New pathway maps
- GnRH signaling pathway
- pathway maps
- Update history
- Tropane, piperidine and pyridine alkaloid biosynthesis
- Flavone and flavonol biosynthesis
- Flavonoid biosynthesis
- Isoflavonoid biosynthesis
- Anthocyanin biosynthesis
- Ubiquinone and other terpenoid-quinone biosynthesis
- Porphyrin and chlorophyll metabolism
- Stilbenoid, diarylheptanoid and gingerol biosynthesis
- Phenylpropanoid biosynthesis
- Indole diterpene alkaloid biosynthesis
- Indole alkaloid biosynthesis
- Protein export
- Translation factors
- SNARE interactions in vesicular transport
- Protein processing in endoplasmic reticulum
- Ribosome
- Ribosome biogenesis in eukaryotes
- Transfer RNA biogenesis
- Ribosome biogenesis
- Sulfur relay system
- Ubiquitin mediated proteolysis
- Hypnotics
- Anxiolytics
- Anticonvulsants
- Local analgesics
- Antineoplastics - antimetabolic agents
- Antineoplastics - agents from natural products
- Antineoplastics - hormones
- Antineoplastics - protein kinases inhibitors
- Opioid analgesics
- Glycosphingolipid biosynthesis - lacto and neolacto series
- Insect hormone biosynthesis
- Zeatin biosynthesis
- Glycosylphosphatidylinositol(GPI)-anchor biosynthesis
- Other types of O-glycan biosynthesis
- Mucin type O-Glycan biosynthesis
- Biosynthesis of type II polyketide backbone
- Biosynthesis of type II polyketide products
- Regulation of actin cytoskeleton
- Flagellar assembly
- Bacterial chemotaxis
- Regulation of autophagy
- Peroxisome
- Lysosome
- Phagosome
- Endocytosis
- Cytoskeleton proteins
- Bacterial motility proteins
- Transporters
- Solute carrier family
- DNA replication proteins
- Chromosome
- Non-homologous end-joining
- Fanconi anemia pathway
- Phosphotransferase system (PTS)
- Bacterial secretion system
- DNA repair and recombination proteins
- ABC transporters
- Dilated cardiomyopathy (DCM)
- Arrhythmogenic right ventricular cardiomyopathy (ARVC)
- Hypertrophic cardiomyopathy (HCM)
- Prion diseases
- Huntington's disease
- Amyotrophic lateral sclerosis (ALS)
- Parkinson's disease
- Alzheimer's disease
- Alcoholism
- Nicotine addiction
- Sulfonamide derivatives - hypoglycemic agents
- Antiarrhythmic drugs
- Glycosphingolipid biosynthesis - lacto and neolacto series
- Glycosphingolipid biosynthesis - globo series
- Glycosaminoglycan degradation
- Glycosylphosphatidylinositol(GPI)-anchor biosynthesis
- Glycosaminoglycan biosynthesis - HS/Hep
- Glycosaminoglycan biosynthesis - KS
- Antineoplastics
- Target-based classification
- KEGG Pathogen
- Infectious diseases
- Bacterial toxins
- KEGG DRUG
- ATC classification (WHO)
- USP drug classification (USA)
- Therapeutic category of drugs (Japan)
- Antiinfectives
- Other glycan degradation
- DNA repair and recombination proteins
- DNA replication proteins
- Chromosome
- Bacterial secretion system
- Transporters
- ABC transporters
- Phosphotransferase system (PTS)
- Solute carrier family
- Secretion system
- KEGG Atlas
- Type II diabetes mellitus
- Degradation of aromatic compounds
- Amphetamine addiction
- Morphine addiction
- Prion diseases
- Cocaine addiction
- Amyotrophic lateral sclerosis (ALS)
- Huntington's disease
- Alzheimer's disease
- Parkinson's disease
- Graft-versus-host disease
- Primary immunodeficiency
- Pyruvate metabolism
- Proteasome
- Sulfur relay system
- Ubiquitin mediated proteolysis
- SNARE interactions in vesicular transport
- Protein processing in endoplasmic reticulum
- Protein export
- Ribosome biogenesis in eukaryotes
- mRNA surveillance pathway
- RNA transport
- Aminoacyl-tRNA biosynthesis
- Taurine and hypotaurine metabolism
- Phosphonate and phosphinate metabolism
- Amino acid related enzymes
- beta-Alanine metabolism
- D-Glutamine and D-glutamate metabolism
- D-Arginine and D-ornithine metabolism
- Selenocompound metabolism
- Cyanoamino acid metabolism
- D-Alanine metabolism
- Glutathione metabolism
- Glyoxylate and dicarboxylate metabolism
- Lysine degradation
- Arginine and proline metabolism
- Valine, leucine and isoleucine biosynthesis
- Lysine biosynthesis
- Cysteine and methionine metabolism
- Valine, leucine and isoleucine degradation
- Alanine, aspartate and glutamate metabolism
- Glycine, serine and threonine metabolism
- Lipids
- Lipid biosynthesis proteins
- Ethylbenzene degradation
- Chloroalkane and chloroalkene degradation
- Phytochemical compounds
- beta-Adrenergic receptor agonists/antagonists
- Dopamine receptor agonists/antagonists
- Cholinergic and anticholinergic drugs
- alpha-Adrenergic receptor agonists/antagonists
- Antidyslipidemic agents
- Antiglaucoma agents
- Antirheumatics - DMARDs and biological agents
- Antidiabetics
- Histamine H1 receptor antagonists
- Histamine H2/H3 receptor agonists/antagonists
- Biotin metabolism
- Two-component system
- 1,2-Diphenyl substitution family
- alpha-Adrenergic receptor agonists/antagonists
- Cholinergic and anticholinergic drugs
- Antiglaucoma agents
- Antidyslipidemic agents
- Histamine H2/H3 receptor agonists/antagonists
- Histamine H1 receptor antagonists
- Dopamine receptor agonists/antagonists
- beta-Adrenergic receptor agonists/antagonists
- Eicosanoid receptor agonists/antagonists
- Serotonin receptor agonists/antagonists
- Vitamin B6 metabolism
- Cofactor/vitamin
- Glycan
- Global/overview
- 1. Metabolism
- Energy
- Biosynthesis of terpenoids and steroids
- Riboflavin metabolism
- Biosynthesis of plant secondary metabolites
- Overview of biosynthetic pathways
- Drug metabolism - other enzymes
- Drug metabolism - cytochrome P450
- Metabolism of xenobiotics by cytochrome P450
- Steroid degradation
- Biosynthesis of alkaloids derived from ornithine, lysine and nicotinic acid
- Biosynthesis of alkaloids derived from shikimate pathway
- Thiamine metabolism
- Pancreatic secretion
- Bile secretion
- Tropane, piperidine and pyridine alkaloid biosynthesis
- Acridone alkaloid biosynthesis
- Indole diterpene alkaloid biosynthesis
- Isoquinoline alkaloid biosynthesis
- Glucosinolate biosynthesis
- Benzoxazinoid biosynthesis
- Caffeine metabolism
- Betalain biosynthesis
- Penicillin and cephalosporin biosynthesis
- Carbapenem biosynthesis
- Sphingolipid metabolism
- Arachidonic acid metabolism
- Linoleic acid metabolism
- alpha-Linolenic acid metabolism
- Steroid hormone biosynthesis
- Glycerolipid metabolism
- Glycerophospholipid metabolism
- Ether lipid metabolism
- Glycan binding proteins
- Biosynthesis of unsaturated fatty acids
- Lipids
- Proximal tubule bicarbonate reclamation
- Collecting duct acid secretion
- Pesticides
- Cytochrome P450
- Toll-like receptor signaling pathway
- NOD-like receptor signaling pathway
- Enzymes
- Inositol phosphate metabolism
- C5-Branched dibasic acid metabolism
- Butanoate metabolism
- Naphthalene degradation
- Polycyclic aromatic hydrocarbon degradation
- Furfural degradation
- Steroid degradation
- Metabolism of xenobiotics by cytochrome P450
- Drug metabolism - cytochrome P450
- Drug metabolism - other enzymes
- Endocrine disrupting compounds
- Prenyltransferases
- Bacterial secretion system
- Phosphotransferase system (PTS)
- ABC transporters
- DNA repair and recombination proteins
- Chromosome
- DNA replication proteins
- Fanconi anemia pathway
- Non-homologous end-joining
- Homologous recombination
- Penicillins
- Cephalosporins - parenteral agents
- Indole alkaloid biosynthesis
- Indole diterpene alkaloid biosynthesis
- Toxoplasmosis
- Leishmaniasis
- Amoebiasis
- Malaria
- beta-Lactam resistance
- Vancomycin resistance
- Chagas disease (American trypanosomiasis)
- African trypanosomiasis
- Circadian rhythm - plant
- Ethylbenzene degradation
- Starch and sucrose metabolism
- Dioxin degradation
- Dorso-ventral axis formation
- Inflammatory mediator regulation of TRP channels
- Cell adhesion molecules (CAMs)
- ECM-receptor interaction
- Bisphenol degradation
- Neurotrophin signaling pathway
- Synaptic vesicle cycle
- Retrograde endocannabinoid signaling
- Long-term depression
- Taste transduction
- Olfactory transduction
- Phototransduction - fly
- Phototransduction
- Lysine degradation
- Lysine biosynthesis
- Valine, leucine and isoleucine biosynthesis
- Vibrio cholerae pathogenic cycle
- Vibrio cholerae infection
- Pathogenic Escherichia coli infection
- Epithelial cell signaling in Helicobacter pylori infection
- Arrhythmogenic right ventricular cardiomyopathy (ARVC)
- Hypertrophic cardiomyopathy (HCM)
- Viral myocarditis
- Dilated cardiomyopathy (DCM)
- Cysteine and methionine metabolism
- Circadian entrainment
- Circadian rhythm
- Shigellosis
- Salmonella infection
- Lysosome
- Alanine, aspartate and glutamate metabolism
- Endocytosis
- Malaria
- Toxoplasmosis
- Epstein-Barr virus infection
- Amoebiasis
- Hepatitis C
- Herpes simplex infection
- Nitrogen metabolism
- Influenza A
- Glutamatergic synapse
- Hepatitis B
- GABAergic synapse
- Cholinergic synapse
- Fatty acid degradation
- Synthesis and degradation of ketone bodies
- Long-term potentiation
- Cytokines
- Nuclear receptors
- Enzyme-linked receptors
- Cytokine receptors
- Two-component system
- G protein-coupled receptors
- Solute carrier family
- Secretion system
- DNA repair and recombination proteins
- Transporters
- RNA degradation
- Chaperones and folding catalysts
- SNARE interactions in vesicular transport
- Ubiquitin mediated proteolysis
- Sulfur relay system
- Proteasome
- Transfer RNA biogenesis
- Translation factors
- Protein export
- Protein processing in endoplasmic reticulum
- Dopaminergic synapse
- Serotonergic synapse
- Vasopressin-regulated water reabsorption
- Aldosterone-regulated sodium reabsorption
- Endocrine and other factor-regulated calcium reabsorption
- Proximal tubule bicarbonate reclamation
- Collecting duct acid secretion
- Glutamatergic synapse
- GABAergic synapse
- Cholinergic synapse
- DDT degradation
- Bisphenol degradation
- Dioxin degradation
- Naphthalene degradation
- Polycyclic aromatic hydrocarbon degradation
- Furfural degradation
- TGF-beta signaling pathway
- Hippo signaling pathway
- Notch signaling pathway
- Hedgehog signaling pathway
- ErbB signaling pathway
- Wnt signaling pathway
- MAPK signaling pathway - fly
- MAPK signaling pathway - yeast
- Rap1 signaling pathway
- MAPK signaling pathway
- MAPK signaling pathway - fly
- MAPK signaling pathway
- ErbB signaling pathway
- MAPK signaling pathway - yeast
- Two-component system
- Bacterial secretion system
- Rap1 signaling pathway
- Ras signaling pathway
- Notch signaling pathway
- Wnt signaling pathway
- D-Arginine and D-ornithine metabolism
- D-Alanine metabolism
- Glutathione metabolism
- Alanine, aspartate and glutamate metabolism
- Homologous recombination
- Non-homologous end-joining
- Cyanoamino acid metabolism
- D-Glutamine and D-glutamate metabolism
- Glycine, serine and threonine metabolism
- Cysteine and methionine metabolism
- Two-component system
- Ras signaling pathway
- Histidine metabolism
- Arginine and proline metabolism
- Phenylalanine metabolism
- Tyrosine metabolism
- Phenylalanine, tyrosine and tryptophan biosynthesis
- Tryptophan metabolism
- Taurine and hypotaurine metabolism
- beta-Alanine metabolism
- Selenocompound metabolism
- Phosphonate and phosphinate metabolism
- Cyclooxygenase inhibitors
- Catecholamine transferase inhibitors
- Calcium channel blocking drugs
- GABA-A receptor agonists/antagonists
- Potassium channel blocking and opening drugs
- Carbohydrate
- Sodium channel blocking drugs
- Ion channels
- N-Metyl-D-aspartic acid receptor antagonists
- Neurotransmitter transporter inhibitors
- Ion transporter inhibitors
- Glycosyltransferases
- Nitrotoluene degradation
- Xylene degradation
- Chloroalkane and chloroalkene degradation
- Fluorobenzoate degradation
- Toluene degradation
- Chlorocyclohexane and chlorobenzene degradation
- Aflatoxin biosynthesis
- Novobiocin biosynthesis
- Aminobenzoate degradation
- Benzoate degradation
- Macrolides and ketolides
- Quinolones
- African trypanosomiasis
- beta-Lactam resistance
- Vancomycin resistance
- Penicillins
- Cephalosporins - parenteral agents
- Cephalosporins - oral agents
- Aminoglycosides
- Tetracyclines
- KEGG modules
- KEGG Atlas
- Chloroalkane and chloroalkene degradation
- Chlorocyclohexane and chlorobenzene degradation
- KEGG Atlas
- KEGG Atlas
- KEGG Atlas
- KEGG Atlas
- KEGG Atlas
- Degradation of aromatic compounds
- KEGG Atlas
- KEGG Atlas
- Puromycin biosynthesis
- Novobiocin biosynthesis
- Streptomycin biosynthesis
- Butirosin and neomycin biosynthesis
- Aminobenzoate degradation
- Fluorobenzoate degradation
- Aflatoxin biosynthesis
- Benzoate degradation
- Chloroalkane and chloroalkene degradation
- Chlorocyclohexane and chlorobenzene degradation
- Synthesis and degradation of ketone bodies
- Fatty acid degradation
- Photosynthesis proteins
- Sulfur metabolism
- Fatty acid elongation
- Fatty acid biosynthesis
- Carbon fixation pathways in prokaryotes
- Global/overview
- Carbon fixation in photosynthetic organisms
- Nitrogen metabolism
- Methane metabolism
- Hippo signaling pathway - fly
- Hippo signaling pathway
- ErbB signaling pathway
- MAPK signaling pathway - yeast
- MAPK signaling pathway - fly
- MAPK signaling pathway
- TGF-beta signaling pathway
- Hedgehog signaling pathway
- Notch signaling pathway
- Wnt signaling pathway
- MicroRNAs in cancer
- Transcriptional misregulation in cancer
- Chemical carcinogenesis
- Proteoglycans in cancer
- KEGG DISEASE
- Viral carcinogenesis
- Human diseases
- KEGG Cancer
- Pancreatic cancer
- Colorectal cancer
- Cell cycle - Caulobacter
- Endocrine disrupting compounds
- Pesticides
- Cytochrome P450
- Transcription factors
- Glycan binding proteins
- KEGG Atlas
- Polyketide biosynthesis proteins
- Phytochemical compounds
- KEGG Atlas
- Transcription machinery
- Spliceosome
- Acute myeloid leukemia
- Thyroid cancer
- Viral carcinogenesis
- Chemical carcinogenesis
- KEGG Cancer
- KEGG DISEASE
- Colorectal cancer
- Human diseases
- Glioma
- Pancreatic cancer
- KEGG Atlas
- Other glycan degradation
- RNA polymerase
- Biosynthesis of plant hormones
- Biosynthesis of alkaloids derived from histidine and purine
- Biosynthesis of alkaloids derived from terpenoid and polyketide
- Biosynthesis of alkaloids derived from shikimate pathway
- Biosynthesis of alkaloids derived from ornithine, lysine and nicotinic acid
- Basal transcription factors
- Spliceosome
- Phenylpropanoid biosynthesis
- Stilbenoid, diarylheptanoid and gingerol biosynthesis
- Tetracycline biosynthesis
- Polyketide sugar unit biosynthesis
- Nonribosomal peptide structures
- Biosynthesis of siderophore group nonribosomal peptides
- Biosynthesis of vancomycin group antibiotics
- Prenyltransferases
- Polyketide biosynthesis proteins
- Osteoclast differentiation
- Circadian rhythm
- Dorso-ventral axis formation
- Axon guidance
- Circadian rhythm - plant
- Plant-pathogen interaction
- Circadian entrainment
- Circadian rhythm - fly
- Pathways in cancer
- Prenyltransferases
- Polyketide biosynthesis proteins
- Biosynthesis of siderophore group nonribosomal peptides
- Biosynthesis of vancomycin group antibiotics
- Polyketide sugar unit biosynthesis
- Nonribosomal peptide structures
- Biosynthesis of type II polyketide products
- Tetracycline biosynthesis
- Benzoate degradation
- Aminobenzoate degradation
- Glycosaminoglycan degradation
- Glycosylphosphatidylinositol(GPI)-anchor biosynthesis
- Various types of N-glycan biosynthesis
- Mucin type O-Glycan biosynthesis
- Amino acid related enzymes
- N-Glycan biosynthesis
- Glycosaminoglycan biosynthesis - HS/Hep
- Glycosaminoglycan biosynthesis - KS
- Other types of O-glycan biosynthesis
- Glycosaminoglycan biosynthesis - CS/DS
- ECM-receptor interaction
- Cell adhesion molecules (CAMs)
- G protein-coupled receptors
- Enzyme-linked receptors
- Plant hormone signal transduction
- Two-component system
- Neuroactive ligand-receptor interaction
- Cytokine-cytokine receptor interaction
- Cytokine receptors
- Cytokines
- Monoterpenoid biosynthesis
- Therapeutic category of drugs (Japan)
- USP drug classification (USA)
- Anti-HIV agents
- Antiviral agents
- Antifungal agents
- Rifamycins
- Quinolones
- Macrolides and ketolides
- GABAergic synapse
- Glutamatergic synapse
- Vasopressin-regulated water reabsorption
- Mineral absorption
- Vitamin digestion and absorption
- Fat digestion and absorption
- Collecting duct acid secretion
- Proximal tubule bicarbonate reclamation
- Endocrine and other factor-regulated calcium reabsorption
- Aldosterone-regulated sodium reabsorption
- Zeatin biosynthesis
- Insect hormone biosynthesis
- Hippo signaling pathway
- Hippo signaling pathway - fly
- MAPK signaling pathway
- MAPK signaling pathway - fly
- MAPK signaling pathway - yeast
- ErbB signaling pathway
- Wnt signaling pathway
- Notch signaling pathway
- Hedgehog signaling pathway
- TGF-beta signaling pathway
- KEGG Atlas
- KEGG modules
- KEGG reaction modules
- Glycolysis / Gluconeogenesis
- Citrate cycle (TCA cycle)
- Pentose phosphate pathway
- Collecting duct acid secretion
- Fructose and mannose metabolism
- Galactose metabolism
- Mineral absorption
- Vasopressin-regulated water reabsorption
- Fat digestion and absorption
- Vitamin digestion and absorption
- Carbohydrate digestion and absorption
- Protein digestion and absorption
- Local analgesics
- Opioid analgesics
- Anxiolytics
- Anticonvulsants
- Antineoplastics
- Hypnotics
- Antineoplastics - hormones
- Antineoplastics - protein kinases inhibitors
- Antineoplastics - antimetabolic agents
- Antineoplastics - agents from natural products
- Vitamin digestion and absorption
- SNAREs
- Ubiquitin system
- Proteasome
- Ubiquitin mediated proteolysis
- Sulfur relay system
- Gastric acid secretion
- RNA degradation
- DNA replication
- Base excision repair
- Cardiac muscle contraction
- Adrenergic signaling in cardiomyocytes
- N-Glycan biosynthesis
- Global/overview
- 1. Metabolism
- Energy
- Carbohydrate
- Naphthalene family
- 1,2-Diphenyl substitution family
- 7. Drug Development
- Benzodiazepine family
- Nucleotide
- Lipid
- Cyanoamino acid metabolism
- D-Glutamine and D-glutamate metabolism
- Pentose and glucuronate interconversions
- Pentose phosphate pathway
- Citrate cycle (TCA cycle)
- Glycolysis / Gluconeogenesis
- Starch and sucrose metabolism
- Ascorbate and aldarate metabolism
- Galactose metabolism
- Fructose and mannose metabolism
- Pyruvate metabolism
- Amino sugar and nucleotide sugar metabolism
- PI3K-Akt signaling pathway
- cGMP-PKG signaling pathway
- mTOR signaling pathway
- AMPK signaling pathway
- Two-component system
- Plant hormone signal transduction
- Phagosome
- Endocytosis
- Peroxisome
- Lysosome
- Cytokine-cytokine receptor interaction
- ECM-receptor interaction
- Cell adhesion molecules (CAMs)
- GnRH signaling pathway
- PPAR signaling pathway
- Adipocytokine signaling pathway
- Endocytosis
- Insulin signaling pathway
- Insulin secretion
- Chemokine signaling pathway
- Intestinal immune network for IgA production
- Phagosome
- Estrogen signaling pathway
- Lysosome
- Peroxisome
- Regulation of autophagy
- Gap junction
- Signaling pathways regulating pluripotency of stem cells
- Compounds with biological roles
- Photosynthesis proteins
- KEGG Atlas
- KEGG Atlas
- KEGG Atlas
- Apoptosis
- KEGG Atlas
- Focal adhesion
- Adherens junction
- Tight junction
- Amyotrophic lateral sclerosis (ALS)
- Parkinson's disease
- Alzheimer's disease
- Primary immunodeficiency
- Graft-versus-host disease
- Allograft rejection
- Inflammatory bowel disease (IBD)
- Autoimmune thyroid disease
- Rheumatoid arthritis
- Systemic lupus erythematosus
- Isoquinoline alkaloid biosynthesis
- Betalain biosynthesis
- Terpenoid/PK
- Cofactor/vitamin
- Glycan
- Other amino
- 2. Genetic Information Processing
- Chemical structure
- Xenobiotics
- Other secondary metabolite
- 4. Cellular Processes
- 3. Environmental Information Processing
- Atrazine degradation
- Caprolactam degradation
- DDT degradation
- Antineoplastics - hormones
- Dioxin degradation
- Naphthalene degradation
- Polycyclic aromatic hydrocarbon degradation
- Furfural degradation
- Agents for Alzheimer-type dementia
- Antidepressants
- Antipsychotics - butyrophenones
- Antipsychotics - phenothiazines
- Antineoplastics - agents from natural products
- Antineoplastics - antimetabolic agents
- Antineoplastics - alkylating agents
- KEGG modules
- Antiparkinsonian agents
- Fluorobenzoate degradation
- Chloroalkane and chloroalkene degradation
- Biosynthesis of alkaloids derived from terpenoid and polyketide
- Biosynthesis of plant hormones
- Benzoate degradation
- Aminobenzoate degradation
- Biosynthesis of terpenoids and steroids
- Biosynthesis of alkaloids derived from shikimate pathway
- Biosynthesis of alkaloids derived from ornithine, lysine and nicotinic acid
- Biosynthesis of alkaloids derived from histidine and purine
- LPS biosynthesis proteins
- Proteoglycans
- HS/Hep binding proteins
- Glycan binding proteins
- beta-Alanine metabolism
- Taurine and hypotaurine metabolism
- Phosphonate and phosphinate metabolism
- Selenocompound metabolism
- Cyanoamino acid metabolism
- D-Glutamine and D-glutamate metabolism
- NF-kappa B signaling pathway
- TNF signaling pathway
- VEGF signaling pathway
- Jak-STAT signaling pathway
- Hippo signaling pathway
- Hippo signaling pathway - fly
- Hedgehog signaling pathway
- TGF-beta signaling pathway
- Wnt signaling pathway
- Notch signaling pathway
- Ether lipid metabolism
- Antidepressants
- Antipsychotics - butyrophenones
- Antiparkinsonian agents
- Agents for Alzheimer-type dementia
- Opioid analgesics
- Local analgesics
- Antipsychotics - phenothiazines
- Antipsychotics
- Sulfonamide derivatives - sulfa drugs
- Sulfonamide derivatives - overview
- Taste transduction
- Olfactory transduction
- Dorso-ventral axis formation
- Inflammatory mediator regulation of TRP channels
- Lipid
- Axon guidance
- Circadian entrainment
- Circadian rhythm
- 1. Metabolism
- Circadian rhythm - fly
- Help
- DBGET
- Update history
- New pathway maps
- Terpenoid backbone biosynthesis
- Bacterial invasion of epithelial cells
- Carbon fixation pathways in prokaryotes
- Methane metabolism
- Photosynthesis - antenna proteins
- Carbon fixation in photosynthetic organisms
- Oxidative phosphorylation
- Photosynthesis
- Compounds with biological roles
- Nitrogen metabolism
- Sulfur metabolism
- Antimigraines
- Antithrombosis agents
- Antirheumatics - DMARDs and biological agents
- Antidiabetics
- Antiarrhythmic drugs
- Antiulcer drugs
- Immunosuppressive agents
- Osteoporosis drugs
- Antidyslipidemic agents
- Antiglaucoma agents
- Base excision repair
- DNA replication
- Protein export
- Ribosome biogenesis in eukaryotes
- SNARE interactions in vesicular transport
- Protein processing in endoplasmic reticulum
- Sulfur relay system
- Ubiquitin mediated proteolysis
- RNA degradation
- Proteasome
- Ribosome
- Aminoacyl-tRNA biosynthesis
- Proximal tubule bicarbonate reclamation
- RNA polymerase
- Basal transcription factors
- Transcription machinery
- Spliceosome
- Spliceosome
- Transcription factors
- Aldosterone-regulated sodium reabsorption
- Endocrine and other factor-regulated calcium reabsorption
- GABAergic synapse
- Cholinergic synapse
- Dopaminergic synapse
- Target-based classification
- Angiotensin receptor and endothelin receptor antagonists
- Opioid receptor agonists/antagonists
- Eicosanoid receptor agonists/antagonists
- Serotonin receptor agonists/antagonists
- Histamine H2/H3 receptor agonists/antagonists
- Histamine H1 receptor antagonists
- Dopamine receptor agonists/antagonists
- Endocrine and other factor-regulated calcium reabsorption
- Glucocorticoid and mineralocorticoid receptor agonists/antagonists
- G protein-coupled receptors
- Collecting duct acid secretion
- Glutamatergic synapse
- Stilbenoid, diarylheptanoid and gingerol biosynthesis
- Degradation of aromatic compounds
- Biosynthesis of amino acids
- 7. Drug Development
- 6. Human Diseases
- Biosynthesis of secondary metabolites
- Metabolic pathways
- Carbon metabolism
- Microbial metabolism in diverse environments
- Fatty acid metabolism
- 2-Oxocarboxylic acid metabolism
- Calcium signaling pathway
- FoxO signaling pathway
- HIF-1 signaling pathway
- TNF signaling pathway
- NF-kappa B signaling pathway
- Jak-STAT signaling pathway
- VEGF signaling pathway
- Hippo signaling pathway - fly
- Protein digestion and absorption
- Sphingolipid signaling pathway
- Phosphatidylinositol signaling system
- Fat digestion and absorption
- Bile secretion
- Carbohydrate digestion and absorption
- Vasopressin-regulated water reabsorption
- Proteasome
- Protein digestion and absorption
- Carbohydrate digestion and absorption
- Vitamin digestion and absorption
- Pancreatic secretion
- Gastric acid secretion
- Salivary secretion
- Bile secretion
- Pancreatic secretion
- Cytosolic DNA-sensing pathway
- Natural killer cell mediated cytotoxicity
- NOD-like receptor signaling pathway
- RIG-I-like receptor signaling pathway
- B cell receptor signaling pathway
- Fc epsilon RI signaling pathway
- Antigen processing and presentation
- T cell receptor signaling pathway
- Fc gamma R-mediated phagocytosis
- Leukocyte transendothelial migration
- Other glycan degradation
- KEGG GLYCAN
- Ribosome biogenesis in eukaryotes
- GTP-binding proteins
- Riboflavin metabolism
- Vitamin B6 metabolism
- Glycosphingolipid biosynthesis - globo series
- Glycosphingolipid biosynthesis - ganglio series
- Glycosylphosphatidylinositol(GPI)-anchor biosynthesis
- Glycosphingolipid biosynthesis - lacto and neolacto series
- Other glycan degradation
- Thiamine metabolism
- Lipopolysaccharide biosynthesis
- Peptidoglycan biosynthesis
- Flavone and flavonol biosynthesis
- Olfactory transduction
- Phototransduction - fly
- Photosynthesis
- Neurotrophin signaling pathway
- Glucagon signaling pathway
- Adipocytokine signaling pathway
- Insulin secretion
- Insulin signaling pathway
- Intestinal immune network for IgA production
- Chemokine signaling pathway
- Fc gamma R-mediated phagocytosis
- Leukocyte transendothelial migration
- B cell receptor signaling pathway
- Fc epsilon RI signaling pathway
- Inflammatory mediator regulation of TRP channels
- Taste transduction
- Vibrio cholerae infection
- Maturity onset diabetes of the young
- Epithelial cell signaling in Helicobacter pylori infection
- Vibrio cholerae pathogenic cycle
- Type I diabetes mellitus
- Viral myocarditis
- Non-alcoholic fatty liver disease (NAFLD)
- Type II diabetes mellitus
- Salmonella infection
- Transcriptional misregulation in cancer
- MicroRNAs in cancer
- KEGG Cancer
- Human diseases
- KEGG Atlas
- KEGG Atlas
- Viral carcinogenesis
- Carbon metabolism
- Microbial metabolism in diverse environments
- Fatty acid metabolism
- 2-Oxocarboxylic acid metabolism
- Degradation of aromatic compounds
- Biosynthesis of amino acids
- KEGG Atlas
- KEGG Atlas
- Aminoglycosides
- Cephalosporins - oral agents
- Phytochemical compounds
- Rifamycins
- Quinolones
- Antiviral agents
- Antifungal agents
- KEGG DRUG
- Anti-HIV agents
- Penicillin and cephalosporin biosynthesis
- LPS biosynthesis proteins
- Lipopolysaccharide biosynthesis
- Peptidoglycan biosynthesis
- Other glycan degradation
- KEGG GLYCAN
- Glycosphingolipid biosynthesis - globo series
- Endocrine disrupting compounds
- Pesticides
- Cytochrome P450
- Overview of biosynthetic pathways
- Biosynthesis of plant secondary metabolites
- Biosynthesis of phenylpropanoids
- Betalain biosynthesis
- Biosynthesis of alkaloids derived from shikimate pathway
- Biosynthesis of alkaloids derived from ornithine, lysine and nicotinic acid
- Penicillin and cephalosporin biosynthesis
- Carbapenem biosynthesis
- Opioid analgesics
- Benzoate degradation
- Antipsychotics
- Antigen processing and presentation
- T cell receptor signaling pathway
- Hematopoietic cell lineage
- Complement and coagulation cascades
- Platelet activation
- Toll-like receptor signaling pathway
- NOD-like receptor signaling pathway
- RIG-I-like receptor signaling pathway
- Cytosolic DNA-sensing pathway
- Natural killer cell mediated cytotoxicity
- Therapeutic category of drugs (Japan)
- Antiinfectives
- Maturity onset diabetes of the young
- Non-alcoholic fatty liver disease (NAFLD)
- Vibrio cholerae pathogenic cycle
- Vibrio cholerae infection
- Pathogenic Escherichia coli infection
- Epithelial cell signaling in Helicobacter pylori infection
- Shigellosis
- Salmonella infection
- Legionellosis
- Pertussis
- Biosynthesis of amino acids
- Fatty acid metabolism
- Color Pathway
- Search&Color Pathway
- Search Pathway
- 7. Drug Development
- 6. Human Diseases
- 5. Organismal Systems
- 4. Cellular Processes
- 3. Environmental Information Processing
- Acute myeloid leukemia
- Thyroid cancer
- Glioma
- Pancreatic cancer
- Colorectal cancer
- Human diseases
- KEGG Cancer
- KEGG DISEASE
- Basal cell carcinoma
- Chronic myeloid leukemia
- PPAR signaling pathway
- Ovarian steroidogenesis
- Glycan
- Cofactor/vitamin
- Lipid
- Nucleotide
- Amino acid
- Other amino
- 1. Metabolism
- Global/overview
- Carbohydrate
- Energy
- GABA-A receptor agonists/antagonists
- Calcium channel blocking drugs
- Glucocorticoid and mineralocorticoid receptor agonists/antagonists
- Progesterone, androgen and estrogen receptor agonists/antagonists
- Target-based classification
- G protein-coupled receptors
- Nuclear receptors
- Nicotinic cholinergic receptor antagonists
- Retinoic acid receptor (RAR) and retinoid X receptor (RXR) agonists/antagonists
- Peroxisome proliferator-activated receptor (PPAR) agonists
- Peroxisome
- Phototransduction - fly
- Phototransduction
- Long-term potentiation
- Serotonergic synapse
- Dopaminergic synapse
- Cholinergic synapse
- Neurotrophin signaling pathway
- Synaptic vesicle cycle
- Retrograde endocannabinoid signaling
- Long-term depression
- Biosynthesis of 12-, 14- and 16-membered macrolides
- Eicosanoid receptor agonists/antagonists
- Biosynthesis of type II polyketide backbone
- Histamine H2/H3 receptor agonists/antagonists
- Tetracycline biosynthesis
- Polyketide sugar unit biosynthesis
- Nonribosomal peptide structures
- Biosynthesis of siderophore group nonribosomal peptides
- Agents for Alzheimer-type dementia
- Antidepressants
- Sulfonamide derivatives - overview
- Antiparkinsonian agents
- Sulfonamide derivatives - diuretics
- Sulfonamide derivatives - sulfa drugs
- Antiarrhythmic drugs
- Sulfonamide derivatives - hypoglycemic agents
- Immunosuppressive agents
- Antiulcer drugs
- Other amino
- Amino acid
- Nucleotide
- Lipid
- Energy
- Carbohydrate
- Global/overview
- 1. Metabolism
- Benzodiazepine family
- Naphthalene family
- Alcoholism
- Nicotine addiction
- Cytokine receptors
- Enzyme-linked receptors
- Huntington's disease
- Amyotrophic lateral sclerosis (ALS)
- G protein-coupled receptors
- Alzheimer's disease
- Morphine addiction
- Transporters
- Neuroactive ligand-receptor interaction
- Secretion system
- Benzodiazepine family
- Kanehisa Laboratories
- 1,2-Diphenyl substitution family
- Naphthalene family
- Carbohydrate
- Energy
- 1. Metabolism
- Global/overview
- Lipid
- Nucleotide
- Vasopressin-regulated water reabsorption
- Mineral absorption
- Endocrine and other factor-regulated calcium reabsorption
- Aldosterone-regulated sodium reabsorption
- Phytochemical compounds
- Protein digestion and absorption
- Carbohydrate digestion and absorption
- Vitamin digestion and absorption
- Fat digestion and absorption
- Collecting duct acid secretion
- Proximal tubule bicarbonate reclamation
- Phenylalanine metabolism
- Tryptophan metabolism
- Phenylalanine, tyrosine and tryptophan biosynthesis
- beta-Alanine metabolism
- Taurine and hypotaurine metabolism
- Phosphonate and phosphinate metabolism
- Selenocompound metabolism
- Cyanoamino acid metabolism
- D-Glutamine and D-glutamate metabolism
- D-Arginine and D-ornithine metabolism
- Citrate cycle (TCA cycle)
- Overview of biosynthetic pathways
- Pentose and glucuronate interconversions
- ErbB signaling pathway
- Wnt signaling pathway
- Notch signaling pathway
- Hedgehog signaling pathway
- Rap1 signaling pathway
- MAPK signaling pathway
- MAPK signaling pathway - fly
- MAPK signaling pathway - yeast
- KEGG Atlas
- TGF-beta signaling pathway
- Hippo signaling pathway
- KEGG Atlas
- KEGG reaction modules
- Biosynthesis of alkaloids derived from histidine and purine
- Butanoate metabolism
- Propanoate metabolism
- Glyoxylate and dicarboxylate metabolism
- Pyruvate metabolism
- Amino sugar and nucleotide sugar metabolism
- Starch and sucrose metabolism
- Ascorbate and aldarate metabolism
- Galactose metabolism
- Fructose and mannose metabolism
- Pentose and glucuronate interconversions
- Monoterpenoid biosynthesis
- Sesquiterpenoid and triterpenoid biosynthesis
- Terpenoid backbone biosynthesis
- Porphyrin and chlorophyll metabolism
- Ubiquinone and other terpenoid-quinone biosynthesis
- One carbon pool by folate
- Retinol metabolism
- Diterpenoid biosynthesis
- Carotenoid biosynthesis
- USP drug classification (USA)
- ATC classification (WHO)
- KEGG DRUG
- Anti-HIV agents
- Antiviral agents
- Antifungal agents
- Rifamycins
- Quinolones
- Antiinfectives
- Therapeutic category of drugs (Japan)
- Vibrio cholerae infection
- Vibrio cholerae pathogenic cycle
- Epithelial cell signaling in Helicobacter pylori infection
- Pathogenic Escherichia coli infection
- Salmonella infection
- Shigellosis
- Pertussis
- Legionellosis
- Staphylococcus aureus infection
- Tuberculosis
- Ethylbenzene degradation
- Styrene degradation
- Xylene degradation
- Nitrotoluene degradation
- Chlorocyclohexane and chlorobenzene degradation
- Toluene degradation
- Fluorobenzoate degradation
- Chloroalkane and chloroalkene degradation
- Cell cycle - Caulobacter
- Atrazine degradation
- Caprolactam degradation
- Bacterial chemotaxis
- Flagellar assembly
- Peroxisome
- Regulation of autophagy
- Cytoskeleton proteins
- Cell cycle
- Regulation of actin cytoskeleton
- Bacterial motility proteins
- Cell cycle - yeast
- Cell cycle - Caulobacter
- Other secondary metabolite
- Terpenoid/PK
- Energy
- Carbohydrate
- Nucleotide
- Lipid
- Other amino
- Amino acid
- Cofactor/vitamin
- Glycan
- KEGG Atlas
- KEGG Atlas
- KEGG Atlas
- KEGG Atlas
- Prion diseases
- Huntington's disease
- KEGG reaction modules
- Alzheimer's disease
- Primary immunodeficiency
- Amyotrophic lateral sclerosis (ALS)
- Parkinson's disease
- Inflammatory bowel disease (IBD)
- Nicotinate and nicotinamide metabolism
- Graft-versus-host disease
- Allograft rejection
- Pantothenate and CoA biosynthesis
- NOD-like receptor signaling pathway
- Toll-like receptor signaling pathway
- Color Pathway
- Search Pathway
- Regulation of autophagy
- Biosynthesis of secondary metabolites
- Microbial metabolism in diverse environments
- Bacterial motility proteins
- Cytoskeleton proteins
- Cell cycle
- Carbon metabolism
- 2-Oxocarboxylic acid metabolism
- HIV protease inhibitors
- Quinolines
- Eicosanoids
- Prostaglandins
- Benzoic acid family
- 1,2-Diphenyl substitution family
- Naphthalene family
- Benzodiazepine family
- Kanehisa Laboratories
- Ras signaling pathway
- Rap1 signaling pathway
- Secretion system
- Two-component system
- Transporters
- Solute carrier family
- Phosphotransferase system (PTS)
- Bacterial secretion system
- MAPK signaling pathway
- MAPK signaling pathway - fly
- Vitamin B6 metabolism
- Riboflavin metabolism
- LPS biosynthesis proteins
- Glycosyltransferases
- Monosaccharide codes
- Composite structure map
- Thiamine metabolism
- Glycan binding proteins
- HS/Hep binding proteins
- Proteoglycans
- Pathways in cancer
- Plant-pathogen interaction
- Choline metabolism in cancer
- Central carbon metabolism in cancer
- MicroRNAs in cancer
- Transcriptional misregulation in cancer
- Chemical carcinogenesis
- Proteoglycans in cancer
- Colorectal cancer
- Viral carcinogenesis
- Antineoplastics - hormones
- Antineoplastics - agents from natural products
- USP drug classification (USA)
- ATC classification (WHO)
- KEGG DRUG
- Anti-HIV agents
- Antineoplastics - antimetabolic agents
- Antineoplastics - alkylating agents
- Antiinfectives
- Therapeutic category of drugs (Japan)
- Biosynthesis of unsaturated fatty acids
- alpha-Linolenic acid metabolism
- Sphingolipid metabolism
- Ether lipid metabolism
- Linoleic acid metabolism
- Arachidonic acid metabolism
- Steroid hormone biosynthesis
- Secondary bile acid biosynthesis
- Glycerophospholipid metabolism
- Glycerolipid metabolism
- Potassium channel blocking and opening drugs
- Sodium channel blocking drugs
- Ion channels
- N-Metyl-D-aspartic acid receptor antagonists
- Nicotinic cholinergic receptor antagonists
- Nuclear receptors
- Calcium channel blocking drugs
- GABA-A receptor agonists/antagonists
- Neurotransmitter transporter inhibitors
- Ion transporter inhibitors
- Pathogenic Escherichia coli infection
- Epithelial cell signaling in Helicobacter pylori infection
- Shigellosis
- Salmonella infection
- Legionellosis
- Pertussis
- Tuberculosis
- Staphylococcus aureus infection
- KEGG Pathogen
- Bacterial invasion of epithelial cells
- Glucagon signaling pathway
- Cephalosporins - oral agents
- KEGG Atlas
- Cephalosporins - parenteral agents
- Tetracyclines
- Aminoglycosides
- Vancomycin resistance
- beta-Lactam resistance
- PI3K-Akt signaling pathway
- Insect hormone biosynthesis
- Zeatin biosynthesis
- Ovarian steroidogenesis
- ATC classification (WHO)
- USP drug classification (USA)
- Antineoplastics - agents from natural products
- Antineoplastics - hormones
- alpha-Linolenic acid metabolism
- Biosynthesis of unsaturated fatty acids
- Arachidonic acid metabolism
- Linoleic acid metabolism
- Ether lipid metabolism
- Sphingolipid metabolism
- Glycerolipid metabolism
- Glycerophospholipid metabolism
- Brassinosteroid biosynthesis
- Purine metabolism
- Pyrimidine metabolism
- Chloroalkane and chloroalkene degradation
- Chlorocyclohexane and chlorobenzene degradation
- ECM-receptor interaction
- Cell adhesion molecules (CAMs)
- Butirosin and neomycin biosynthesis
- Puromycin biosynthesis
- cAMP signaling pathway
- Aflatoxin biosynthesis
- Neuroactive ligand-receptor interaction
- Cytokine-cytokine receptor interaction
- Aminobenzoate degradation
- Fluorobenzoate degradation
- Fatty acid biosynthesis
- Fatty acid degradation
- Fatty acid elongation
- Nitrogen metabolism
- Methane metabolism
- Photosynthesis proteins
- Sulfur metabolism
- Cutin, suberine and wax biosynthesis
- Synthesis and degradation of ketone bodies
- Purine metabolism
- Pyrimidine metabolism
- Biotin metabolism
- Pantothenate and CoA biosynthesis
- Malaria
- Amoebiasis
- Valine, leucine and isoleucine degradation
- Valine, leucine and isoleucine biosynthesis
- Glycan binding proteins
- HS/Hep binding proteins
- Proteoglycans
- Nicotinate and nicotinamide metabolism
- Vitamin B6 metabolism
- Riboflavin metabolism
- Thiamine metabolism
- Epithelial cell signaling in Helicobacter pylori infection
- Staphylococcus aureus infection
- DNA replication proteins
- Chromosome
- Mismatch repair
- Homologous recombination
- Non-homologous end-joining
- Fanconi anemia pathway
- Proteasome
- DNA replication
- Base excision repair
- Nucleotide excision repair
- alpha-Linolenic acid metabolism
- Linoleic acid metabolism
- Arachidonic acid metabolism
- Sphingolipid metabolism
- Ether lipid metabolism
- Glycerophospholipid metabolism
- Glycerolipid metabolism
- Steroid hormone biosynthesis
- Secondary bile acid biosynthesis
- Primary bile acid biosynthesis
- Vibrio cholerae infection
- Maturity onset diabetes of the young
- Non-alcoholic fatty liver disease (NAFLD)
- Type II diabetes mellitus
- Salmonella infection
- Pathogenic Escherichia coli infection
- Epithelial cell signaling in Helicobacter pylori infection
- Vibrio cholerae pathogenic cycle
- Inositol phosphate metabolism
- C5-Branched dibasic acid metabolism
- Pertussis
- Shigellosis
- Oxidative phosphorylation
- Compounds with biological roles
- Enzymes
- Carbapenem biosynthesis
- Clavulanic acid biosynthesis
- Isoquinoline alkaloid biosynthesis
- Tropane, piperidine and pyridine alkaloid biosynthesis
- Acridone alkaloid biosynthesis
- Caffeine metabolism
- Betalain biosynthesis
- Glucosinolate biosynthesis
- Benzoxazinoid biosynthesis
- Penicillin and cephalosporin biosynthesis
- Benzoate degradation
- Aminobenzoate degradation
- Fluorobenzoate degradation
- Chloroalkane and chloroalkene degradation
- Chlorocyclohexane and chlorobenzene degradation
- Toluene degradation
- Xylene degradation
- Nitrotoluene degradation
- Ethylbenzene degradation
- ECM-receptor interaction
- Cell adhesion molecules (CAMs)
- Neuroactive ligand-receptor interaction
- Cytokine-cytokine receptor interaction
- Plant hormone signal transduction
- Two-component system
- AMPK signaling pathway
- mTOR signaling pathway
- G protein-coupled receptors
- Enzyme-linked receptors
- Melanogenesis
- Amino sugar and nucleotide sugar metabolism
- Starch and sucrose metabolism
- Renin-angiotensin system
- Vascular smooth muscle contraction
- Adrenergic signaling in cardiomyocytes
- Gastric acid secretion
- Glyoxylate and dicarboxylate metabolism
- Cell cycle - Caulobacter
- Meiosis - yeast
- Oocyte meiosis
- KEGG Atlas
- p53 signaling pathway
- Enzymes
- KEGG Atlas
- KEGG Atlas
- Inflammatory bowel disease (IBD)
- Autoimmune thyroid disease
- Rheumatoid arthritis
- Systemic lupus erythematosus
- Asthma
- Non-small cell lung cancer
- Small cell lung cancer
- Endometrial cancer
- Graft-versus-host disease
- Allograft rejection
- Vascular smooth muscle contraction
- Chagas disease (American trypanosomiasis)
- Leishmaniasis
- beta-Lactam resistance
- African trypanosomiasis
- Amoebiasis
- Epstein-Barr virus infection
- Toxoplasmosis
- Malaria
- Vascular smooth muscle contraction
- Vasopressin-regulated water reabsorption
- Aldosterone-regulated sodium reabsorption
- Endocrine and other factor-regulated calcium reabsorption
- Vancomycin resistance
- Salivary secretion
- Gastric acid secretion
- Starch and sucrose metabolism
- Ascorbate and aldarate metabolism
- Galactose metabolism
- Fructose and mannose metabolism
- Propanoate metabolism
- Glyoxylate and dicarboxylate metabolism
- Pyruvate metabolism
- Amino sugar and nucleotide sugar metabolism
- C5-Branched dibasic acid metabolism
- Butanoate metabolism
- Pathways in cancer
- Plant-pathogen interaction
- Circadian rhythm - plant
- Circadian rhythm - fly
- Circadian entrainment
- Circadian rhythm
- Osteoclast differentiation
- Choline metabolism in cancer
- Central carbon metabolism in cancer
- Phosphatidylinositol signaling system
- Calcium signaling pathway
- cGMP-PKG signaling pathway
- cAMP signaling pathway
- Sphingolipid signaling pathway
- PI3K-Akt signaling pathway
- cGMP-PKG signaling pathway
- mTOR signaling pathway
- AMPK signaling pathway
- Methane metabolism
- Nitrogen metabolism
- Photosynthesis
- Photosynthesis - antenna proteins
- Carbon fixation in photosynthetic organisms
- Carbon fixation pathways in prokaryotes
- Butanoate metabolism
- C5-Branched dibasic acid metabolism
- Inositol phosphate metabolism
- Oxidative phosphorylation
- Chaperones and folding catalysts
- SNAREs
- Cytochrome P450
- Transcription factors
- Transcription machinery
- Spliceosome
- Ribosome
- Ribosome biogenesis
- Transfer RNA biogenesis
- Translation factors
- Primary immunodeficiency
- Graft-versus-host disease
- Allograft rejection
- Inflammatory bowel disease (IBD)
- Autoimmune thyroid disease
- Rheumatoid arthritis
- Systemic lupus erythematosus
- Asthma
- Non-small cell lung cancer
- Small cell lung cancer
- Biosynthesis of amino acids
- Degradation of aromatic compounds
- 2-Oxocarboxylic acid metabolism
- Fatty acid metabolism
- KEGG Atlas
- KEGG Atlas
- Pesticides
- Cytochrome P450
- Drug metabolism - other enzymes
- Endocrine disrupting compounds
- Metabolism of xenobiotics by cytochrome P450
- Drug metabolism - cytochrome P450
- Furfural degradation
- Steroid degradation
- Naphthalene degradation
- Polycyclic aromatic hydrocarbon degradation
- Regulation of actin cytoskeleton
- Flagellar assembly
- Bacterial chemotaxis
- Cellular antigens
- CAM ligands
- CAMs
- Quinolines
- Benzodiazepine family
- Benzoic acid family
- HIV protease inhibitors
- Naphthalene family
- 1,2-Diphenyl substitution family
- Cyclooxygenase inhibitors
- Catecholamine transferase inhibitors
- Renin-angiotensin system inhibitors
- HMG-CoA reductase inhibitors
- Chemical carcinogenesis
- Proteoglycans in cancer
- Pathways in cancer
- Plant-pathogen interaction
- Circadian rhythm - plant
- Circadian rhythm - fly
- MicroRNAs in cancer
- Transcriptional misregulation in cancer
- Choline metabolism in cancer
- Central carbon metabolism in cancer
- Carotenoid biosynthesis
- Diterpenoid biosynthesis
- Insect hormone biosynthesis
- Brassinosteroid biosynthesis
- Limonene and pinene degradation
- Zeatin biosynthesis
- Type I polyketide structures
- Geraniol degradation
- Biosynthesis of ansamycins
- Biosynthesis of 12-, 14- and 16-membered macrolides
- Phosphonate and phosphinate metabolism
- Selenocompound metabolism
- Glutathione metabolism
- D-Arginine and D-ornithine metabolism
- D-Alanine metabolism
- Polyketide sugar unit biosynthesis
- Nonribosomal peptide structures
- Biosynthesis of type II polyketide products
- Tetracycline biosynthesis
- Biosynthesis of ansamycins
- Biosynthesis of type II polyketide backbone
- Type I polyketide structures
- Biosynthesis of 12-, 14- and 16-membered macrolides
- Limonene and pinene degradation
- Geraniol degradation
- Antineoplastics - protein kinases inhibitors
- Bisphenol degradation
- Aminoacyl-tRNA biosynthesis
- Steroid degradation
- Spliceosome
- Ribosome
- Ribosome
- Ribosome biogenesis
- mRNA surveillance pathway
- Metabolism of xenobiotics by cytochrome P450
- Transfer RNA biogenesis
- Translation factors
- Inositol phosphate metabolism
- C5-Branched dibasic acid metabolism
- Phototransduction
- Oxidative phosphorylation
- Glyoxylate and dicarboxylate metabolism
- Dorso-ventral axis formation
- Butanoate metabolism
- Propanoate metabolism
- Circadian rhythm
- Osteoclast differentiation
- Carbon fixation in photosynthetic organisms
- Photosynthesis - antenna proteins
- Oxytocin signaling pathway
- Thyroid hormone synthesis
- Progesterone-mediated oocyte maturation
- Prolactin signaling pathway
- Ovarian steroidogenesis
- Estrogen signaling pathway
- PPAR signaling pathway
- GnRH signaling pathway
- Thyroid hormone signaling pathway
- Melanogenesis
- Lipid
- Tight junction
- Meiosis - yeast
- Overview of biosynthetic pathways
- Biosynthesis of plant secondary metabolites
- Pesticides
- Cytochrome P450
- Drug metabolism - other enzymes
- Endocrine disrupting compounds
- Metabolism of xenobiotics by cytochrome P450
- Drug metabolism - cytochrome P450
- Biosynthesis of phenylpropanoids
- Biosynthesis of terpenoids and steroids
- Oxytocin signaling pathway
- Thyroid hormone synthesis
- Ovarian steroidogenesis
- Estrogen signaling pathway
- Progesterone-mediated oocyte maturation
- Prolactin signaling pathway
- Glucagon signaling pathway
- Adipocytokine signaling pathway
- PPAR signaling pathway
- GnRH signaling pathway
- Vibrio cholerae infection
- Maturity onset diabetes of the young
- Type I diabetes mellitus
- Viral myocarditis
- Non-alcoholic fatty liver disease (NAFLD)
- Type II diabetes mellitus
- Hypertrophic cardiomyopathy (HCM)
- Alcoholism
- Dilated cardiomyopathy (DCM)
- Arrhythmogenic right ventricular cardiomyopathy (ARVC)
- Cocaine addiction
- Rheumatoid arthritis
- Antiglaucoma agents
- Antidyslipidemic agents
- alpha-Adrenergic receptor agonists/antagonists
- Tuberculosis
- Bacterial invasion of epithelial cells
- Stilbenoid, diarylheptanoid and gingerol biosynthesis
- Vibrio cholerae pathogenic cycle
- Isoquinoline alkaloid biosynthesis
- Pathogenic Escherichia coli infection
- Salmonella infection
- Shigellosis
- Pertussis
- Legionellosis
- Antimigraines
- Indole alkaloid biosynthesis
- Isoflavonoid biosynthesis
- Proximal tubule bicarbonate reclamation
- Collecting duct acid secretion
- Aldosterone-regulated sodium reabsorption
- Endocrine and other factor-regulated calcium reabsorption
- Neurotrophin signaling pathway
- Vasopressin-regulated water reabsorption
- Retrograde endocannabinoid signaling
- Synaptic vesicle cycle
- Long-term potentiation
- Long-term depression
- Photosynthesis - antenna proteins
- Photosynthesis
- KEGG Atlas
- KEGG Atlas
- KEGG Atlas
- KEGG Atlas
- KEGG modules
- KEGG Atlas
- Oxidative phosphorylation
- KEGG reaction modules
- Mineral absorption
- Vitamin digestion and absorption
- Fat digestion and absorption
- Protein digestion and absorption
- Carbohydrate digestion and absorption
- Bile secretion
- Pancreatic secretion
- Gastric acid secretion
- Aldosterone-regulated sodium reabsorption
- Vasopressin-regulated water reabsorption
- Endometrial cancer
- Prostate cancer
- Cytoskeleton proteins
- Bacterial motility proteins
- Melanoma
- Basal cell carcinoma
- Bladder cancer
- Renal cell carcinoma
- Thyroid cancer
- Glioma
- Chronic myeloid leukemia
- Ion channels
- HMG-CoA reductase inhibitors
- Renin-angiotensin system inhibitors
- N-Metyl-D-aspartic acid receptor antagonists
- Ion channels
- Sodium channel blocking drugs
- Potassium channel blocking and opening drugs
- Catecholamine transferase inhibitors
- Cyclooxygenase inhibitors
- Ion transporter inhibitors
- Neurotransmitter transporter inhibitors
- Microbial metabolism in diverse environments
- Carbon metabolism
- Metabolic pathways
- Biosynthesis of secondary metabolites
- Biosynthesis of amino acids
- Degradation of aromatic compounds
- 2-Oxocarboxylic acid metabolism
- Fatty acid metabolism
- Glycolysis / Gluconeogenesis
- Citrate cycle (TCA cycle)
- Cellular antigens
- Bacterial motility proteins
- CAMs
- CAM ligands
- Ion channels
- GTP-binding proteins
- Cytokines
- Nuclear receptors
- Enzyme-linked receptors
- Cytokine receptors
hal_cmonkey2_group
Group
Gaggle Workflow
Modules
|
Workflows
|
|
|---|---|---|
Workflow CanvasThis is your workflow canvas. Start adding workflow components from the left, open a saved workflow or read our quick start guide.
Workflow HelpQuick Start Guide1 Start the Gaggle Boss by clicking on the Start the Boss link and click on the "Gaggle" link in the firegoose toolbar to connect to Gaggle. 2 Add workflow modules from left sidebar and connect them. 3 Select an organism to analyze if you would like to use Network Portal organisms in your workflow. This will automatically create necessary attributes specific for the selected organism. Otherwise you can leave this field unselected and enter your custom specifications for each module. 4 Click "Run" to start the workflow Running custom workflowsIf you would like to use your own cytoscape or mev files it is possible to create custom workflows. For the initial setup you will need to download and install custom workflow modules. 1 Install each goose by using the links on the left (if this is your first time). This will download the updated goose. 2 Start the Gaggle Boss by clicking on the Start the Boss link 3 Click on the Gaggle toolbar in Firefox and Connect to Gaggle 4 Drag and drop the goose you want into your workflow canvas 5 For each module (except firegoose), workflow will automatically capture path to the executable file in your computer if you open the module (cytoscape or mev) after the gaggle boss has already started.Alternatively, "Enter the url of the executable in your computer" e.g for cytoscape: "C:\Program Files\Cytoscape_v2.8.3\Cytoscape.exe" in Windows or "/Applications/Cytoscape_v2.8.3" in Mac OSX. 6 Select any subactions for your modules from the dropdown menu. 7 If your workflow requires additional files, enter path to data files in your desktop or on the web. For example, this could be link to the expression file in your desktop or web. 8 In order to connect to components in the workflow drag the circle from the input goose to square of the next workflow component 9 Save your workflow Running the Workflow1 Create a new workflow or open a saved one 2 Click "Run" to start the workflow 3 For Firegoose, this will open a new tab and will take you to the page you specified in your workflow 4 Select the type of the data you want for the next component from the Firegoose toolbar and select "Next" 5 Your data will be broadcast to the next component in your workflow and your next application or webpage will be opened. 6 For each workflow component you need to select specific data and click "Next" Recording the Workflow1 Gaggle can follow your actions and record them into your workflow for automated tasks 2 Before recording make sure that the Gaggle bos has started 3 Click on "Record" button to start recording 4 Create workflow and follow the steps to complete your analysis 5 Go back to your workspace and "Stop" your recording Once you are done 6 Workflow components and connections will be automatically created and placed into your workspace. 7 You can "Pause" workflow anytime API documents for developing Boss and Goose that supports workflow |

Name:
Description:
Save as a new workflow
Do you want to login and save the workflow?
Do you really want to delete the workflow?
You haven't selected a data application method. Do you want to proceed?
Workflow finished. Do you want to execute the next one in the batch?
Do not ask for this batch
Configure the Path of Gaggle Geese Applications
There are two ways to configure the execution path of a goose:
If you already know the path of the goose (e.g for cytoscape: "C:\Program Files\Cytoscape_v2.8.3\Cytoscape.exe" in Windows or "/Applications/Cytoscape_v2.8.3" in Mac OSX), simply add the path to the input field.
Alternatively, Gaggle can automatically detect the path for you. Here is how it works: First, click the "Start Gaggle boss" button to start the boss. Next, start the goose application and connect to the boss. (most geese connect to boss automatically. MeV, however, needs to be connected manually) and that's it! The Gaggle boss will remember the paths for ALL the workflows.
How to Build a Workflow
Important: Go to the Java Test Page and verify that the version of your Java is at least Java SE 6 (or 1.6).
1. Install each goose by clicking the on the name of the goose in the "Modules" column. (If this is your first time). This will download the updated goose. You will need to install them for your application
2. Drag the box corresponding to the goose you want in your workflow and drop into the Workflow canvas.
3. For each goose "Enter the url of the executable in your computer" e.g for cytoscape: "C:\Program Files\Cytoscape_v2.8.3\Cytoscape.exe" in Windows or "/Applications/Cytoscape_v2.8.3/Cytoscape" in Mac OSX
4. Select any subactions or data you want to open.
5. Input the url (or path) to the data file to be opened by a the component.
6. In order to connect to components in the workflow drag the circle from the input goose to square of next workflow component.
7. Save your workflow.
Saved Workflows
You can save workflows into your personal workspace if you are logged in or you can save them into public workspace. Please remember that public workflows can be edited/deleted by others.
It is a good practise to provide a descriptive text for the workflow for future reference.
Clicking on the workflow title will bring workflow components into the canvas and will also list associated reports under the reports section.
Open in a New Goose
Select a broadcast type
NameList File
Group Name:
Description:
Save the Group
Description:
Cytoscape Network Mev Analysis File Generic
The Gaggle Workspace
Important: Go to the Java Test Page and verify that the version of your Java is at least Java SE 6 (or 1.6).
The Gaggle Workspace Page consists of the following tabs:
1. The Dataspace Tab. User can capture data using Firegoose from heterogenous webpages (tutorial video
here) or local files for
cloud-based organization and storage of raw and processed data (tutorial video here).
All the data is displayed in the Dataspace tab.
You should first select an organism from the "select organism" dropdown list. Data related to the selected organism will be displayed in two tables. First, the Network Portal Files Table. These files are automatically generated by the Network Portal. Usually they are Cytoscape network files and MeV analysis files. Second, the User Data Table. Users can upload any data related to the species and the files will be stored on the server. A video tutorial of uploading and organizing data can be found here. For each file, users can select from a list of actions from the dropdown list on each row of the tables to open, edit, and download the data file. Users can also select multiple data files and use the links on top of the table to save, delete, or group data. Tutorials can be found here.
In particular, users can group data by checking the checkboxes in the table and clicking the "Group" link on top of the tables. The newly generated group will be displayed in the "My Group" list on the right-hand side of the page. Users can select to open some or all the data in a group.
2. The Workflow Tab. The system automatically records data communication between various applications and generates workflows. Users can also manually create workflows by dragging and dropping workflow components to the canvas and connecting them to indicate directions of data communications. Users can save and rerun workflows on different data sets. A video tutorial can be viewed here.
3. The Save State Tab. It allows users to save the state of all open websites and desktop applications and reload the session later from any machine. A tutorial video can be found here.
4. The Session Reports Tab. Reports are automatically generated for workflows. A report consists of snapshots of each applications of the workflow after the workflow is finished. A video tutorial is here.
5. The History Tab. The page records the actions (e.g., open a data file, save/load states, etc.) triggered by users.
6. The Log Tab. The page contains debugging information. Users can send debugging information to us if they encounter problems.
7. An open API for community development.
How to Upload File to the Workspace
1. Select the target organism for which the files you want to upload. If you want the files to be available for all organisms, don't select any organism.
2. Click the "Browse" button and select one or more files you want to upload.
3. Type additional information in the "Description" box.
4. Select the type of files (MeV, Cytoscape, Generic) you are uploading. Later on, the files will be automatically opened by their associated applications if possible. For example, suppose you select "Mev Analysis File" as the type of a file, later on when you select the "Open" action in the User File table, MeV will be started automatically and the file will be opened.
5. You can upload application specific files as well as text(.txt) files that contain lists of genes. MeV files (.tsv) should look like the following:
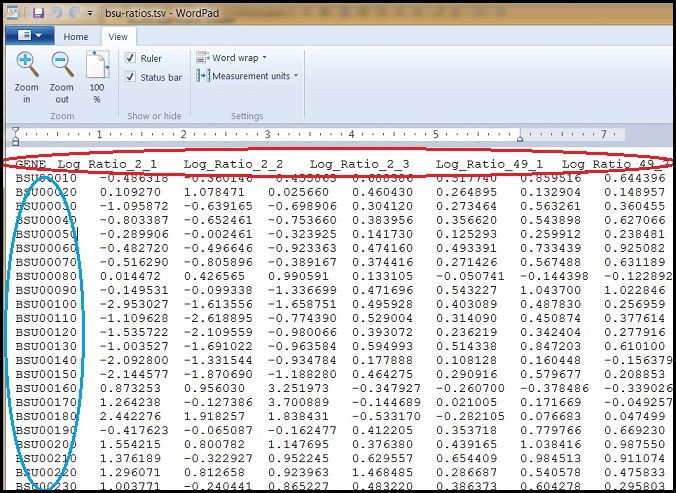
Notice that the first column contains the gene names and the first row contains the name of the log ratios.
The text file include a list of genes. It should look like this:
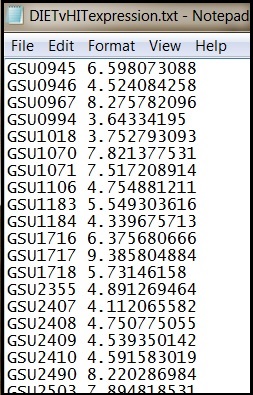
Save/Load States
Users can save and load states. After clicking the "Save State" button, the Boss contacts each geese to save their current states (e.g., all the tabs opened in Firefox, and the associated gaggle data, all the networks opened in Cytoscape, all the expression files opened in MeV etc).
It generally takes about half to one minute to save the state. Once the state is saved, a new row will appear in the saved states table.
User can edit, delete, and load the saved states. After user clicks the "load" button, all the applications corresponding to the state will be automatically started and the state data will be loaded.
A tutorial video could be viewed here.
Workflow Report
A Workflow reports consists of snapshots of each application when workflow execution has finished. A sample report looks like the following and a video tutorial can be found here.
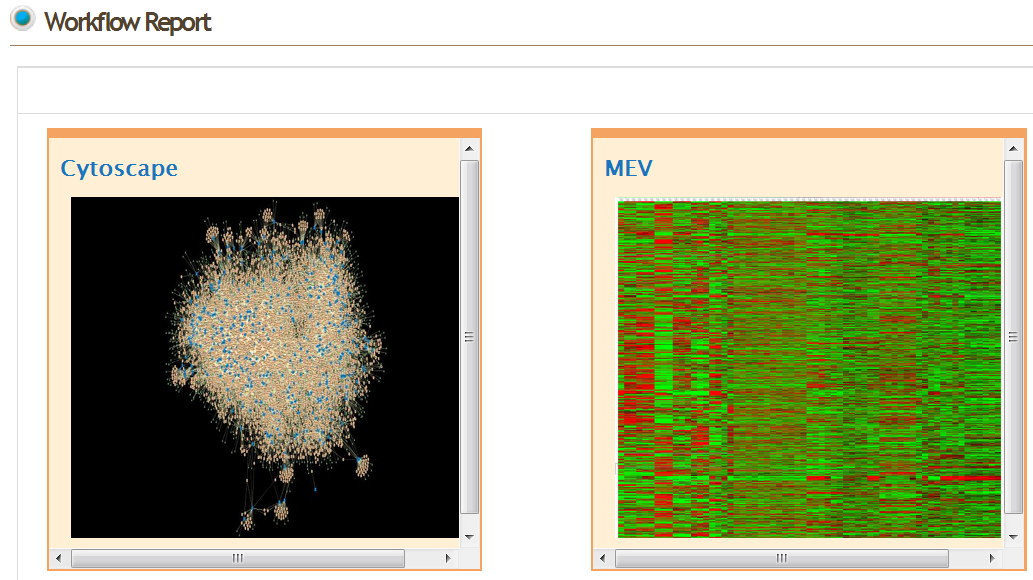
Broadcast Data Type
If you are opening a list of gene names (e.g., {DVU2025, DVU2028, DVU3038}, select "Namelist". If you are opening a file that contains a list of gene names, select "File".
Name:
Description:
Reports
| Name | Workflow | Date | Operations |
|---|